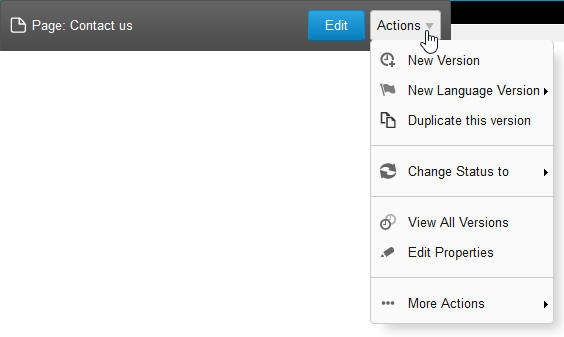
The Actions menu in the Editor contains commands that allow you to quickly perform commonly used actions on a content item. All actions you can perform on all content items are explained in this section. Some actions are not available for some content item types. Depending on the permissions assigned to your role, some of the actions described in this section many not be available to you. To access the Actions menu, hover the mouse over the title of the content item and then expand the Actions drop-down list:
In this topic, the term "content item" refers to pages, page sections, articles, images, downloads, multimedia content, and all other custom content.
All of the actions you can perform from the Actions menu are also available in the Properties Panel. See also the Site Structure Widget and the Page Sections Widget for information on other actions you can perform on pages and page sections.
In This Topic
New Version
In XperienCentral, content items can have multiple versions. While only one version can be active at a time, older versions are saved and you can quickly and easily revert from the current version to an older version, which then becomes the active version on the frontend of the website. To create a new version of a content item follow the steps below. You can also create new versions of pages using the Site Structure Widget.
- Navigate to the content item for which you want to create a new version.
- Hover the mouse over the title of the content item and click the [Actions] button.
- Select "New Version". A new version is created containing duplicate content and having properties identical to the previous version. The name of the new page is "Version of [content item name]" and its workflow status is Planned.
New Language Version
Select your version of XperienCentral below:
XperienCentral supports multiple language versions of a website. Each content item can be displayed in multiple languages. Oftentimes, a content item is created in one language and then a new language version is created and then the text is translated. To create a new language version of a content item, follow these steps:
- Navigate to the content item for which you want to create a new language version.
- Hover the mouse over the Actions menu and select "Create new language version". The "New Language Version" dialog appears:
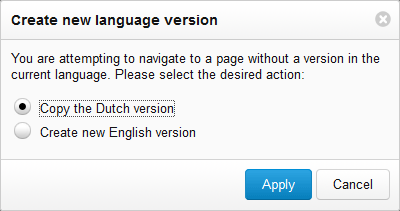
- To create an empty version of the content item, select "Create new <language> version".
- To copy the content from a version of the content item that exists in a different language, select "Copy the <language> version". You can then select the version to copy content from in the drop-down list.
- Click [Apply]. The new version of the content item is created in the language you selected. The version of the new content item becomes the active language in the Edit environment.
Once a new language version of a content item is created, the language of the content item becomes the active one in the Workspace. You can quickly switch between languages and also create new language versions of a content item using the Language drop-down in a sidebar header or using the Language Widget in XperienCentral versions R31 and lower.
See Working with Language Versions in XperienCentral for general information about maintaining multiple language versions of a channel.
Duplicate this Version
You can create duplicates of a version of a content item quickly and easily. The version of the content item will be duplicated in its entirety including all its content and properties.
The version of the content item that is duplicated is the one that you are currently viewing. To duplicate a different version of the current content item, switch to that version first and then select "Duplicate this version" from the Actions menu. In XperienCentral versions 10.26 and lower, this menu item was named "Duplicate" and always duplicated the published version of the content item regardless of which version of it was currently being viewed.
To duplicate a version of a content item, follow the steps below. You can also duplicate pages using the Context menu in the Site Structure Widget.
- Navigate to the content item that you want to duplicate.
- Hover the mouse over the title of the content item and click the [Actions] button.
- Select "Duplicate this version". The item is duplicated including all its content and properties. The name of the duplicated content item version is "Copy of <name>". For pages and page sections, the duplicate appears at the bottom of the current subtree.
Move
You can quickly move a page or page section to another part of the site structure using the "Actions" menu. To do so, follow the steps below. You can also move pages using the Site Structure Widget.
- Navigate to the page or page section that you want to move.
- Hover the mouse over the title of the page or page section and click the [Actions] button.
- Select "Move Page" or "Move Page Section".
- Select the new parent page for the page or page section. You can either enter a full or partial string in the "Search" field to locate the new parent page or click [Show All Pages] to show a list of all pages on the website.
- Select the new parent page and then click [Apply]. The page or page section is moved and is now a child page of the parent page or page section you selected.
Delete
You can quickly delete a content item from the website using the "Actions" menu. When you delete a page, all of its versions will also be deleted, so use caution when executing this command. To delete a page and all its versions, follow the steps below. You can also delete pages using the Site Structure Widget.
- Navigate to the content item that you want to delete.
- Hover the mouse over the title of the content item and click the [Actions] button.
- Select "Delete <content item>".
- Confirm the operation by clicking [OK]. All versions of the content item are deleted.
Change Status to
The workflow state of a content item can be quickly changed in the "Actions" menu. To change the workflow status of a content item, follow the steps below. You can also change the workflow status using the Properties Widget.
- Navigate to the content item for which you want to change the workflow status.
- Hover the mouse over the title and click the [Actions] button.
- Select "Change Status to". The available status(es) that you can switch to appear.
Select the new status. The status of the content item is changed.
If you change the status of the content item to an unpublished state, it will no longer be available on the website frontend.
View All Versions
Content items can have multiple versions, one of which is the active version. You can view all versions of a content item and switch between them. For information on switching between languages for pages and page sections, see Language Widget. To view all versions of a content item, follow the steps below. You can also view all versions using the Properties Widget.
- Navigate to the content item.
- Hover the mouse over the title of the content item and click the [Actions] button.
- Select "View All Versions" from the menu. All versions of the current content item are shown in a list. To switch to another version, click it in the list.
Edit Properties
This option opens the Properties panel for a content item. It does the same thing as clicking [Edit] in the Properties Widget.
More Actions
For pages, page sections, and articles, the "More Options" menu is available. The extra options are described below.
Start Watching
The XperienCentral watching functionality sends you an e-mail notification when certain events occur with regard to page, page section, or article. This allows you to know when an important change has occurred. See Status for complete information on the watching functionality. To start watching a page, page section, or article, follow the steps below. See also Notification Settings for information on receiving notifications about other changes in content items outside of the watching functionality.
- Navigate to the page, page section, or article.
- Hover the mouse over the title of the page, page section, or article and click the [Actions] button.
- Point the mouse to "More Actions". The extra actions appear.
- Select "Start Watching" from the list. You are now watching the page, page section, or article and will receive e-mail notifications when changes occur.
To stop watching a page, page section, or article, follow these steps:
- Navigate to the page, page section, or article.
- Hover the mouse over the title of the page, page section, or article and click the [Actions] button.
- Point the mouse to "More Actions". The extra actions appear.
- Select "Stop Watching" from the list. You are no longer watching the page, page section, or article.
Save Page to Content Repository
By default, web pages are not available to be linked to from Content Overview or Dynamic Content Overview content elements. In order to make a web page selectable from these content elements, a "media page" must be created. A "media page" is essentially a reference to a web page that is saved in the Content Repository and which allows a page to be treated in the same way that a media item is and also allows it to have the same metadata (tags, lead text and a lead image).
In XperienCentral versions R31 and lower, there is only one version of a media page and it links to the current version of the web page. In XperienCentral versions R32 and higher, a media page version exists for each page version and it has a one to one relation with its page version.
To save a web page in the Content Repository (create a media page), follow these steps:
- Navigate to the page.
- Hover the mouse over the title of the page and click the [Actions] button.
- Point the mouse to "More Actions". The extra actions appear.
- Select "Save in Content Repository" from the list. A media page for the web page is created in the Content Repository.
When a page is saved to the Content Repository, you can also add tags, lead text and a lead image to it. In XperienCentral versions R32 and higher, media pages inherit the lead text and lead image from the page it references.
Edit in Content Repository
When a web page has been saved in the Content Repository, this option is available for editing the properties of the media page. To edit the media page for a web page saved in the Content Repository, follow these steps:
- Navigate to the page that you want to edit in the Content Repository.
- Hover the mouse over the title of the page and click the [Actions] button.
- Point the mouse to "More Actions". The extra actions appear.
- Select "Edit in Content Repository".
- Hover the mouse over the title of the media page and click the [Actions] button.
- Select "Edit Properties". The properties for the media page appear.
- Modify the properties for the media page. Click [Save] and then [Close].
If you click the [Edit] button above the title of a web page while editing its media page properties, you will switch modes and return to editing the content of the web page.
Delete Media Page
To delete a "media page", follow these steps:
- Navigate to the page whose "media page" you want to delete.
- Hover the mouse over the title of the page and click the [Actions] button.
- Select "Delete Media Page".
- Click [OK] to confirm the action.