This topic describes how to configure caching in XperienCentral which is essential for websites that experience high traffic. It enables the website to handle the load created by many page requests by using an intelligent mechanism that returns pages without having to regenerate them completely. The XperienCentral caching module is also tailored to not interfere with visitor interaction and personalization.
In This Topic
Architecture and Overview
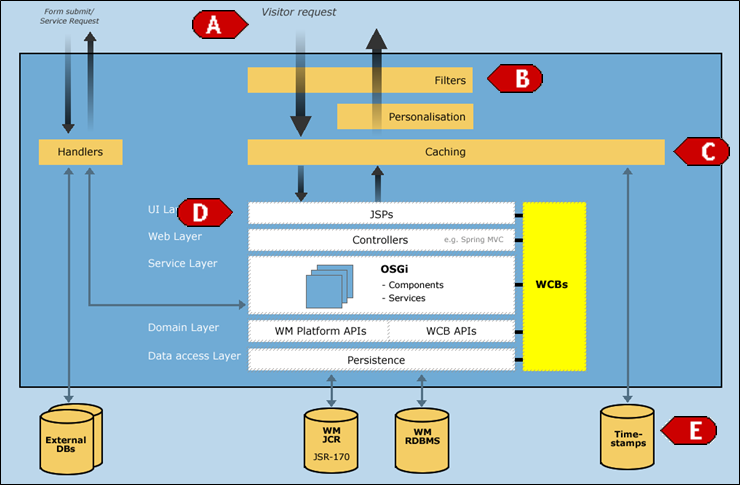
Caching occurs in the frontend server processes and has links with JSP rendering [D] and the time stamps table [E], As you can see in the image below. A page request [A] from a website visitor goes through some filters [B] and arrives at the caching module [C].
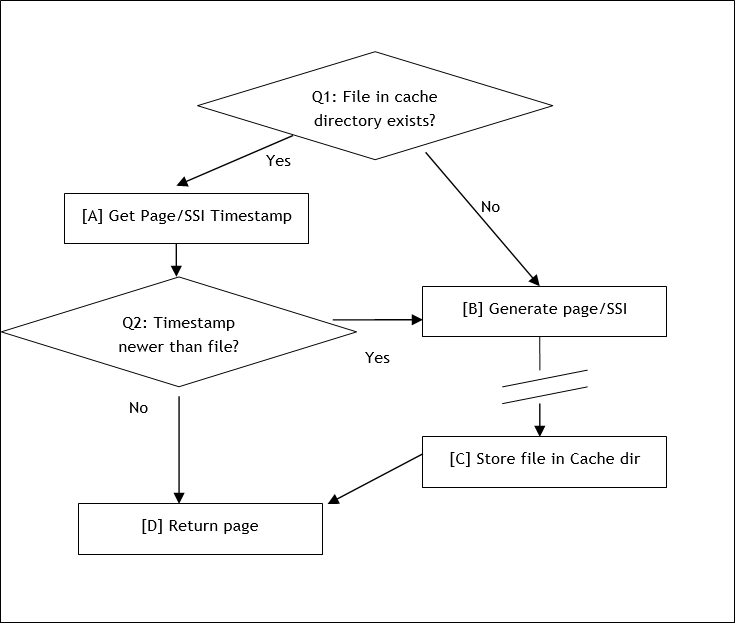
The actions inside the caching module [C] can be summarized as follows (see image below):
The caching module first determines whether a cached file exists for the page request. If the file exists, go to [A], otherwise go to [B]
- [A] Retrieve the timestamp of the page (or SSI) by performing a query on the Timestamp database. The database is not always queried but instead the timestamps are also cached in the caching module. The timestamp is compared with the date of the file in the cache. If the timestamp is newer then the file is returned [D], otherwise the page has to be rendered.
- [B] The page must be regenerated, therefore a request goes from the caching module to the backend servlet in order to render the page. This takes some time and it’s the slowest scenario. After the page has been rendered, it is stored as a file in the cache directory [C] and the page is returned.
Pages and Server Side Includes
In a very basic setting the caching module can save local cache files based on every page request for example every URL. But in several cases this may not really speed up the page rendering because parts of the page might change often. Dynamic Content Overviews are an example of page parts that can change often.
In XperienCentral, page parts can be cached. This is done using Server Side Includes (SSIs). This is a common mechanism whereby tags are placed inside the (HTML/JSP) source code. These SSI tags refer to other pieces of code and can be referenced by local file path or URL. When the application server encounters an SSI tag it will request the SSI and add the generator code to the page. The following is an example of an SSI tag:
<!--#include virtual="/web/show?id=68644&langid=43&contentid=5&elementHolder=68637&jelly=true ssiObjectClassName=nl.gx.webmanager.cms.mediarepository.MediaCollectionElement&ssiObjectId=68647&webid=26098" -->
This SSI tag will render a Content Overview element with the ID 68647. There are more parameters that describe the element’s context, for example a. Page ID, Content Item ID, channel ID, and so forth.
An SSI Example: the Poll Element
Polls are elements that can change quite often when a lot of people vote, therefore it is better to use an SSI for the Poll Element. In a basic situation where you add a poll element to a page, the page.jsp is used as a starting point. The page.jsp will require the /pagepart/content.jspf, which will call the /element/pollElement.jspf. Before we look into this .jspf let’s examine the /element/pollElement.xml file:
<presentation>
   <name>WM pollelement</name>
   <display-name>WM Poll element</display-name>
   <scope>PollElement</scope>
   <include>WM pollelement form</include>
   <include>WM pollelement result</include>
   <property>
   ...
   </property>
   <ssi>
      <presentation>pollElementSsi</presentation>
   </ssi>
</presentation>
An extra SSI node is included that points to a special SSI presentation. In this case it points to the /element/pollElementSsi.jspf file (see marked lines). Because of this SSI presentation the default pollElement.jspf is not used, but instead the /pollElementSsi.jspf is rendered.
<wm:link var="ssiLink" ssiObjectId="${pollElement.id}" ssiObjectClassName="nl.gx.webmanager.cms.element.PollElement" passOn="${passOn}" cachetimeout="120" />
${ssiLink.ssiTag}
To see the SSI in action on a page you have to perform the following steps:
First make sure you can log in to your application server as an administrator. For Tomcat this involves editing the file
/conf/tomcat-users.xmlin the Tomcat directory. Example:<?xml version='1.0' encoding='utf-8'?> <tomcat-users> <role rolename="wmadmin"/> <user username="wmadmin" password="123456" roles="wmadmin"/> </tomcat-users>
- Restart Tomcat and go to the URL
http://<hostname>:<port>/web/admin. Enter the username and password. - Create a page in XperienCentral and add a Poll element. Enter some information in the poll element and publish the page.
- Open the page on the backend hostname: open a new tab/window in your browser and go to
http://<hostname>:<port>/web/show. This will show the homepage of your website without using the cache. Navigate to the page with the poll element. Add the following string to the URL of the page:
/ssidebug=trueand refresh the page. This should show the string we have seen in the previous paragraph, something like:<!--#include virtual="/web/show?id=26111&langid=43&cachetimeout=120&elementHolder=26114&ssiObjectClassName=nl.gx.webmanager.cms.element.PollElement&ssiObjectId=72418"-->
It’s possible to paste the marked part after your backend hostname and port number and open it in a browser. You will then see the code of the poll element and nothing else. This exercise shows that individual SSIs can be rendered on their own by passing the right parameters (such as elementHolder and ssiObjectClassName to a /web/show command.
Working with the Caching Module
Enabling Caching
- To enable caching go to
frontend_system_settingssection of the General tab of Setup Tool and ensure that theallow_cachecheckbox is selected. - You can test if it works by requesting several pages on the frontend. Verify whether there are subdirectories with numbers created in the cache directory (the default is
/work/cachefor local installations and/cachefor production servers). - If you want to make sure that most pages are generated (and therefore in the cache) before a website goes live you can run the XperienCentral search engine.
Cache Configuration Settings
You can find most of the caching settings in the frontend_system_settings section of the General tab of Setup Tool. The relevant cache options are:
| Parameter | Description |
|---|---|
| Enables/disables caching in the XperienCentral frontend. |
| Specifies the URL where the configuration for external application integration is located. |
| A comma-separated list of cacheable response codes. The default is "200" (successful response from the server). Only codes that denote an immediate successful response should be entered. |
| The folder where the files containing cached content is stored. |
| The maximum depth that the folder tree used for caching can reach. The recommended value is 3. |
| The number of seconds that the frontend will serve an old version of a page from the cache while the page is being regenerated by the backend. The recommended value is 0. |
| The maximum number of subfolders that will be created for the caching directory structure. The recommended value is 30. |
| Specifies the number of seconds between queries from the frontend to ensure the validity of cached content. |
| The maximum number of seconds that a query to the Timestamp database is allowed to take. If there is no response from the database within this time period, the cached version of the page is returned. The recommended value is 2. |
Caching Optimization in the Edit Environment
Some caching optimization can also be done in the edit environment of XperienCentral. Every page section can have a caching timeout value. This will prevent the rendering of the page section more than once in the time span specified by the caching timeout. Common page sections that can benefit from a caching timeout value are page sections that contain navigation such as menus.
For example, suppose there is a page section that contains the top 10 articles of the month. This is not likely to change very fast (say every minute), so it’s reasonable to set the caching timeout for this page section to 3600, which means this page section is only generated at most once per hour.
If the caching timeout is incorrectly set it could slow down performance. Before adding a caching timeout value, consider whether the page section is very static or updated more frequently. Static page sections like logos, headers and footers don’t have to contain a caching timeout because sometimes they change only once per year, or even less often. In that case you can clear the timestamps of all the pages, which will also regenerate the page sections with the logos, headers and footers. If you set the timeout for a logo to 3600 it might be regenerated every hour, which is not necessary.
On the other hand be careful with very dynamic page sections. If you set a caching timeout for these types of page sections you might frustrate site editors because it takes too long for new content or content changes to show up.
Clearing the Cache
In a normal situation XperienCentral takes care of the required actions to clear the cache when content is changed, added or removed. When an editor adds an element to a page the timestamp for the page will be set to the current date and time. The caching mechanism will notice this when the page is requested and the page will be regenerated.
There are more complex situations where several page sections could be involved or situations where a lot of caching timeouts are set for individual parts of a page or a situation where the load on the server is very high and there’s no time to regenerate pages. For example, one page section could be included on a lot of pages and if you create a new version of that page section, all these pages have to be regenerated. This will normally happen automatically, but in some situations you don’t want this to wait until someone retrieves the page but instead you want to force all the pages to be regenerated.
XperienCentral has the option to clear the timestamps in a safe and controlled manner. There are two ways to do this: updating the timestamps and "soft timestamping". Updating the timestamps sets the timestamps of objects within a certain range (update from-update to) to the current date and time. This means that when a visitor requests one of the updated objects, the object is regenerated and then returned to the visitor.
To control the cache, navigate to Configure > Server configuration > [Caching]:
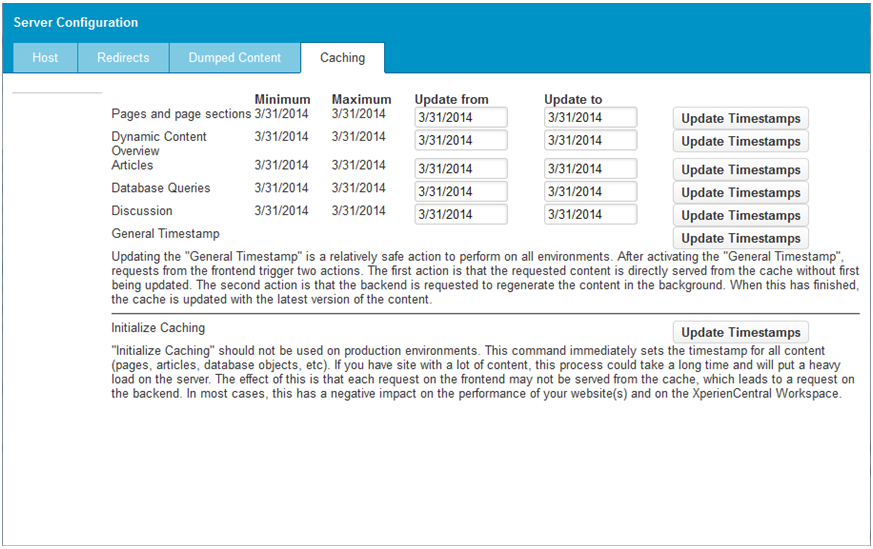
To update the timestamps, select a time range for the objects you want to update and click [Update timestamps]. This can be done for the various items, so use common sense to clear the cache only for the relevant items.
If you are dealing with a live server with a significant load you have to be a bit more careful with updating the timestamps. For this purpose "soft timestamping" is available. By setting a soft timestamp, a special entry with ID 0 is created in the "sw_object" table. When a visitor requests a page, the timestamp of this page is compared with the "0" object. If the timestamp is older, a request is sent to regenerate the page and at the same time the cached version of the page is returned to the visitor, therefore the visitor doesn’t have to wait until the page is generated but instead they will get the cached page. The next visitor will get the regenerated page. To use soft timestamping you have to click the [Update timestamps] button next to "General timestamp".
When you launch a new website, you can initialize the caching module by clicking on the [Update timestamps] button next to the "Initialize caching" label. This will create a timestamp entry for each page.
Timestamps in the Database
For debugging purposes it might be necessary to look at the timestamps more closely. Timestamps are stored in the XperienCentral external database in the following seven tables:
| Table | Description |
|---|---|
| Used for database detail pages. Timestamps are identified by the "dbid" parameter. |
| Used for all databases. Timestamps are identified by the database ID. |
| Used for discussion timestamps. Timetamps are identified by the thread ID. |
| Used for Content Repository items. Timestamps are identified by media repository content ID. |
| Used for the Content Repository items of a channel. Timestamps are identified by channel ID. |
| Used for various XperienCentral objects such as pages and page sections. Timestamps are identified by object ID. For pages this is also the ID in the URL of a page, for example |
| Used for Content Repository terms. When terms are changed they could influence content overviews so they have their own table. Timestamps are identified by term ID. |
Debugging the XperienCentral Cache
The cache debugging functionality was introduced in XperienCentral version R24.
You can visually inspect the parts of a content item that have been cached. To do so, you must be logged in to the website backend and the permission "Access debugging tools" in the Permission category "System utilities" must be enabled for your user role. To inspect/debug the cache, navigate to the content item you want to inspect on the website frontend and append the parameter ?cachedebug=true to the end of the URL For example:
https://www.gxsoftware.com/en/products.htm?cachedebug-true
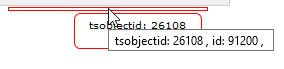
The content item will reload and you will see cached content outlined in red. If you hover the mouse over the area, the cache ID for the content will appear in a tooltip. For example:
Performance Checklist
The following checklist can be used to check the performance variables of a XperienCentral website. Performance involves more than XperienCentral and the caching module so other relevant settings are also taken into account.
Infrastructure
Application Server
- Application Server (Tomcat or other) has sufficient memory.
Recommendation: make sure the application server meets the system requirements for your version of XperienCentral and that the required amount of memory is available for the application server process. - The number of other applications (such as other application servers) is as low as possible
Recommendation: for optimal performance run only one application server per server
How to check: use a process list in UNIX/Windows and/or thenetstatcommand to scan port usage
- Check incoming requests on the application server
Recommendation: on a well-tuned website the page duration time should be well under 1 second for cached pages. The average duration for well-tuned XperienCentral websites is around 100 milliseconds.
How to check: usehttp://<hostname>/web/admin/statusto watch all incoming page requests on the application server. If the load on the server is high check for:
- Pages with a high duration. Solution: investigate the page.
- A large number of requests from one IP address. Solution: block the IP address.
- Crawlers/search engines/robots (see the user agent string). Solution: add a
robots.txtfile or block the IP address.
Database Server
- Make sure the transaction speed is fast enough
Recommendation: Websites with many database interactions can suffer severely from slow database servers and/or connections. Normal XperienCentral queries should take no longer than 1-2 seconds (maximum) with an average of tenths (1/10) of seconds. Queries to non-XperienCentral content should also be optimized.
How to check:
- Monitor the log of the application server for database/query timeouts or JDBC errors
- Use the database manager in XperienCentral to run some test queries, for example:
- Use a database analysis tool to monitor the database speed and connection. This is beyond the scope of this document.
Application
Configuration
- Make sure caching is enabled
- Make sure there are no backend server names and server aliases listed under the frontend server names and server aliases
How to check: Check the propertiesfrontend_server_aliasandfrontend_hostnamein the Setup Tool. These should not contain backend hostnames.
- Consider using dumped static pages.
Recommendation: When the normal caching mechanism fails or when one or more pages are for the larger part static you might consider dumping certain pages, such as the homepage.
How to check: This can be set up in Configuration > Server configuration > [Dumped Content].
JSPs/programming
- Make sure the URLs contain as little query string parameters as possible
Recommendation: try to avoid using query string parameters to pass parameters to other pages or page sections. This will create more unique URLs and thus more pages have to be generated and not cached. How to check: usehttp://<hostname>/web/admin/status(Administrative Pages) to watch all incoming page requests.
- Use Server Side Includes (SSIs) for media overviews and queries
Recommendation: Try to use SSIs for all Content Overview and query elements. This is also the default setting in the XperienCentral cleansite (the default set of JSPs that come with XperienCentral). How to check: usehttp://<hostname>/<page-url/ssidebug=trueto see all SSIs on a page. On pages that contain media collections you should see the SSI URLs.
- Don’t use too many Server Side Included (SSIs)
Recommendation: More than 5 SSIs will more create more overhead and add more complexity to the caching mechanism. How to check: usehttp://<hostname>/<page-url/ssidebug=trueto see all SSIs on a page.
- Avoid using hardcoded queries in JSPs
Recommendation: hardcoded queries in JSPs don’t profit from the caching/timestamp mechanism and should therefore be avoided. Instead, use the XperienCentral query element or database pages.
FAQ
Q: Where can I find the cache directory?
A: The cache directory is set in the cache_directory property in the frontend_system_settings section on the General tab of the Setup Tool.
Q: What happens if the (application) server is restarted? Will the cache be emptied?
A: No. The cached objects are stored on disk and the timestamps are stored in the database.
Q: Is it OK to remove the files from the cache directory or can the cache get corrupted?
A: No. The proxy will detect whether the file is present on disk. If not it will be regenerated and written to disk again.
Be very careful when removing all cached files on a live server because it could create a significant load to regenerate all the pages. It’s better to use the soft timestamping mechanism if you want to clear the entire cache.
Q: What happens if I clear all the timestamp tables?
A: No timestamps will be found for any object or page so the cached file will be returned automatically. This happens until a requested object is changed and saved again.