Support for the Microsoft IIS web server was removed from XperienCentral in version R31.
In This Topic
Activate IIS
XperienCentral uses Microsoft Internet Information Services (IIS) to handle all the requests to the website. After a default install of Windows 2012/2016, IIS might not be available. Follow these steps to check whether IIS has been installed — If it has not been installed, install it.
- Press the Windows key and navigate to the Control Panel > Programs > Turn Windows features on or off option.
- Navigate to the Roles and then the Web Server (IIS) option in the left tree of the window.
- On the right, details appear about the IIS installation. Scroll to the “Role Services” section and check whether the Application Development services have been installed. If not, use the “Add Role Services” option on the right to add these services to the IIS role (for XperienCentral the following services (at least) should installed: “ISAPI Extensions”, “ISAPI Filters” and “Server Side Includes”).
Allow the use of the ISAPI Filter within IIS
By default, IIS blocks the use of ISAPI filters. Follow these steps to enable the ISAPI Redirect filter:
- Open the IIS Manager. In the left pane, click on your server name. In the center of the screen a several options appear; double-click the option “ISAPI and CGI Restrictions”.
- In the right frame, choose the action [Add…] and enter the following values:
- ISAPI or CGI path =
D:\Program Files\Jakarta Isapi Redirector\bin\isapi_redirect.dll - Description =
jakarta - Select the option
Allow extension path to execute
- ISAPI or CGI path =
- Click [OK].
The ISAPI Redirect filter also needs to be added to the general configuration of IIS. Follow these steps to add the ISAPI filter to all websites:
- Click on your server name in the left pane.
- Double-click the option ‘ISAPI Filters’ and choose the action “Add…” on the right. Enter the following values:
- Filter name =
jakarta - Executable =
D:\Programs\Jakarta Isapi Redirector\bin\isapi_redirect.dll
- Filter name =
- Close the IIS Manager.
- Click [OK].
Open a command prompt and execute the command
iisreset.
Change the Default Settings for all Websites
In the properties overview of the server, three options have to be set that will apply to all other websites. The properties that have to be changed are the “Default Documents”, the “Logging” and the “MIME types”. These options are available when you click on the hostname on the left pane.
Changing the Default Documents
- Double-click the option “Default Document”.
- Move
index.htmlto the top of the list. Remove the optionsindex.htm,default.htmandiisstart.htm. - Click [OK].
Changing the Logging
- Click on the server name in the left pane and double-click the option “Logging”.
- Choose a “Monthly” logging period and change the “Log file directory” (for example to
D:\Logfiles). - Click [Apply] to save the settings.
Changing the extra MIME Types
When a browser requests an object from the website, it is important that IIS returns the proper Content-type header in the response. To make sure that IIS serves all the files with the proper Content-type header, follow these steps:
- Click on the server name in the left pane and double-click the option “MIME Types".
- Add the .rss MIME type as text/xml.
- Edit the
.htmand the.htmlMIME types (add; charset=utf-8to the MIME type).
Configuring the Maximum Request Size (IIS 7)
In IIS version 7, there is a default maximum size of 30 MB that is allowed for uploads. Any request that exceeds 30 MB will return an HTTP 404.13 error. The maximum query size is set to 2048 bytes. This value is too low for the search engine of XperienCentral to function properly. To set the maximum size of a request and query string in IIS version 7 and up, follow these steps:
- Click the server name in the left pane.
- Select “Configuration Editor”.
- Navigate to the section
system.webServer/security/requestFiltering. - Open the "requestLimits" subtree.
- For
maxAllowedContentLength, set the size to the maximum request you want to allow. The size is measured in bytes, therefore if you want the maximum request to be 100MB, you would enter “100000000”. For maxQueryString, set the size to the maximum request you want to allow. The size is measured in bytes, therefore if you want the maximum request to be 4KB, you would enter “4096”.- Save your changes.
Create the Website (frontend) in IIS
IIS receives all requests for the website. If IIS can’t handle the request, it will relay the request to Tomcat using the ISAPI filter. For each host that IIS should support, a separate website needs to be created. In this document, two new ‘Web Sites’ need to be created (www.mywebsite.com and edit.mywebsite.com). Follow these steps to create a new website in IIS:
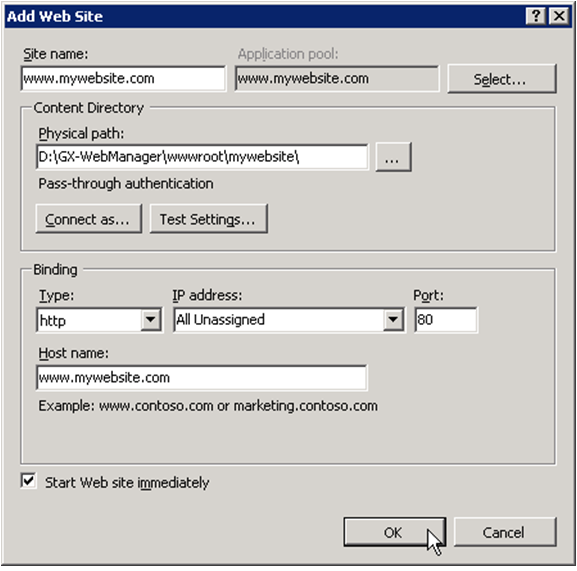
- Click the “Sites” option in the left pane and choose the “Add Web Site…” action on the right of the window.

(click image to enlarge) In the pop-up enter these values:
- Site name:
www.mywebsite.com - Physical path:
D:\XperienCentral\wwwroot\mywebsite\ - Type:
http - IP address = All Unassigned
- TCP port =
80 - Host name =
www.mywebsite.com - Check the option “Start Web site immediately
- Site name:
- Click [OK].
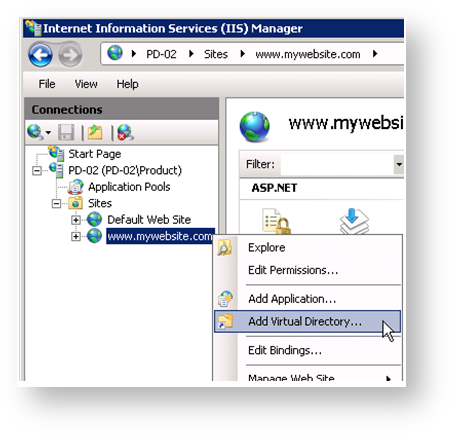
Follow these steps to add the Tomcat connector to this website:
- Right-click on “www.mywebsite.com” and choose the option “Add Virtual Directory…” in the Context menu.
Enter the following values in the dialog box:
- Alias:
jakarta - Physical path:
D:\Program Files\Jakarta Isapi Redirector\bin
- Alias:
Click [OK].
Click on the newly created virtual directory “jakarta” and double click “Handler Mappings”.
Click on “Edit Feature Permissions” and select the “Execute” permission.
Create the Edit Environment Website
Repeat the steps from above except use "edit.mywebsite.com" as hostname. After creating the two websites, IIS Manager looks like this:

(click image to enlarge)
At this point the folders “META-INF” and “WEB-INF” will not be present. After performing the steps as described in Preparing XperienCentral they will automatically be added.
HTTPS Support in IIS
Set up HTTPS support for IIS.
The instructions below are for IIS version 8. For earlier versions, some of the screenshots shown and/or steps may be slightly different. The steps you need to take to enable HTTPS are:
- Obtain an SSL certificate.
- Create an HTTPS binding on a site.
- Test the HTTPS connection.
- (Optional) Configure the SSL options.
- Define the redirects to HTTPS.
Obtain an SSL Certificate
To obtain an SSL certificate using the IIS manager, follow these steps:
- Select the server node in the treeview in the IIS Manager and double-click “Server Certificates” in the middle pane.
- Click ”Create Self-Signed Certificate” in the “Actions” pane:

- Enter a descriptive name for the new certificate.
- Select the certificate store for the certificate and then click [OK]:
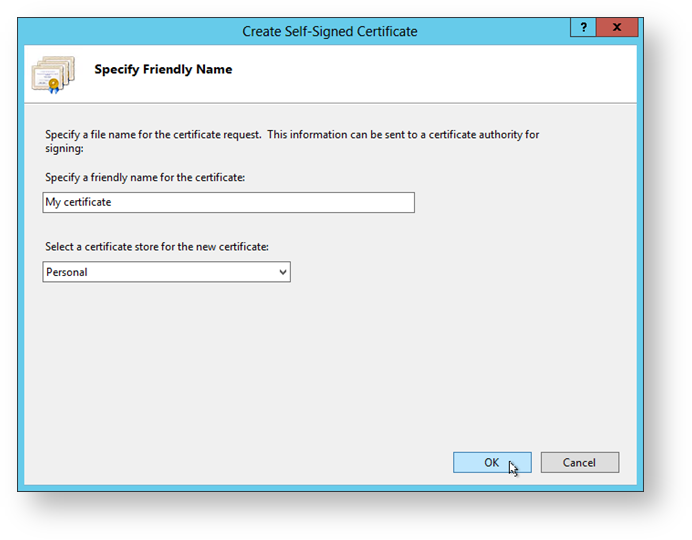
The certificate is created. The newly created certificate is self-signed and is used on the server-side to authenticate the identity of the server and for HTTP SSL encryption.
Create an HTTPS Binding on a Site
To create an HTTPS binding on a site, follow these steps:
- Select the site in the “Sites” treeview for which you want to create the HTTPS binding.
- Click “Bindings” in the “Edit Site” section of the “Actions” pane:

The Bindings Editor appears. Click [Add] to add the new SSL binding to the site. By default, the new binding is set to HTTP on port 80.
Select “HTTPS” in the “Type” drop-down list:

Select the certificate that you received from the certificate authority from the “SSL Certificate” drop-down list.
Click [OK]. The site now has an SSL binding.
Test the HTTPS Connection
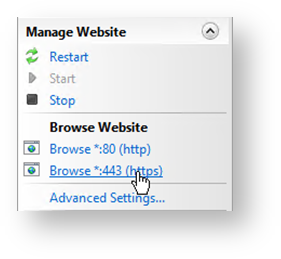
To test the HTTPs connection, follow these steps:
- Click the link for the binding you created above in the “Browse Website” section of the “Actions” menu:
Depending on the browser, you may see an error message stating that there is a problem with the certificate because it was issued by your computer, not by a trusted Certificate Authority (CA). To solve this problem, add the certificate to the list of Trusted Root Certification Authorities in the certificates store on the local computer or in Group Policy for the domain.
Configure the SSL Options
If you want to further configure the SSL settings, for example to make your site require SSL, follow these steps:
- Click your site in the “Sites” node.
- In the middle pane, double-click “SSL Settings”. The SSL Settings appear:

Modify the settings as desired.
Click [Yes] when prompted to save your changes.
Define the Redirects to HTTPS
In order for traffic to your site to be correctly routed to HTTP or HTTPS, you need to configure rules to ensure that the request for your web address goes to the protocol you intend. There are two ways to accomplish this, both of which are described below. To define redirect rules in the IIS Manager, follow these steps:
- Click your site in the treeview.
- Double-click “URL Rewrite” in the middle pane. The URL Rewrite Editor appears.
- Click [Add Rule(s)] in the “Actions” pane:

Select “Blank rule” from the “Inbound rules” section.
Give the rule a descriptive name, for example “Redirect to HTTPS”.
Define the other settings for the rule.
Click [Apply]” in the “Actions” pane.
Click the rule in the URL Rewrite” list.
Click [Add] in the Conditions section of the “Actions” menu:

- Add the following three conditions:

For the third rule, the “Pattern” is the URL of the site. In the IIS URL Rewrite editor, the inbound rule should look like this:

Add any other conditions that you need for your site.
To define redirect rules using a configuration file, follow these steps:
- Create a text file named
web.config. Add the following content:
<?xml version="1.0" encoding="UTF-8"?>
<configuration>
   <system.webServer>
      <rewrite>
         <rules>
            <rule name="Redirect to HTTPS" stopProcessing="true">
               <match url="(.*)" />
               <conditions logicalGrouping="MatchAll">
                  <add input="{HTTPS}" pattern="^OFF$" />
                  <add input="{REMOTE_ADDR}" pattern="127.0.0.1" negate="true" />
                  <add input="{HTTP_HOST}" pattern="<frontend URL" negate="true" />
               </conditions>
               <action type="Redirect" url="https://{HTTP_HOST}/{R:1}" redirectType="SeeOther" />
            </rule>
         </rules>
      </rewrite>
   </system.webServer>
</configuration>
Add any conditions that you need for your site in the <conditions> section.
- Save the file.
- Copy the file to the folder
wwwroot\<mywebsite>. IIS will detect this file and the rule/conditions will be added to your site.
X-Frame Options
The following applies to XperienCentral versions 10.16.1 and higher.
Browsers can restrict or deny the loading of a web page inside a frame, iframe or other object by reacting to the HTTP response header X-Frame-Options associated with that page. Setting this property correctly can prevent click-jacking attacks (https://en.wikipedia.org/wiki/Clickjacking).
This property has three options:
- DENY - The page may never be loaded inside another page.
- SAMEORIGIN - The page may only be loaded inside another page if it has the same origin.
- ALLOW-FROM <origin> - The page may only be loaded inside another page if is from the indicated origin (www.mywebsite.com, for example).
The option ALLOW-FROM is not recommended because it is not universally supported by all browsers.
In general you are advised to use this property with the option SAMEORIGIN in order to prevent click-jacking attacks. For the frontend environment you can also choose the DENY option, but be aware that with this option pages can no longer be embedded in frames, iframes or other objects. Configuring IIS for X-Frame-Options will be effective for both pages served by XperienCentral and external static pages.
To configure IIS to send the X-Frame-Options header, do the following:
frontend Environment
Locate your frontend environment in IIS Manager add select "HTTP Response Headers", right click "Add..." to add the property.

Backend Environment
Locate your backend (internal edit environment of XperienCentral) environment in IIS Manager add select "HTTP Response Headers", right click "Add..." to add the property. The backend environment cannot use DENY because XperienCentral itself uses frames.
X-Content-Type-Options and X-XSS-Protection
The following applies to XperienCentral versions 10.17 and higher.
GX Software strongly recommends that you consult with us before implementing the X-Content-Type-Options and/or X-XSS-Protection configuration(s) described below in order to ensure that either or both are appropriate for your XperienCentral implementation.
The X-Content-Type-Options response HTTP header is a marker used by the server to indicate that the MIME types advertised in the Content-Type headers should not be changed and be followed. The HTTP X-XSS-Protection response header is a feature of Internet Explorer, Chrome and Safari that stops pages from loading when they detect reflected cross-site scripting (XSS) attacks.
Perform the following steps for both your frontend and backend websites:
- Locate your environment in IIS Manager add select "HTTP Response Headers".
- Add the property
X-Content-Type-Optionsand set its value tonosniff. - Add the property
X-XSS-Protectionand set its value to1; mode=block. - Add the property
Strict-Transport-Securityand set its value tomax-age=63072000.
Configuring Invalid Characters in HTTP Requests
In IIS, specific characters are invalid in an HTTP request by default. The set of characters that are not allowed by IIS in an HTTP request are:
< > * % & : \ ?
The colon (:) prevents XperienCentral from working properly. To allow the use of the colon in an HTTP request, you must reconfigure the RequestPathInvalidCharacters property. Follow these steps:
- Open a command prompt.
Issue the following command:
%windir%\system32\inetsrv\appcmd.exe set config "<hostname>" -section:system.web/httpRuntime /requestPathInvalidCharacters:"<characters>"
where<hostname>is the name of the backend host and<characters>is a comma separated list of invalid characters. For example:%windir%\system32\inetsrv\appcmd.exe set config "my-host" -section:system.web/httpRuntime /requestPathInvalidCharacters:"<,>,*,%,&,\,?"
specifies that the characters< > * % & \and?are invalid in an HTTP request. In the above example, because the colon (:) is left out of the list, it may be used in HTTP requests. To allow the other characters in a request, follow the steps above and leave out the character(s) that you want to make valid.After configuring the
RequestPathInvalidCharactersproperty as shown above, you must reset IIS using theiisresetcommand in the same command prompt window.