Select your version of XperienCentral below.
The Structure widget defines the page navigation structure of your website. The arrangement of pages in the Site Structure Widget in subtrees (parent and child pages) is precisely how the pages are arranged on the website frontend. In the Site Structure you can create, duplicate, move, and delete pages and their child pages. New pages can also be created using the the Create Content drop-down in a sidebar header or using Create Content Widget in XperienCentral versions R31 and lower. Some of the actions you can perform in the Site Structure Widget are also available in the Actions menu.
The Site Structure widget does not react to the settings in the Context Widget.
In This Topic
Creating a New Page
All new pages that you create using the Site Structure Widget are child pages of the "Home" page. The "Home" page is at the highest level of the tree and is the only page at that level. To create a new page for your site, follow the steps below. New pages can also be created using the Actions menu and the Create Content drop-down in a sidebar header or using the Create Content Widget in XperienCentral versions R31 and lower.
- In the tree in the Site Structure Widget, right-click the page underneath which you want to create the new page.
- Select "New" from the Context menu:
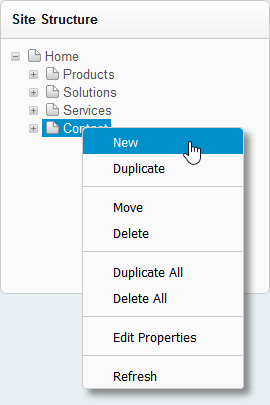
The new page will appear as a child page underneath the page that you right-clicked, By default, the name of the new page is "New Page" and its workflow state is "Planned". Select the new page in the site structure to add content to it. Use the Editor to add content to the new page. Use the Properties Widget or the Actions Menu in the Editor to modify the properties of the new page.
Duplicating a Page
In the Site Structure Widget, you can duplicate a page quickly and easily in one operation. It is also possible to duplicate a page and all its child pages. If a page has multiple versions, only the active version is duplicated. All content appearing on the page is duplicated as are all its properties. The only difference is that the duplicate page(s) are in the "Planned" state instead of "Published". If your website supports multiple languages, the duplicated page(s) will be created in all the available languages.
When you duplicate a page, the duplicate appears at the bottom of the current tree/subtree on the same level as the original page. The new page will be given the title "Copy of <name>". You can also duplicate a page using the Actions menu.
To duplicate a page, follow these steps:
- Right-click the page that you want to duplicate.
- Select "Duplicate" from the Context menu:
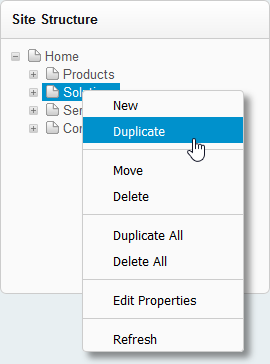
A duplicate of the page will appear at the bottom of the subtree to which the original page belongs. You can now select the duplicated page in the site structure and modify its content.
To duplicate a page and all its child pages at once, follow these steps:
- Right-click the page that you want to duplicate including all its child pages.
- Select "Duplicate All" from the Context menu. A warning message will appear indicating all the pages that you are about to duplicate. Click [Duplicate All]. The page and all its child pages are duplicated. The duplicated page appears at the bottom of the same level as the page you duplicated.
Moving a Page
In the Site Structure Widget, you can easily move a web page from one location in the tree to another using drag and drop or via the "Context" menu. If the page has child pages, they will be moved to the new location under the parent page. The page you want to move can be dragged and dropped anywhere in the tree under the "Home" page.
Moving a Page Using Drag and Drop
To move a page in the navigation tree using drag and drop, hover the mouse pointer over the page and then click the left mouse button and keep it depressed. Drag the page to the location in the tree where you want to drop it. An arrow indicator appears at the location(s) where you can drop the page. If you drag the page over a page with child pages, the subtree will open and show the child pages. When you reach the point where you want to drop the page, let go of the left mouse button. The page is moved to that location. You can also drag a page on top of another page and the moved page will become a child page of the parent. For example:

Moving a Page Using the Context Menu
To move a page using the Context menu, follow these steps:
- Hover the mouse over the page that you want to move and then click the right mouse button. The Context menu appears.
- Select "Move".
- Click [Search] to search for the page under which you want to move the page or click [Show all pages].
- Select the page from the results list and then click [Apply]. The page is moved under the selected page. If the page you move has child pages, they will be moved along with the parent page to the new location.
Deleting a Page
In the Site Structure Widget, you can delete a page and all its versions at once. This includes all language versions as well. You can also delete a page and all its child pages in one operation. When you delete a page but do not delete its child pages, the child pages appear in the Orphan Pages subtree.
To delete all versions of a page simultaneously, follow these steps:
- In the navigation tree, right-click the page that you want to delete.
- Select "Delete" from the Context menu:
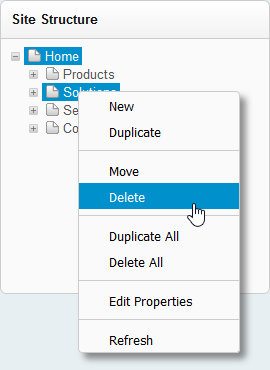
A warning message will appear asking you to confirm whether you want to delete the page including all its versions. - Click [OK]. All versions of the page in all languages are deleted.
To delete a page and all its child pages at once, follow these steps:
- In the navigation tree, right-click the page that you want to delete.
- Select "Delete All" from the Context menu. A warning message will appear indicating all the pages (and all their versions) that you are about to delete. Click [Delete All] to confirm the operation. All versions of the current page and all its child pages in all languages are deleted.
Page Status
In the Site Structure widget, you can visually see the status of pages on your website. The following table explains the icons used to indicate the state of pages in the Site Structure widget.
Icon | Description |
|---|---|
| The page is in a published state and may be edited. |
| The page is in an unpublished state and may be edited. |
| The page is locked (see Content Item Locking below). |
| You may not edit this page. |
| The page is not visible in the frontend site navigation. |
| A remark has been added to the page (see Content Item Properties - Status). |
| The page exists but there is no version for it in the current language. |


The icons shown above are the ones most often seen in XperienCentral. The rest of the icons not shown in the table above are combinations of the states described (not visible and locked, not editable and unpublished, and so forth).
Refreshing the Page Tree
When working with the page structure of your website, there are times when you need to refresh the view of the pages as they appear in the Site Structure Widget, for example if multiple editors are working simultaneously with the page structure and new pages have been created that do not appear in the current view. To do so, follow these steps:
- In the navigation tree, right-click any page.
- Select "Refresh" from the Context menu:
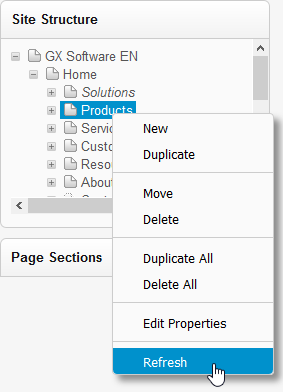
The view of the page structure is refreshed to show the current situation.
Language Versions
When more than one language version of your website exists, you can quickly and easily switch between the versions using the Language drop-down in a sidebar header or using the Language Widget in XperienCentral versions R31 and lower. When multiple language versions of pages exist parallel to each other, the page structures are identical, but the title of the pages can be different as well as the workflow status. You can also quickly create a new language version of a page using the Actions menu.
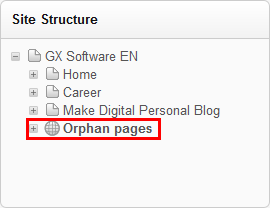
Orphan Pages
At times, a subtree named "Orphan Pages" can appear in the Site Structure Widget at the bottom of the first level below the "Home" page. This subtree contains pages whose parent was at one time deleted while the child page (the one appearing in "Orphan Pages") was not. Pages appearing in the "Orphan Pages" subtree cannot be navigated to in the frontend of the website, even if they are in the published state. As long as there are orphan pages, the "Orphan Pages" subtree exists. You can create new sub pages under the existing orphan pages and they can be duplicated, moved, and deleted. You cannot create new pages at the top level of the "Orphan Pages" subtree.
Content Item Locking
While you are editing a content item in XperienCentral, it is locked, which prevents another user from being able to edit it at the same time. This prevents conflicts between multiple users who try to modify the same content item at the same time.
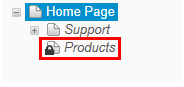
When a content item is locked, a "locked" icon appears next to the content item name for all users except the one who has control. The following example shows a locked page in the Site Structure widget:
When a user clicks on a content item that is locked, the following message appears: 
When a content item is locked, other users can still perform the following actions on it:
- View the content item.
- Create a new version of the content item (in the same or a different language).
- Duplicate the content item. The duplicate of the content item will contain all the content/modifications that the content item had from the moment it was last saved.
Content Item Lock Override
XperienCentral users assigned the role Application Manager and Main Editor are allowed to take over the lock on a content item. When the lock for a content item is taken over, the user who had the lock is still able to modify the content item but he or she cannot save their changes. See Lock Override Scenarios for complete information over what happens to the content in a content item when a lock is overridden. The right to take over the lock on a content item is not hierarchical, which means that users with the role Application Manager and Main Editor can take over the lock of a content item from any XperienCentral user.
When a user with the role Application Manager or Main Editor views a content item that is locked, the following message appears:

When the "unlock" link is clicked, the user will be asked whether they want to take over the lock. Clicking [OK] transfers the lock on the content item to that user.
Overriding the lock for a content item should be exercised with caution because it can cause the user from whom the lock was taken to lose their changes.
Lock Override Scenarios
When the lock on a content item is overridden, the possible outcomes for the content item are described below. In the theoretical cases, User A overrides the lock from User B.
- User B has modified the content item at the time the lock is overridden. User A subsequently modifies the content item and saves and closes it. When User B clicks [Save], they have the choice of overwriting the changes made by User A or accepting the changes made by User A and losing their own changes.
- User B has modified the content item at the time the lock is overridden. User A is currently modifying the content item. User B tries to save the content item and sees a message informing him or her that the content item is currently being edited by another user and therefore the content item cannot be saved. If User B then closes the content item, they no longer have the option of overwriting the changes made by User A and the modifications made by User B before the lock was overridden are lost.
The Structure widget helps you organize the pages for your website. Although the name suggests that the Site Structure widget defines the page navigation structure of your website, in XperienCentral Headless it simply makes it possible to arrange your pages in the Workspace in a coherent manner just like the Page Section Widget. New pages can also be created using the Create Content drop-down in a sidebar header or using Create Content Widget in XperienCentral versions R31 and lower. Some of the actions you can perform in the Site Structure Widget are also available in the Actions menu.
In This Topic
Creating a New Page
All new pages that you create using the Site Structure Widget are child pages of the "Home" page. The "Home" page is at the highest level of the tree and is the only page at that level. To create a new page for your site, follow the steps below. New pages can also be created using the Actions menu and the Create Content drop-down in a sidebar header or using the Create Content Widget in XperienCentral versions R31 and lower.
- In the page tree in the Site Structure Widget, right-click the page underneath which you want to create the new page.
- Select "New" from the Context menu:
The new page will appear as a child page underneath the page that you right-clicked, By default, the name of the new page is "New Page" and its workflow state is "Planned". Select the new page in the site structure to add content to it. Use the Editor to add content to the new page. Use the Properties Widget or the Actions Menu in the Editor to modify the properties of the new page.
Duplicating a Page
In the Site Structure Widget, you can duplicate a page quickly and easily in one operation. It is also possible to duplicate a page and all its child pages. If a page has multiple versions, only the active version is duplicated. All content appearing on the page is duplicated as are all its properties. The only difference is that the duplicate page(s) are in the "Planned" state instead of "Published". If your website supports multiple languages, the duplicated page(s) will be created in all the available languages.
When you duplicate a page, the duplicate appears at the bottom of the current tree/subtree on the same level as the original page. The new page will be given the title "Copy of <name>". You can also duplicate a page using the Actions menu.
To duplicate a page, follow these steps:
- Right-click the page that you want to duplicate.
- Select "Duplicate" from the Context menu:
A duplicate of the page will appear at the bottom of the subtree to which the original page belongs. You can now select the duplicated page in the site structure and modify its content.
To duplicate a page and all its child pages at once, follow these steps:
- Right-click the page that you want to duplicate including all its child pages.
- Select "Duplicate All" from the Context menu. A warning message will appear indicating all the pages that you are about to duplicate. Click [Duplicate All]. The page and all its child pages are duplicated. The duplicated page appears at the bottom of the same level as the page you duplicated.
Moving a Page
In the Site Structure Widget, you can easily move a web page from one location in the page tree to another using drag and drop or via the "Context" menu. If the page has child pages, they will be moved to the new location under the parent page. The page you want to move can be dragged and dropped anywhere in the page tree under the "Home" page.
Moving a Page Using Drag and Drop
To move a page in the page tree using drag and drop, hover the mouse pointer over the page and then click the left mouse button and keep it depressed. Drag the page to the location in the tree where you want to drop it. An arrow indicator appears at the location(s) where you can drop the page. If you drag the page over a page with child pages, the subtree will open and show the child pages. When you reach the point where you want to drop the page, let go of the left mouse button. The page is moved to that location. You can also drag a page on top of another page and the moved page will become a child page of the parent. For example:
Moving a Page Using the Context Menu
To move a page using the Context menu, follow these steps:
- Hover the mouse over the page that you want to move and then click the right mouse button. The Context menu appears.
- Select "Move".
- Click [Search] to search for the page under which you want to move the page or click [Show all pages].
- Select the page from the results list and then click [Apply]. The page is moved under the selected page. If the page you move has child pages, they will be moved along with the parent page to the new location.
Deleting a Page
In the Site Structure Widget, you can delete a page and all its versions at once. This includes all language versions as well. You can also delete a page and all its child pages in one operation. When you delete a page but do not delete its child pages, the child pages appear in the Orphan Pages subtree.
To delete all versions of a page simultaneously, follow these steps:
- In the page tree, right-click the page that you want to delete.
- Select "Delete" from the Context menu:
A warning message will appear asking you to confirm whether you want to delete the page including all its versions. - Click [OK]. All versions of the page in all languages are deleted.
To delete a page and all its child pages at once, follow these steps:
- In the page tree, right-click the page that you want to delete.
- Select "Delete All" from the Context menu. A warning message will appear indicating all the pages (and all their versions) that you are about to delete. Click [Delete All] to confirm the operation. All versions of the current page and all its child pages in all languages are deleted.
Page Status
In the Site Structure widget, you can visually see the status of pages on your website. The following table explains the icons used to indicate the state of pages in the Site Structure widget.
Icon | Description |
|---|---|
| The page is in a published state and may be edited. |
| The page is in an unpublished state and may be edited. |
| The page is locked (see Content Item Locking below). |
| You may not edit this page. |
| Not relevant in XperienCentral Headless. |
| A remark has been added to the page (see Content Item Properties - Status). |
| The page exists but there is no version for it in the current language. |
The icons shown above are the ones most often seen in XperienCentral. The rest of the icons not shown in the table above are combinations of the states described (not visible and locked, not editable and unpublished, and so forth).
Refreshing the Page Tree
When working with the page structure of your website, there are times when you need to refresh the view of the pages as they appear in the Site Structure Widget, for example if multiple editors are working simultaneously with the page structure and new pages have been created that do not appear in the current view. To do so, follow these steps:
- In the page tree, right-click any page.
- Select "Refresh" from the Context menu:
The view of the page structure is refreshed to show the current situation.
Language Versions
When more than one language version of your website exists, you can quickly and easily switch between the versions using the Language Widget. When multiple language versions of pages exist parallel to each other, the page structures are identical, but the title of the pages can be different as well as the workflow status. You can also quickly create a new language version of a page using the Actions menu.
Orphan Pages
At times, a subtree named "Orphan Pages" can appear in the Site Structure Widget at the bottom of the first level below the "Home" page. This subtree contains pages whose parent was at one time deleted while the child page (the one appearing in "Orphan Pages") was not. As long as there are orphan pages, the "Orphan Pages" subtree exists. You can create new sub pages under the existing orphan pages and they can be duplicated, moved, and deleted. You cannot create new pages at the top level of the "Orphan Pages" subtree.
Content Item Locking
While you are editing a content item in XperienCentral, it is locked, which prevents another user from being able to edit it at the same time. This prevents conflicts between multiple users who try to modify the same content item at the same time.
When a content item is locked, a "locked" icon appears next to the content item name for all users except the one who has control. The following example shows a locked page in the Site Structure widget:
When a user clicks on a content item that is locked, the following message appears:
When a content item is locked, other users can still perform the following actions on it:
- View the content item.
- Create a new version of the content item.
- Create a new language version of the content item.
- Duplicate the content item. The duplicate of the content item will contain all the content/modifications that the content item had from the moment it was last saved.
Content Item Lock Override
XperienCentral users assigned the role Application Manager and Main Editor are allowed to take over the lock on a content item. When the lock for a content item is taken over, the user who had the lock is still able to modify the content item but he or she cannot save their changes. See Lock Override Scenarios (below) for complete information over what happens to the content in a content item when a lock is overridden. The right to take over the lock on a content item is not hierarchical, which means that users with the roles Application Manager and Main Editor can take over the lock of a content item from any other XperienCentral user.
When a user with the role Application Manager or Main Editor views a content item that is locked, the following message appears:
When the "unlock" link is clicked, the user will be asked whether they want to take over the lock. Clicking [OK] transfers the lock on the content item to that user.
Overriding the lock for a content item should be exercised with caution because it can cause the user from whom the lock was taken to lose their changes.
Lock Override Scenarios
When the lock on a content item is overridden, the possible outcomes for the content item are described below. In the theoretical cases, User A overrides the lock from User B.
- User B has modified the content item at the time the lock is overridden. User A subsequently modifies the content item and saves and closes it. When User B clicks [Save], they have the choice of overwriting the changes made by User A or accepting the changes made by User A and losing their own changes.
- User B has modified the content item at the time the lock is overridden. User A is currently modifying the content item. User B tries to save the content item and sees a message informing him or her that the content item is currently being edited by another user and therefore the content item cannot be saved. If User B then closes the content item, they no longer have the option of overwriting the changes made by User A and the modifications made by User B before the lock was overridden are lost.