In This Topic
Starting the Search Service
Adding basic search functionality to a website is straightforward. The following are the prerequisites:
- a search service that indexes the website
- a form for entering search queries
- a page on which to display the search results
If your installation already contains a working search service you can skip this section.
The search engine is not a default part of the XperienCentral application — it runs in a separate (Java) process, therefore it has to be started by running either a batch file (Windows) or a shell script (Unix). Because the search engine process is executed in a separate process, it needs to have a basic form of authentication. This is configured in the credentials.xml file. Open credentials.xml in a text editor. It is stored in the search engine conf directory:
- For normal XperienCentral installations on Windows computers this is
<xperiencentral-root>/webmanager-searchengine/target/classes/conf. - For UNIX servers this is normally something similar to
/vol/www/search/indexer-mywebsite/conf.
Add a valid username and password in the second line of the file:
<credentials>
   <credential pattern=".*localhost.*" type="postform" username="gxsearch" password="Search987">
</credentials>
The First Site Index
There are two ways to index the website: manually and automatically. The second is configured by running the search engine at a scheduled time from a Cron job or scheduled service.
- To manually index your website, navigate to the Setup Tool. Login in as Administrator and then click the Search Tools tab.

If the search engine is running correctly, the number of indexed pages plus some other information appears in the lower part of the page under "Server Status" . Normally when the search engine has been started for the first time the number of pages will be 0:
Right above the "Search status" information is the "Index URL" pane. This pane contains three fields that tell the search engine
- where to start crawling the website (the
URLfield). - which domains are allowed (the
hostfield). This should contain at least the frontend hostname and the backend hostname. Optionally this can contain frontend and backend alias hostnames. Multiple hostnames must be separated by a comma. - how deep the crawler goes. Normally this is set to 1, which means the crawler will index the page in the
URLfield plus all the pages that are linked from theURLpage.
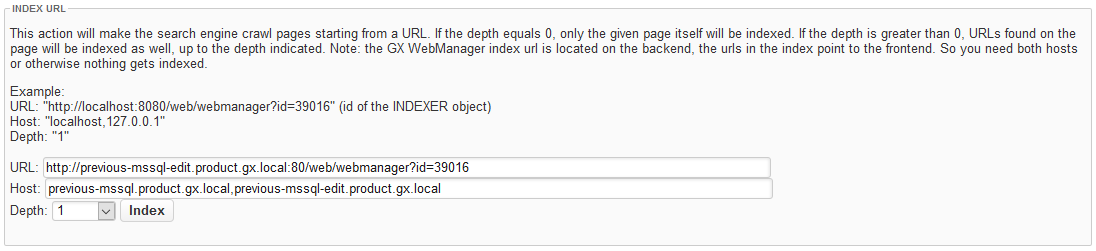
By default the
URLfield contains the URL of the so-called indexer page. This indexer page contains links to all accessible XperienCentral pages, documents and articles. The URL is normally something likehttp://<domain>:<port>/web/webmanager?id=39016. To see all the URLs that will be indexed, open this URL in a separate window. - where to start crawling the website (the
Click on the [Index] button to start the indexing process. The search engine crawler will open the indexer page and start indexing all the pages and documents. This process will take anywhere from several seconds for a small website to several hours for a large website. For a detailed description of the indexing process see Crawling.

In the upper part of the ‘"Search Tools" tab the search engine can be tested by entering one or more search terms and hitting <Enter> or by clicking on the [Relevance] or [Date] buttons:

In a normal situation this should return results. If there are zero documents in the index, or if there are documents in the index that are not returned in the search field, or there is a certain document that’s missing, see Search Engine Troubleshooting.
Search Element and Search Results
The Search Element
Add the Search element to a page from the Insert menu:

- Select the size of the "Search" box in pixels.
- Select whether to restrict the search to pages that are on the same level as the page on which the Search element has been added.
- Select whether to restrict the search to only the subpages of the page on which the Search element has been added.
Select where to display the search results. If you select "Yes", the results will be shown on the page containing the Search element. If you select "No" and then click [Apply], you can then select the page on which to display the results.
On most websites the Search element is not placed on one or more pages but rather on a central page section. This is a better solution because you only have to do it once and can centrally manage the Search element.
Search Results Page
The default search results are displayed with the following basic set of information:
- A number and the title of the page or article
- The bread crumb path or navigation path (for pages only)
- A summary of the contents
Some presentation properties can be changed by creating a design template variant of the "WM Advanced search element".
- Navigate to Configuration > Design Templates.
- Set the scope to "SearchElement" and choose "WM Advanced search element".
- Click on the button [New presentation variant]:
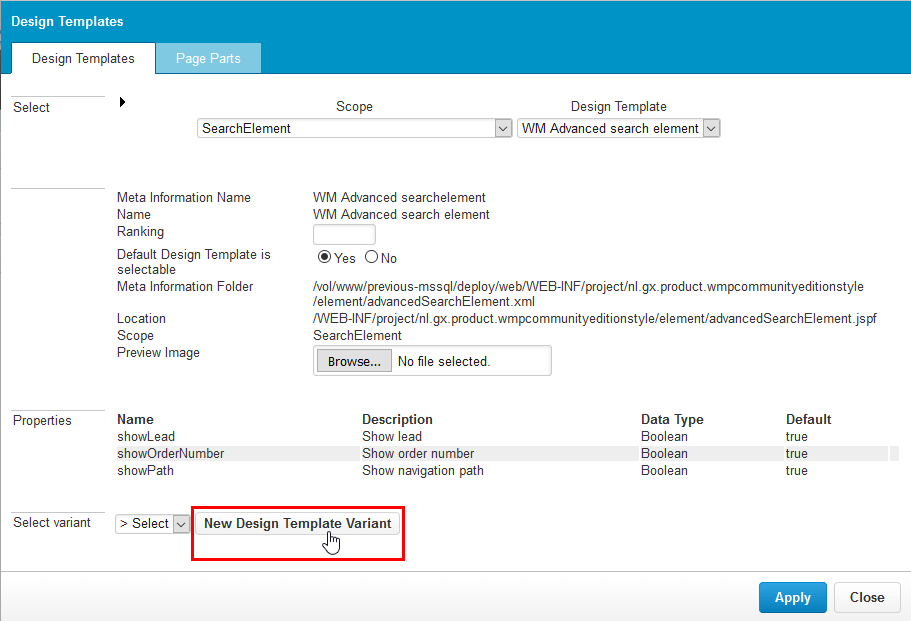
- Modify the new design template as desired.
- Navigate to the page containing the Search element and select the new design template variant for the Search element in order to preview the look and feel of the Search element.
Central Search Results Page
You can show search results on a special page. This is convenient because you can use a special presentation or add special content to accompany the results. To assign a special search results page, follow these steps:
- Navigate to Configuration > Channel Configuration.
- Click [Special Pages].
- Click [Search] next to "Search-result page" and select the search results page from Advanced Search.
Click [Select] and then [Apply]. The search results page is assigned. For example:

Be sure that the search results page that you select is not visible in the website navigation.
Additional Indexing Options
Include/Exclude Pages
By default the search engine will index all pages and Content Repository items. It is possible, however, to exclude certain pages from the index. Follow these steps:
- Clear the search index in the Search Tools tab of the Setup Tool. Check the status: there should be 0 pages in the index.
- Create some pages and content on the website to test the indexing.
- To exclude a page from the indexing, click [Edit] in the Properties widget and navigate to the "Basic" tab.
- Clear the "Include in Search Engine" checkbox:
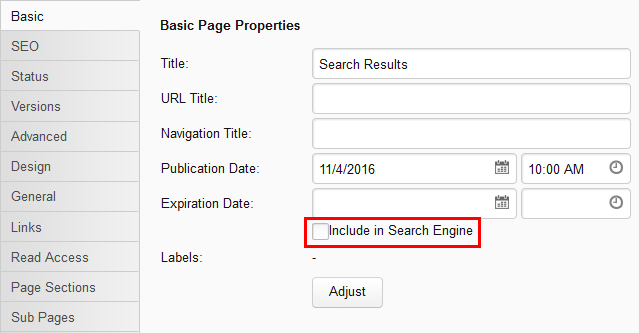
- Reindex the website from the Setup Tool.
By clearing the "Include in Search Engine" option, the page HTML will contain a special META tag that prevents search engines from indexing the website. The code of the tag is<meta name="robots" content="noindex" />. This will not only prevent the XperienCentral search engine from indexing that page but all other internet search engines such as Google as well.
Include/Exclude Page Parts
Page parts can be included or excluded in the search index. To specify whether a page part is included or excluded from the search index, follow these steps:
- Navigate to Configuration > Design Templates.
- Click [Page Parts].
- Select a page part from the drop-down list.
- Next to "Index", select either "Yes" or "No" to include its content in the search index. For example:

The result of this configuration depends on the design template of the website. In normal situations, indexing is enabled for the main content page parts, therefore setting the indexing to "No" doesn’t prevent the page part from being indexed. Technically, the "No" setting does nothing and by setting the index to "Yes" the page part is wrapped with
<!-- indexer: on --/>and<!-- indexer: off --/>tags. As a result, the indexing configuration in page parts will only be effective for websites where all content is wrapped inindexer: offtags and where individual page parts can be enabled for indexing.
Meta Keywords
On most public websites it is considered bad practice to have identical keywords for a lot of pages. This can result in a lower ranking in internet search engines. Google expects content and meta information to be relevant, and by assigning a static keyword to all pages this can be considered to be less relevant. Therefore the general advice would be to not use the general keywords for an entire website or in page templates unless there is a special purpose.
Meta Keywords for the Entire Website
To enter keywords that will be added to every page and article, navigate to Configuration > Channel configuration [General] tab. In the field "Default meta keywords" one or more keywords can be added. Multiple keywords must be separated by commas.
Meta Keywords for Pages
Meta keywords can be assigned to individual pages. When you assign one or more meta keywords to a page, they override the website-wide meta keyword(s). To assign a meta keyword to a page, follow these steps:
- Navigate to the page.
- Click [Edit] in the Properties widget.
- Click [SEO].
- Enter the keyword in the "Meta Keywords" field. If you enter multiple keywords, separate them with a comma (no space).
- Click [Save].
Search Tips
Website visitors can sometimes have difficulty searching for information using a search engine. Even when the website is indexed correctly and everything is working, visitors sometimes have problems finding relevant information. It can help to display a set of search tips on the page that contains the search element. Some search tips that help narrow down the search results are:
- A search query that contains several search terms to search for in combination can be included in double quotes (“”). This will return results that contain the exact string. For example “Technical University Eindhoven” will only return results that contain this string and not just pages about "Technical", "University" or "Eindhoven".
- Put "+" (without quotes) in front of search terms that must be included. In queries that contain multiple search terms, it can sometimes occur that search results are returned that contain one of the search terms but not all. Using "+" ensures that at least that search term is included.
- Put "—" (without quotes) in front of search terms that will be excluded.
- Add the wildcard symbol "*" (without quotes) to return search results for that search term plus all variations that start with the search term. For example when searching for "shop*", the returned results could contain "shop", "shopping", "shops", "shop-a-holic", but not "bishop" or "pawnshop". The wildcard symbol can only be used after the search string, for example "shop*" is allowed but "*shop" is not.