This topic explains other topics that are useful for developers working with XperienCentral.
In This Topic
| Anchor |
|---|
| developing_dashboard_plugins_for_the_monitoring_framework |
|---|
| developing_dashboard_plugins_for_the_monitoring_framework |
|---|
|
Developing Dashboard Plugins for the Monitoring Framework
| Panel |
|---|
| borderColor | #0081C0 |
|---|
| titleColor | #0081C0 |
|---|
|
The following applies to XperienCentral versions R24.1 and higher. |
In the wm-addon-monitoring Git repository there is sample code that shows how to develop your own dashboard plugin. This demo code is located in the wmaxmfdashboardplugindemo folder. This code (mainly written in Angular Typescript) will, when deployed,show up as a separate tab in the Monitoring Dashboard. You can use this project to get started creating your own plugin(s).
- The main
pom.xml of the bunde contains all the logic needed to build the Angular code for your plugin. It is a variant on the code that can be found in other bundles that use Angular-based code.
The code in the bundle is split into separate Java and Angular parts:
- The Java part that implements the
XMFDashboardPluginsProvider interface via the OSGI Activator. - The Angular part that implements an Angular library that can be loaded at runtime.
Java XMFDashboardPluginsProvider
This class implements the getDashboardPlugins() method that is called to by the monitoring framework on bundle load to determine which dashboard plugin(s) are contained within the bundle and how to load them correctly. The following information about the dashboard plugin has to be supplied here:
jsresource — The full filename (including path) of the Angular library Javascript resource that is built.exportedModule — The module name that this library exports as a bootstrap (case-sensitive).routedpath — The path under which the the Angular router should add the dashboard plugin in the main menu of the Monitoring Dashboard. Note that no conflicting paths are allowed so be sure to use an exclusive name for your plugin.translationPath — The path where i18n JSON files for the ngx-translate mechanism are located. These translation files can be used for static translations in the tab you add.menuNames — A set of names for your dashboard plugins, one for each locale you support (typically en_US, and nl_NL).menuIcon — The icon to display in the main menu of the Monitoring Dashboard. It is the technical name of the Google material icon to use.
Angular Library
The project for the Angular library that makes up the visual part of the plugin is a standard Angular library that can be created via the Angular CLI (see https://angular.io/guide/creating-libraries).
It consists of
- One module that ensures static translations via ngx-translate can be accessed (in the demo:
demoplugin.module.ts). - One main component that is rendered by Angular as the content of your added tab in the dashboard (the demoplugin.component in the example).
In the main component you can add new custom indicators.
Generic code for the Monitoring Dashboard is located in the xmfdashboardframework package (version 1.0.1) which is installed via npm (the package is published on our local Nexus server). When changes in the generic code are required, this should be done in the xmfdashboardframework package and the build result should be published to NPM with a new version number. Normally this should not be required in order to create a plugin for the Monitoring Dashboard.
Two indicators are added by the example (http-backend-request-multinode-card and clusterinfo-card) which shows you how you could create indicator cards.
All the indicator cards are developed in the Angular Material style for the cards themselves, Angular Flex layout is used to place them on the canvas (see https://material.angular.io/ and https://github.com/angular/flex-layout). Please note since you are developing in an Angular library that is loaded at run-time by the main Monitoring Dashboard panel, you do not have the freedom to import anything from the npm. The main dashboard must be able to resolve the imports required. The following are supported:
'@angular/core'
'@angular/common'
'@angular/router'
'@angular/flex-layout'
'@angular/material'
'@ngx-translate/core'
'@angular/cdk/overlay'
'@angular/common/http'
'ngx-cookie-service'
'rxjs'
'rxjs/operators'
'chart.js'
'ng2-charts'
'@ngx-translate/http-loader'
'xmfdashboardframework'
Translation files for ngx-translate should be added under the assets folder (in the demo found under project/demoplugin/assets).
REST Services
The following REST services are offered by the xmfdashboardframework:
Components
The following Angular/web-components are offered by the xmfdashboardframework:
AbstractMultiValueCard — The base-class that implements a basic pattern for handling indicator dataDoughnutGraphComponent (xmf-doughnut-graph) — Used to draw a doughnut graphPieGraphComponent (xmf-pie-graph) — Used to draw a pie graphIndicatorCardContentComponent (xmf-indicatorcard-content) —Used as a wrapper for the actual card content with a conforming height and look-and-feelIndicatorCardHeaderComponent (xmf-indicatorcard-header) —Used as the default header for a card showing settings and refresh iconsMultiValueCardComponent (xmf-multivalue-card) — Used to display a default styled card with a row or column of indicatorsMultiValueContentComponent (xmf-multivalue-content) —Used to display a row or column of indicatorsSingleValueContentComponent (xmf-singlevalue-content) —Used to display a single indicators
When developing a new card the following pattern can be followed. This is a class that implements the data layer of the indicator set to be visualized and it extends AbstractMultiValueCard:
<mat-card>
<xmf-indicatorcard-header></xmf-indicatorcard-header>
<xmf-indicatorcard-content>
<Specific content of the card>
</xmf-indicatorcard-content>
</mat-card>
In the wmaxmfdashboard main dashboard, several examples can be found on how to use the xmfdashboardframework.
Developing Your Own Indicators
The explanation above only describes how to create a Monitoring Dashboard plugin but does not cover how to develop your own indicator set(s). That is done entirely in Java. See the wmaxmfindicators bundle for an example of how to create your own custom indicators. As a starting point you should implement an XMFIndicatorProvider that enables the registration of your custom indicators. See the file DefaultIndicatorsServiceImpl.java in wmaxmfindicators. Refer to the Javadoc for wmaxmfapi in the wm-addon-monitoring package for the interfaces offered by the framework.
| Anchor |
|---|
| custom_media_items_and_the_is_used_in_widget |
|---|
| custom_media_items_and_the_is_used_in_widget |
|---|
|
| Panel |
|---|
| borderColor | #0081C0 |
|---|
| titleColor | #0081C0 |
|---|
|
The following applies to XperienCentral versions 10.22.0 and higher. |
The Is Used In widget shows an overview of content items that are using the currently selected content item. Before XperienCentral 10.22.0, the usage of content items referring to a custom content type was not detected for content items from a custom content type, The widget would only show a count of 0 used content items. The API of several content items in XperienCentral has been extended with a method for implementing this used-in relationship for custom content types. This functionality is available via the new abstract method:
| Code Block |
|---|
|
ContentItem<?>[] getReferencedContentItems(); |
For all custom content items that implement or extend one of the following interfaces and classes:
ElementElementImplMediaItemVersionMediaItemVersionImplTemporaryRichTextInlineElement
The result of this method is the list of used content items (as defined by the projects requirements). The following is a code snippet from a custom content type (extending MediaItemVersion) which implements the method getReferencedContentItems().
| Code Block |
|---|
|
@Override
   @Property
   public String getReferencedContentIds() {
   return JcrUtil.getString(getPrivateNode(), WCBConstants.NAMESPACE_PREFIX + ":referencedcontentids");
   }
@Override
   public void setReferencedContentIds(String contentids) {
   JcrUtil.setString(getPrivateNode(), WCBConstants.NAMESPACE_PREFIX + ":referencedcontentids", contentids);
   }
public ContentItem<?>[] getReferencedContentItems() { List<ContentItem<?>> result = new ArrayList<ContentItem<?>>();
   if (getReferencedContentIds() != null && !"".equals(getReferencedContentIds())) {
   Session session = getSessionManager().getActiveSession();
   if (session != null) {
   for (String contentid : getReferencedContentIds().split(",")) {
   try {
   result.add((MediaItem) session.getWrapper(new Integer(contentid).intValue(), MediaItem.class));
   } catch (NumberFormatException e) {}
   }
   }
   }
   return result.toArray(new ContentItem[result.size()]);
} |
Use in Page Metadata
It is also possible to define this method for custom page metadata. The method must be added to the page metadata class. Additionally, an adapter must be implemented that supplies the result of the method to the indexer service. The following are examples of implementations of both the method definition and the adapter:
Method Implementation
| Code Block |
|---|
|
/**
   * Returns the content items that this element refers to.
   *
   * @return List of referred content items, or <code>null</code> if no content item is referenced.
   */
@ReferField(stored = false, indexed = true, adapter = ContentReferenceFieldAdapter.class) ContentItem<?>[] getReferencedContentItems(); |
Adapter Implementation
| Code Block |
|---|
|
package com.gxwebmanager.helloworld.helloworldpagemetadata.pagemetadata;
import java.util.Collections;
import java.util.Locale;
import java.util.logging.Level;
import java.util.logging.Logger;
import nl.gx.webmanager.cms.core.RelatedDownloadLink;
import nl.gx.webmanager.cms.core.RelatedInternalLink;
import nl.gx.webmanager.cms.core.RelatedLink;
import nl.gx.webmanager.cms.core.RelatedMediaItemLink;
import nl.gx.webmanager.cms.core.RelatedResourceLink;
import nl.gx.webmanager.cms.mediarepository.MediaItemDownloadVersion;
import nl.gx.webmanager.services.contentdomain.api.ContentDomainException;
import nl.gx.webmanager.services.contentdomain.api.ContentDomainResolver;
import nl.gx.webmanager.services.contentindex.adapter.FieldAdapter;
import nl.gx.webmanager.services.framework.spi.FrameworkException;
import nl.gx.webmanager.services.framework.spi.FrameworkFactory;
   /**
   * Adapter that takes a content item, and returns a String-reference to it, e.g. page-32423. Logs
   * a warning and returns null if the given item could not be resolved.
   *
   * @see ContentDomainResolver
   */
public class ContentReferenceFieldAdapter implements FieldAdapter<Object> {
private static final Logger LOG = Logger.getLogger(ContentReferenceFieldAdapter.class.getName());
@Override
   public boolean isLanguageSpecific() {
   return false;
   }
@Override
   public Object adapt(Object item, Locale forLocale) {
   if (item == null) {
   return null;
   }
if (item instanceof RelatedLink) {
   return adaptLinkReference(item, forLocale);
   }
return getItemId(item);
   }
private String getItemId(Object item) {
   try {
   ContentDomainResolver resolver = (ContentDomainResolver) FrameworkFactory.getInstance().getFramework().getService(ContentDomainResolver.class.getName());
   return resolver.entityToId(item);
   } catch (FrameworkException | ContentDomainException e) {
   LOG.log(Level.WARNING, "Failed to retrieve content reference for " + item, e);
   }
   return null;
   }
private Object adaptLinkReference(Object link, Locale forLocale) {
   if (link instanceof RelatedInternalLink) {
   return adapt(((RelatedInternalLink) link).getPage(), forLocale);
   } else if (link instanceof RelatedMediaItemLink) {
   return adapt(((RelatedMediaItemLink) link).getMediaItem(), forLocale);
   } else if (link instanceof RelatedDownloadLink) {
   MediaItemDownloadVersion downloadVersion = ((RelatedDownloadLink) link).getInContextDownloadMediaItemDownloadVersion();
   if (downloadVersion != null) {
   String itemId = getItemId(downloadVersion.getContentItem());
   if (itemId != null) {
   return Collections.singletonMap("download", itemId);
   }
   }
   } else if (link instanceof RelatedResourceLink) {
   return adapt(((RelatedResourceLink) link).getResourceInstance(), forLocale);
   }
return null;
   }
} |
Credentials Service Provider
| Panel |
|---|
| borderColor | #0081C0 |
|---|
| titleColor | #0081C0 |
|---|
|
The following applies to XperienCentral versions 10.19 and higher.
|
In a standard installation, XperienCentral users are managed in the Authorization component. Along with the Authorization component, there are two types of credentials sets that are not targeted at the editorial tasks but are infrastructure-related. By default these credential sets are managed by the following properties in the XperienCentral Setup Tool (General tab):
These credentials sets are for:
internal_http_authentication_password / internal_http_authentication_username needed for internal_http_use_authentication or internal_http_use_form_authenticationhttp_proxy_username / http_proxy_password needed for http_use_proxy
Because these credentials sets can be managed in an organizational credential storage system external to XperienCentral, you can create an integration with this thereby removing the need to fill in these credential properties in the Setup Tool.
This can be accomplished via your own integration component by creating a plugin that implements the Credentials Service Provider. When there is no plugin active that implements the credentials services, a look-up is done on the settings internal_http_use_authentication or internal_http_use_form_authentication in the "application_settings" section in the General tab of the Setup Tool. If a plugin is active that implements the XperienCentral credentials service, the username/password combination from the plugin is used to authorize the user.
When a credentials provider plugin is created, the service in the activator needs to implement the CredentialsProviderService and CredentialsProvider classes. The following is an example implementation of a credential provider.
| Code Block |
|---|
|
import nl.gx.webmanager.services.credentials.CredentialsProviderService;

public class ExampleCredentialsProviderServiceImpl extends SimpleServiceComponent implements ExampleCredentialsProviderService {

	protected static final Logger LOG = Logger.getLogger(ExampleCredentialsProviderServiceImpl.class.getName());
	private final static String USERNAME = "test";
	private final static String PASSWORD = "test";

	/**
	 * {@inheritDoc}
	 */
	public Credentials getCredentials(String identifier) {
		LOG.log(Level.INFO,"Returning username/password test/test as example credentials for identifier '" + identifier + "'");
		if (identifier.equalsIgnoreCase(CredentialsProviderService.INTERNAL_HTTP_REQUESTS_CREDENTIALS_IDENTIFIER) {
			// Integrate here with some type of storage for credential sets. For now..
			return new CredentialsImpl(identifier, USERNAME, PASSWORD);
		} else if (identifier.equalsIgnoreCase(CredentialsProviderService.HTTP_PROXY_CREDENTIALS_IDENTIFIER) {
			// Integrate here with some type of storage for credential sets. For now..
			return new CredentialsImpl(identifier, USERNAME, PASSWORD);
		} else {
			// For credentials used in custom configuration sets you can identity your own identifiers and capture
 			// them here. For now..
			return new CredentialsImpl(identifier, USERNAME, PASSWORD);
		}
	}
}


// The CredentialsImpl used

import nl.gx.webmanager.services.credentials.UsernamePasswordCredentials;

/**
 * Simple POJO implementation of the {@link UsernamePasswordCredentials} interface.
 */
public class CredentialsImpl implements UsernamePasswordCredentials {
     private String  myId;
     private String  myUsername;
     private String  myPassword;

    /**
     * Creates a new credentials object.
     *
     * @param username The username.
     * @param password The password.
     */

    public CredentialsImpl(String id, String username, String password) {
        myId = id;
        myUsername = username;
        myPassword = password;
    }

    /**
     * {@inheritDoc}
     */
    public String getId() {
        return myId;
    }

    /**
     * {@inheritDoc}
     */
    public String getUsername() {
        return myUsername;
    }

    /**
     * {@inheritDoc}
     */
    public String getPassword() {
        return myPassword;
    }

    /**
     * Returns the String represenation of a credentials object.
     *
     * @return The String representation.
     */
    @Override
    public String toString() {
        return "id=" + getId() + ", username=" + getUsername() + ", password=" + getPassword();
    }
} |
Note that other credential sets that are infrastructure-related that are not already covered via the ones above can also be run though the credential provider logic, however in this case you need to accommodate this yourself. For example:
| Code Block |
|---|
|
import nl.gx.webmanager.services.credentials.CredentialsProviderService;

public class SomeClassThatNeedsTheCustomCredentialsSet {
	....

   OwnedConfigurationService myOwnedConfigurationService;

	private final static String CREDENTIAL_IDENTIFIER = "someCredentialSetIdentier";

	public void doSomething() {
		String username, password;
		CustomCredenentials someCustomCredentials = myCredentialsProviderService.getCredentials(CREDENTIAL_IDENTIFIER);

		if (someCredentials == null) {
			username = myOwnedConfigurationService.getUsername();
			password = myOwnedConfigurationService.getPassword();
		} else {
			username = someCustomCredentials.getUsername();
			password = someCustomCredentials.getPassword();
		}
		// Use the credentials
		....
	}
} |
Depending on the application server being used, a credential provider or -vault may be standard within the application server such as inside IBM WebSphere or another product like CyberArk can be used for this functionality (in case of Tomcat or Jboss).
Back to Top
Property Editors
Property Editors are used to facilitate conversions between a complex type and String. Posted values from an HTML form will usually be converted to a String by the servlet engine. Spring MVC offers a way to convert incoming Strings to complex types; it also converts complex types to Strings when the response is sent back to the browser. Spring MVC offers this functionality through the Property Editors. The Spring MVC and the XperienCentral platforms already have a few default Property Editors for the following types:
- All primitive types plus their auto-boxed equivalents;
- Date (in the format of “dd-MM-yyyy” or “dd/MM/yyyy”).
To add a custom Property Editor, follow these steps:
- Implement a custom Property Editor.
- Register the custom Property Editor in the
initBinder method.
In the following parts of this topic, an example of a custom Property Editor is shown based on the Calendar type. By default, there is no support for a property of type Calendar although it might be of interest for plugin developers.
Implement the Custom Property Editor
To implement a custom Property Editor, a class is needed that:
- Implements the
PropertyEditor interface; usually this is done by extending the PropertyEditorSupport class; - Implements the methods
setAsText and getAsText.
The implementation of the CustomCalendarEditor looks like this:
| Code Block |
|---|
|
public class CustomCalendarEditor extends PropertyEditorSupport {
	private final DateFormat myDateFormat;
	private final static Logger LOG =
Logger.getLogger(CustomCalendarEditor.class.getName());

	public CustomCalendarEditor(DateFormat dateFormat) {
		myDateFormat = dateFormat;
	}
	public void setAsText(String text) {
		if (text == null) {
			setValue(null);
		} else {
			try {
				myDateFormat.parse(text);
				setValue(myDateFormat.getCalendar());
			} catch (ParseException ex) {
				LOG.log(Level.WARNING, "Could not parse the date '" + text + "'" + "\nThe exception\n: " + ex);
			}
		}
	}

	public String getAsText() {
		Calendar value = (Calendar) getValue();
		if (value == null) {
			return "";
		} else {
			return myDateFormat.format(value.getTime());
		}
	}
} |
Register the Custom Property Editor
Now that the custom Property Editor is implemented, it has to be registered with Spring MVC. This is done in the initBinder method; this method is placed in the controller of your component (for example, CustomElementController.java). The registration looks like this:
| Code Block |
|---|
|
@Override
public void initBinder(HttpServletRequest request, ServletRequestDataBinder binder) throws Exception {
super.initBinder(request, binder);
if (myValidator == null) {
		myValidator = new CustomCalendarEditor(
new SimpleDateFormat("dd/MM/yyyy");
addValidator(myValidator);
}
} |
The Custom Property Editor in Action
Once the custom Property Editor has been created and registered, it is ready to use. This means that it is now possible to use the Calendar type for properties in the Java code. Below are some code snippets that illustrate the use of the custom the Calendar type Property Editor that was created in the above example.
Code in the edit-JSP (e.g. editCustomElement.jspf):
| Code Block |
|---|
|
<fmt:message key="helloworldelement.inputfieldLabel.birthdate" />:
|
| Code Block |
|---|
|
<wmedit:datePicker path="birthdate"/>
|
Code in the FormBacking object (for example, CustomElementFBO.java):
| Code Block |
|---|
|
private Calendar myBirthdate;

public Calendar getBirthdate() {
	return myBirthdate;
}

public void setBirthdate(Calendar bdate) {
	myBirthdate = bdate;
}
|
The result as seen in XperienCentral:

Back to Top
Validators
Validators can be used to validate user input and to generate client side error messages when invalid input is provided by a user. Validators prevent users from entering invalid data. Validators are Java classes that implement the org.springframework.validation.Validator interface. This interface provides two methods:
| Code Block |
|---|
|
boolean supports(Class clazz);
void validate(Object target, Errors errors); |
The supports method indicates which classes the validators can handle. The validate method performs the actual validation. The Sprint MVC framework provides API methods that make it easy to perform this validation, for example org.springframework.validation.ValidationUtils and org.springframework.validation.Errors.
To register the validator it must be added in the initBinder method of the controller using the addValidator method. You should only add the validator once per lifetime of the controller instance. So if you have a stateful controller (which is the default), be sure to instantiate and register the validator only once. If you unconditionally add the validator in the initBinder method, the validator will be invoked twice on the second HTTP request, three times on the third, and so forth.
The code snippets below provide an example of using a text validator for a custom element that rejects any empty text value or value that equals “not empty”:
| Code Block |
|---|
|
public void initBinder(HttpServletRequest request, ServletRequestDataBinder binder) throws Exception {
	if (myValidator == null) {
		myValidator = new TextValidator();
		addValidator(myValidator);
	}
}
|
The validator class:
| Code Block |
|---|
|
public class TextValidator implements Validator {

	public void validate(Object target, Errors errors) {
		CustomTextElementFBO element = (CustomTextElementFBO) target;
		ValidationUtils.rejectIfEmpty(errors, "text", "maynotbeempty");
		if (element.getText() != null
			&& element.getText().equals("not empty")) {
			errors.rejectValue("text", "maynotbenotempty");
		}
	}

	public boolean supports(Class clazz) {
		if (CustomElementFBO.class.isAssignableFrom(clazz)) {
			return true;
		}
		else {
			return false;
		}
	}
} |
In messages_en_US.properties:
| Code Block |
|---|
|
maynotbeempty=Text may not be empty
maynotbenotempty=Text may not be “not empty”
|
As a result the message “Text may not be empty” will be displayed if the user input was invalid:

Back to Top
HTTP Client
The java.net package part of the Java API provides a basic set of classes which can be used to handle HTTP GET and POST requests. However, in some cases a more powerful HTTP client API is needed. The commons HTTP client (org.apache.commons.httpclient.HttpClient) may be a better alternative for those cases.
To incorporate the commons HTTPp client jar files into a plugin, modify the pom.xml file in order to define a dependency with the commons HTTPclient artifact. For example, define the following dependency:
| Code Block |
|---|
|
<dependency>
	<groupId>commons-httpclient</groupId>
	<artifactId>commons-httpclient</artifactId>
	<version>3.0</version>
</dependency>
|
Without further changes however, the plugin will throw a runtime error upon the invocation of the HTTP client because of a conflict in commons logging:
Invalid class loader hierarchy. You have more than one version of 'org.apache.commons.logging.Log' visible, which is not allowed.
The reason for this is that the dependency above will cause the commons-logging artifact to be included in the plugin since it is required by the HTTP client artifact. However, the XperienCentral framework also exports the commons logging package which causes the mismatch.
In order to resolve this issue, an additional dependency with the commons-logging artifact must be defined with a scope provided so that at runtime the commons-logging classes exported by the framework will be used instead:
| Code Block |
|---|
|
<dependency>
	<groupId>commons-logging</groupId>
	<artifactId>commons-logging</artifactId>
	<version>1.0.4</version>
	<scope>provided</scope>
</dependency>
|
XperienCentral offers standard HTTP proxy configuration settings. These settings are configured using the XperienCentral Setup Tool (/web/setup). The settings are made available through the default system networking properties. For complete information about these properties, go to the URL http://docs.oracle.com/javase/8/. The example below shows how you can apply these settings in XperienCentral in combination with HTTP clients version 2 and 3.
| Code Block |
|---|
|
private static void configureHttpClient2Proxy(HttpClient httpClient, HttpMethod method) {
	String proxyHost = System.getProperty("http.proxyHost");
	if (proxyHost == null || "".equals(proxyHost)) {
		return;
	}
	try {
		org.apache.commons.httpclient.URI apacheUri = method.getURI();
		java.net.URI javaUri = null;
		if (apacheUri.isAbsoluteURI()==false) {
			javaUri = new
			java.net.URI(httpClient.getHostConfiguration().getHostURL());
	} else {
		javaUri = new java.net.URI(apacheUri.toString());
	}
	// ProxySelector
	List<Proxy> selectedProxy =
	ProxySelector.getDefault().select(javaUri);
	if (selectedProxy.size()==0 ||
	selectedProxy.get(0).type()==Proxy.Type.DIRECT) {
		// No proxy needed.
		return;
	}
	HostConfiguration hc = httpClient.getHostConfiguration();
	hc.setHost(javaUri.getHost(), javaUri.getPort(),
	Protocol.getProtocol(javaUri.getScheme()));
	Proxy proxy = selectedProxy.get(0);
	InetSocketAddress proxyAddress = (InetSocketAddress) proxy.address();
	hc.setProxy(proxyAddress.getHostName(),proxyAddress.getPort());
	if (System.getProperty("http.proxyUserName") != null) {
		httpClient.getState().setProxyCredentials(null, null,
			new UsernamePasswordCredentials(System.getProperty("http.proxyUserName"), System.getProperty("http.proxyPassword")));
		httpClient.getState().setAuthenticationPreemptive(true);
	}


  } catch (URISyntaxException ex) {
		LOG.log(Level.WARNING, null, ex);
  } catch (URIException ex) {
		lOG.log(Level.WARNING, null, ex);
  }
}
|
Back to Top
| Anchor |
|---|
| adding_custom_indicators_to_the_performance_dashboard |
|---|
| adding_custom_indicators_to_the_performance_dashboard |
|---|
|
Adding Custom Indicators to the Performance Dashboard
The XperienCentral Performance Dashboard provides detailed information about how the parts of XperienCentral's infrastructure are functioning. The Performance Dashboard measures the speed and response time of page requests and internal queries as well as other settings that affect how XperienCentral is performing and rates the results according to the optimal expected results. The Performance Dashboard plugin is extensible, which allows you to create plugins that add custom performance indicators. Any custom indicators you create appear on a special tab named “Custom System Performance Indicators”.
Use the methods in the following classes to implement your custom performance indicators:
SystemHealthIndicatorSystemHealthIndicator.ValueStatus
| Note |
|---|
- The indicators are called “System health” indicators instead of “Performance indicators”. The reason for this is that although the current focus is on implementing performance indicators, XperienCentral intends to support more generic system health indicators in the future.
- For complete information on the methods in these classes, see the XperienCentral API Javadoc. For complete information about plugin extensibility, see Extensibility.
|
The following sample adds a category named “My Category” containing an indicator named “test custom PI” to the “Custom System Performance Indicators” tab.
| Code Block |
|---|
|
public class CustomServiceImpl extends SimpleServiceComponent implements SystemHealthIndicatorExtensionPoint {
	// Private logger for this class
	private static final Logger LOG = Logger.getLogger(CustomServiceImpl.class.getName());
	public SystemHealthIndicator[] getPerformanceIndicators() {
	return new SystemHealthIndicator[] {new CustomPI()};
	}

	class CustomPI implements SystemHealthIndicator{
		public String getId() {return "testPI";};
		public String getCategory() {return "my category";}
		public String getType() {return TYPE_CUSTOM;};
		public String getName(Language language) {return "test custom PI";}
		public Object getValue() {return myCache.getCacheRatio;}
		public ValueStatus getValueState() {return myValueStatus;}
		public String getMessage(Language language) {return "test custom PI";}
		public void reset() {}
	}
}
|
Back to Top
Creating an Extension for the User Profiles Component
The XperienCentral component User Profiles can be extended via the API in order to add custom fields and tabs to the default user profile information. In addition to adding extensions to the user profile information, you can also manage users, groups, newsletter subscriptions, permissions, and banned and reserved words via the XperienCentral API. This makes it possible to enhance the functionality contained within the user profile component for your particular implementation. All data in custom fields and tabs can also be exported together with data in the default user detail fields using the provided export functionality in the User Profiles component.
The packages containing the interfaces that manage users, groups, and user profile settings are:
nl.gx.webmanager.services.defaultprofileprovider - Contains the interfaces for managing user profile data in the default user profile as provided by XperienCentral.nl.gx.product.wmpuserprofiles.api - Contains the interfaces for managing custom sub-tabs and permissions for the ‘User Profiles’ component.nl.gx.webmanager.services.usermanager - Contains the interfaces for managing users, groups, and newsletter subscriptions.nl.gx.webmanager.services.usermanager.settings - Contains one interface for managing reserved and banned words.
Generating the Sample Profile Extension Plugin from the User Profiles Archetype
Included with XperienCentral is a sample plugin that extends the user profiles functionality by adding a field to the [User Details] tab (view extension) as well as a new tab named [MSN Details] with one field. By generating a sample profile extension plugin from the archetype, you can see a working example of how extra fields and tabs can be added to the default user profile as well as how the extra data can be exported.
To generate the sample plugin, execute the following command from a command prompt. In the example below, the command is issued from the root of the XperienCentral installation (where the settings.xml file is located). You can also execute this command from a different location as long as you provide the absolute path to the settings.xml file.
mvn -s settings.xml archetype:generate -DinteractiveMode=false -DarchetypeGroupId=nl.gx.webmanager.archetypes -DarchetypeArtifactId=webmanager-profileprovider-archetype -DarchetypeVersion=x.x.x -DgroupId=nl.gx.product -DartifactId=customprofile -DpackageName=nl.gx.product.customprofile -Dclassprefix=Custom
where x.x.x is the version of XperienCentral you are using.
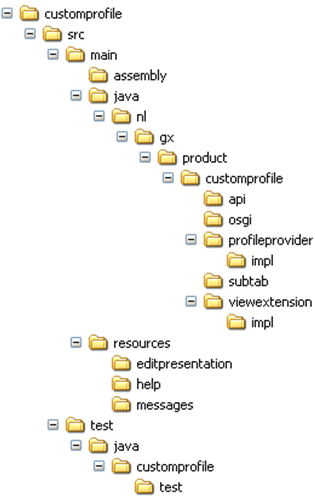
As a result, the following folder structure is created containing the source code for the customprofile sample plugin:
UserManagement Interface Methods
In order to create a custom extension for the user profiles functionality, you must use the following XperienCentral API methods to implement the Profile Extension Provider interface. The following code is taken from the file ProfileExtensionProvider.java:
| Code Block |
|---|
|
/**
	* Call back method that will be invoked by the framework when the
	* given {@link User} is created.
	* @param user the {@link User} instance that just has been created
	*/
	void onCreate(User user);

	/**
	* Call back method that will be invoked by the framework when the given {@link User} is deleted.
	*
	* @param user the {@link User} instance that just has been deleted
	*/
	void onDelete(User user);

	/**
	* Gets the profile for the given user. If the profile part exists, then it is returned, otherwise a default profile part is
	* returned which can be modified and updated.
	*
	* @param user the {@link User} to get the profile for
	* @return the user's profile
	* @throws UserManagementException on error
	*/
	T getProfileFor(User user) throws UserManagementException;

	/**
	* Updates the given profile.
	*
	* @param profile the profile to update
	* @throws UserManagementException on error
	*/
void update(T profile) throws UserManagementException; |
The Profile Extension provider contains the following:
- Callback methods that create and delete users
- Methods to retrieve and update user profiles
- Methods for exporting user profiles
| Code Block |
|---|
|
	/**
	* This method should return a constant list of strings which are the column headers of the values that
	* are exported by this profile extension.
	*
	* @return the headers of the fields that are present in an export
	*/
	List<String> getExportColumnHeaders();

    /**
	* This method should return a list of values whose size is equal to the size
	* of the list returned by
	* {@link #getExportColumnHeaders()}. Each entry in the returned
	* list is a list of strings and represents a single profile property. Single-valued profile properties are
	* to be represented by a list of length
	* 1. Multi-valued profile properties can be represented by a list of appropriate size.
	*
	* @param user the user whose profile to export
	* @return the values for the exportable fields of the given profile
	* @throws UserManagementException on error
	*/
	List<List<String>> export(User user) throws UserManagementException;
} |
Add your own methods that implement this interface. In the file src\main\java\nl\gx\product\customprofile\profileprovider\CustomProfileProviderImpl.java, the following code makes the profile provider available to the framework:
| Code Block |
|---|
|
public final class CustomProfileProviderImpl extends SimpleProfileProviderComponent implements
CustomProfileProvider { |
Custom Profile Declarations
In the file src\main\java\nl\gx\product\customprofile\profileprovider\CustomProfileImpl.java, the following code implements the custom profile and initializes the new fields:
| Code Block |
|---|
|
customprfileimpl - extended profile - declaration:

public final class CustomProfileImpl implements CustomProfile {

	private final User myUser;

		private String myMsnAddress;
		private String myIcqAddress;

		/**
		* @param usr The owner of this profile part
		*/
		public CustomProfileImpl(User usr) {
			myUser = usr;
			String userString = "";
			if (usr != null) {
				userString = "" + usr.getId();
			}
			myMsnAddress = userString + "msn@hotmail.com";
myIcqAddress = userString + "icq@hotmail.com"; |
The following code sets and retrieves the data in the new custom fields:
| Code Block |
|---|
|
/**
	* {@inheritDoc}
	*/
	public void setMsnAddress(String newMsnAddress) {
		myMsnAddress = newMsnAddress;
	}

	/**
	* {@inheritDoc}
	*/
	public String getMsnAddress() {
		return myMsnAddress;
	}

	/**
	* {@inheritDoc}
	*/
	public void setIcqAddress(String newIcqAddress) {
		myIcqAddress = newIcqAddress;
	}

	/**
	* {@inheritDoc}
	*/
	public String getIcqAddress() {
	return myIcqAddress;
|
Adding a Custom Tab to the User Profiles Component
The following code shows how to add a custom tab to ‘User Profiles’ component. The code is taken from the file src\main\java\nl\gx\product\customprofile\subtab\CustomSubTab.java:
| Code Block |
|---|
|
public final Class<?> getDelegatedControllerClass() {
	return CustomSubTabController.class;
	}

	/**
	* {@inheritDoc}
	*/
	public final String getLabelId() {
		return "nl.gx.product.customprofile.subtab.msntitle";
	}

	/**
	* {@inheritDoc}
	* Note: You must implement your own jspf in order for the presentation to be rendered.
	*/
	public final String getEditPresentation() {
		return "customprofilesubtab.jspf";   }

	/**
	* {@inheritDoc}
	*/
	public final void initialize(ComponentController controller, FormBackingObject fbo, HttpServletRequest request, String tabId) {
		fbo.getNestedPath();

		CustomSubTabFBO concreteFBO = (CustomSubTabFBO) fbo;

		// Set the nested path
		concreteFBO.setTabId(tabId);

		// Store the selected user in the form backing object
		ExtensiblePanelTabParentFBO parentFBO;
		try {
			parentFBO = (ExtensiblePanelTabParentFBO) controller.getParentController().formBackingObject(request);
			concreteFBO.setSelectedUser(parentFBO.getSelectedUser());
			concreteFBO.isNewUserMode(parentFBO.isNewUserMode());
		} catch (ServletException e) {
			LOG.log(Level.SEVERE, "Failed to retrieve parent fbo.", e);
		}

		// Store reference to services
		if (controller instanceof ExtensionSubTabController) {
			ExtensionSubTabController extensionSubTabController = ((ExtensionSubTabController) controller);
			extensionSubTabController.setSessionManager(mySessionManager);
			extensionSubTabController.setRealmManager(myRealmManager);
		}
	}

	/**
	* {@inheritDoc}
	*/
	public final int getRank() {
		return MY_RANK;
	}
} |
| Note |
|---|
If you add more than one sub-tab, the order that they appear from left to right is controlled by the custom tab’s rank. The sub-tab with the lowest rank value appears first and the rest follow in order from left to right. |
For example:
| Code Block |
|---|
|
public class CustomSubTab extends SimpleServiceComponent implements ExtensionSubTab {
private static final int MY_RANK = 10; |
The following code, taken from the file src\main\java\nl\gx\product\customprofile\viewextension\impl\CustomSubTabFBO.java, shows how to extend the panel tab’s form backing object to include the new field:
| Code Block |
|---|
|
package nl.gx.product.customprofile.subtab;

import nl.gx.product.wmpuserprofiles.api.ExtensionSubTabFBO;

/**
* The FBO for the customprofile sub tab.
*/
public class CustomSubTabFBO extends ExtensionSubTabFBO {

	private String myMsnAddress;

	/**
	* Returns the msn address.
	*
	* @return the msn address
	*/
	public String getMsnAddress() {
		return myMsnAddress;
	}

	/**
	* Sets the msn address.
	*
	* @param msnAddress the msn address
	*/
	public void setMsnAddress(String msnAddress) {
		this.myMsnAddress = msnAddress;
	}
} |
The following code, taken from the file src\main\resources\editpresentation\customprofilesubtab.jspf, implements the rendering of the new field:
| Code Block |
|---|
|
<%@ page language="java" session="false" buffer="none" %>
<%@ taglib uri="http://java.sun.com/jstl/core" prefix="c" %>
<%@ taglib prefix="spring" uri="http://www.springframework.org/taglib/spring" %>
<%@ taglib prefix="wmedit" uri="http://www.gx.nl/taglib/wmedit"%>
<%@ taglib uri="http://java.sun.com/jsp/jstl/functions" prefix="fn" %>
<%@ taglib uri="http://java.sun.com/jstl/fmt" prefix="fmt" %>

<fieldset>

	<div class="wm_style">
		<table class="widgetgrid">
			<tr>
				<td class="label_left"><fmt:message key="nl.gx.product.customprofile.subtab.msnaddress"/>:</td>
				<td class="datefield"><wmedit:input path="msnAddress" size="25" /></td>
			</tr>
		</table>
	</div>
</fieldset> |
Adding a Custom Field to the User Details Tab
Custom data fields can be added to the [User Details] tab in order to extend the detailed information you want to store for each user. The following sample code, taken from the file src\main\java\nl\gx\product\customprofile\profileprovider\impl\CustomProfileImpl.java, shows how to add a new field, "ICQ Address" to the [User Details] tab.
| Note |
|---|
The same custom profile is used for the custom tab extension and extending the [User Details] tab. |
| Code Block |
|---|
|
/**
* A custom profile extension which adds a single text field to the profile.
*/
public final class CustomProfileImpl implements CustomProfile {

	private final User myUser;
	private String myMsnAddress;
	private String myIcqAddress;
	/**
	* @param usr the owner of this profile part
	*/
	public CustomProfileImpl(User usr) {
		myUser = usr;
		String userString = "";
		if (usr != null) {
			userString = "" + usr.getId();
		}
		myMsnAddress = userString + "msn@hotmail.com";
		myIcqAddress = userString + "icq@hotmail.com";
	}

/**
	* {@inheritDoc}
	*/
	public String getIcqAddress() {
		return myIcqAddress;
	}
/**
	* {@inheritDoc}
	*/
	@Override
	public String toString() {
		return "CustomProfile[User = " + myUser + ", MSN address = " + myMsnAddress + ", ICQ address = " + myIcqAddress + "]";
    }
} |
The following code, taken from the file src\main\java\nl\gx\product\customprofile\viewextension\impl\CustomFBO.java, shows how to extend the panel tab’s form backing object to include the new field:
| Code Block |
|---|
|
/**
* Class customprofileFBO.
*
* Form backing object of the customprofileController
*/
public class CustomFBO extends PanelTabFBO implements FormBackingObject {

	private String myIcqAddress;

	/**
	* {@inheritDoc}
	*/
	public final String getUUID() {
	    return WCBConstants.USER_PROFILES_PROFILEDETAILS_EXTENSION_PATH;
	}

	/**
	* Returns the icq address.
	*
	* @return the icq address
	*/
	public String getIcqAddress() {
		return myIcqAddress;
	}

	/**
	* Set the icq address.
	*
	* @param icqAddress the icq address
	*/
	public void setMsnAddress(String icqAddress) {
		this.myIcqAddress = icqAddress;
	}
}
|
The following code, taken from the file src\main\resources\editpresentation\customprofileview.jspf, implements the rendering of the new field:
| Code Block |
|---|
|
%@ page language="java" session="false" buffer="none" %>
<%@ taglib uri="http://java.sun.com/jstl/core" prefix="c" %>
<%@ taglib prefix="spring" uri="http://www.springframework.org/taglib/spring" %>
<%@ taglib prefix="wmedit" uri="http://www.gx.nl/taglib/wmedit" %>
<%@ taglib uri="http://java.sun.com/jsp/jstl/functions" prefix="fn" %>
<%@ taglib uri="http://java.sun.com/jstl/fmt" prefix="fmt" %>

<tr>
	<td class="label_left"><fmt:message key="nl.gx.product.customprofile.profileview.icqaddress"/>:</td>
	<td class="datefield"><wmedit:input path="icqAddress" size="20" /></td>
</tr> |
Exporting Data from Custom Fields
In order for XperienCentral to be able to export data from custom fields, you must declare the new headers that need to be retrieved during the export. For example:
| Code Block |
|---|
|
public List<String> getExportColumnHeaders() {
	return Collections.unmodifiableList(Arrays.asList(new String[]{"msn address", "icq address"}));
    }
|
The following code passes the values retrieved from the custom fields to the export function:
| Code Block |
|---|
|
public List<List<String>> export(User user) throws UserManagementException {
	return Collections.unmodifiableList(Arrays.asList((List<String>[]) new List[]{
Collections.singletonList(getProfileFor(user).getMsnAddress()), Collections.singletonList(getProfileFor(user).getIcqAddress())
|
This implementation comes from the CustomProfileProviderImpl interface. The methods are part of the ProfileExtensionProvider interface.
Back to Top
Creating Workflow Action Constraints
A workflow action constraint puts a restriction on the transition from one state to another for content items in a workflow. The constraint is based on a specified property or condition belonging to a content item. For example, a constraint can prevent a content item from transitioning from the "Planned" to the "Published" state if it does not have a title or if it does not have an expiration date assigned to it. A constraint can be global and apply to all content types or you can select the specific content type to which it applies.
Developers can create their own workflow action constraints by implementing and registering the WorkflowActionConstraint interface as a service. The interface is implemented as follows:
| Code Block |
|---|
|
public interface WorkflowActionConstraint {

	/**
	 * Returns the domain prefixes for which the workflow action constraint is scoped to. Domain prefixes must
     * correspond with the available concrete implementations of the {@link ContentDomain} interface, though
	 * limited to those whose's default domain type is an instance of {@link WorkflowEnabled}.
	 * <p>
	 * Allowed standard domain prefixes:
	 *
	 <ul>
	 * <li>pageversion</li>
	 * <li>pagesectionversion</li>
	 * <li>articleversion</li>
	 * <li>downloadversion</li>
	 * <li>flashversion</li>
	 * <li>imageversion</li>
	 * <li>multimediaversion</li>
	 * </ul>
	 * Note that the domain prefix <code>mediapageversion</code> which corresponds to the content domain
	 * representing {@link MediaItemPageVersion} is NOT allowed. A media item page version is a media item
     * which references a page version, and in context of its workflow it should be seen as a page version.
	 *
	 * @return Array of domain prefixes. An empty array represents that the constraint is designed for all
	 *  known workflow enabled content domains. Must not return <code>null</code>.
	 */
	String[] getDomainPrefixes();
	/**
	 * Returns the per locale title of the workflow action constraint.
	 *
	 * @return The title of the workflow action constraint.
	 */
	Map<Locale, String> getTitleMessages();

	/**
	 * Returns the identifier of the workflow action constraint. This must be unique among other workflow action
	 * constraints available in the system. If not it will be denied (as logged) and therefore unavailable.
	 *
	 * @return The identifier of the workflow action constraint.
	 */
	String getIdentifier();

	/**
	 * Validates the workflow action constraint.
	 *
	 * @param webEnabled A workflowEnabled object that is the subject of the workflow action.
	 * @return A {@link WorkflowActionResult} that contains the validation  status (true/false) and info
	 * messages.
	 */

WorkflowActionConstraintResult validate(WorkflowEnabled workflowEnabled);
} |
The pagemetadata and mediaitem archetypes provide an example workflow action constraint. This constraint prevents a content item from being published if it has no title.
| Code Block |
|---|
|
public class TitleWorkflowActionConstraint extends SimpleServiceComponent implements WorkflowActionConstraint {

	private static final Logger LOG = Logger.getLogger(TitleWorkflowActionConstraint.class.getName());

	private static final String TITLEKEY = "pagemetadata.constraint.title";

	private static final Map<Locale, String> TITLE_MESSAGES = new HashMap<Locale, String>();

	private static final Map<Locale, String> VALIDATION_MESSAGES = new HashMap<Locale, String>();

	static {
		Locale localeNL = new Locale("nl", "NL");
		ResourceBundle bundle_nl = ResourceBundle.getBundle("messages/messages", new Locale("nl", "NL"));
		ResourceBundle bundle_en = ResourceBundle.getBundle("messages/messages", Locale.US);

		TITLE_MESSAGES.put(localeNL, bundle_nl.getString(TITLEKEY));
		TITLE_MESSAGES.put(Locale.US, bundle_en.getString(TITLEKEY));

		VALIDATION_MESSAGES.put(localeNL, bundle_nl.getString(TITLEKEY));
		VALIDATION_MESSAGES.put(Locale.US, bundle_en.getString(TITLEKEY));
	}

	@Override
	public Map<Locale, String> getTitleMessages() {
		return TITLE_MESSAGES;
	}

@Override
	public String getIdentifier() {
		return WCBConstants.BUNDLE_ID + ".titleWorkflowActionConstraint";
	}

	@Override
	public WorkflowActionConstraintResult validate(final WorkflowEnabled workflowEnabled) {
		final boolean isValid;

		// Validate
		final String title;
		if (workflowEnabled instanceof PageVersion) {
			title = ((PageVersion) workflowEnabled).getTitle();
		} else if (workflowEnabled instanceof MediaItemVersion) {
			title = ((MediaItemVersion) workflowEnabled).getTitle();
		} else {
			title = null;
		}

		isValid = !"".equals(title);
		return new WorkflowActionConstraintResult() {

			@Override
				public String getIdentifier() {
					return TitleWorkflowActionConstraint.this.getIdentifier();
			}

			@Override
			public Map<Locale, String> getMessages() {
				if (isValid) {
					return null;
				} else {
					return VALIDATION_MESSAGES;
				}
			}

			@Override
			public boolean isValid() {
				return isValid;
			}
		}
} |
Back to Top