| Anchor | ||||
|---|---|---|---|---|
|
In This Topic
| Table of Contents | ||
|---|---|---|
|
Some of the properties described in this topic can also be viewed/modified using the Actions menu.
Basic
properties shown in the Properties Widget. The Properties widget appears as follows in a sidebar in the Workspace:
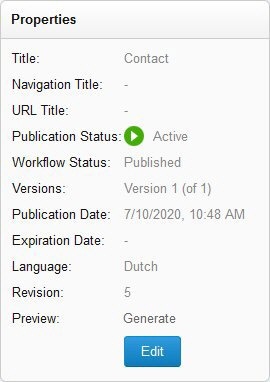
The properties described in the table below are shown in the Properties widget:On the Basic tab, standard metadata for a content item can be viewed/modified.
| Property | Description | ||
|---|---|---|---|
| Title | The title of the content item. This is the string that appears in the title in the Editor. | URL Title | The title to use in the friendly URL. For complete information on friendly URLs, see Search Engine Optimization (SEO). |
Navigation Title | For web pages, you can specify a navigation title that differs from the title of the page. The navigation title appears in the website navigation in both the frontend and in the Workspace. | ||
| Publication Date | The date the content item was or will be published. | ||
| Expiration Date | The date the content item expired or will expire. | ||
| Include in Search Engine | Specifies whether to include the content from this content item in the search engine index. | ||
| Tags | The tags that are assigned to the item. | ||
| Language | The language version of the item. | ||
| Display On | The page on which the item is displayed. |
...
Search Engine Optimization (SEO)
...
URL Title | The title to use in the friendly URL. For complete information on friendly URLs, see Search Engine Optimization (SEO). |
| Note |
|---|
Search Engine Optimization is not relevant for content items in XperienCentral Headless. |
...
| Note |
|---|
When upgrading to XperienCentral versions 10.13.0 and higher, the text in the "Lead" field, if any, is duplicated in the Meta Description field. |
...
- Update frequency — Specifies how often Google Sitemap updates the index for the content item. Select the update frequency from the drop-down list.
- Priority — Defines the page's Google Sitemap priority. Select the priority from the drop-down list.
| Publication Status | If the content item is published, "Active" is shown with a green icon. If the content item is not published, "Inactive" is shown with a gray icon. You can change the publication status by clicking [Edit] and navigating to the Status tab in the Content Item Properties panel or using the Actions menu. |
| Workflow Status | The workflow status of the content item. See Workflow. |
| Versions | Shows the version of the content item that you are viewing ("1 of 2" for example). |
| Publication Date | The date the content item was or will be published. |
| Expiration Date | The date the content item expired or will expire (if any). |
| Language | The language version of the item. |
| Revision | Shows the highest (current) revision number of this content item. See Reverting a Content Item for more information. |
| Preview | Allows you to preview the content item as it appears on the website frontend. See Previewing a Content Item for more information. |
| Display On | The page on which the item is displayed. |
To access the Properties panel, click [Edit].
...
- Active — The content item version has a public workflow state ("Published" for example) and the current date/time falls within the publication and expiration date range and the version has the most recent publication date.
- Inactive — The content item version has a non-public workflow state ("Planned" for example) or its publication date is not the most recent.
- Expired — The content item version has a public workflow state ("Published" for example) and the current date/time is later than the expiration date.
- Scheduled for publication — The content item version has a public workflow state ("Published" for example) and the current date/time is earlier than the publication date.
...
- Content is modified.
- The workflow state is modified.
- A page or page section is moved.
- A content item is deleted.
...
Lead & Interaction
...
| Note |
|---|
When upgrading to XperienCentral versions 10.13.0 and higher, the text in the Lead field, if any, is duplicated in the Meta Description field. |
...
Versions
In the Versions tab you can see details regarding all versions of the content item that exist in the current language. The state of the current version is "Current version" ("Published") and the state of all other versions is "Draft". To switch to a different version of the content item, use the View All Versions command in the Actions menu. The table details which user created the version, its publication date and its expiration date (if any). For pages and page sections, you can also delete older, unpublished versions by selecting the checkbox next to it and clicking [Delete].
| Note |
|---|
You cannot delete the current version of a content item. |
...
Advanced
...
- Permanent Redirect (301) - A (301) redirect permanently redirects to the target page or external URL and indicates to search engines that the old URL should be removed from their indexes.
- Temporary Redirect (302) - A (302) redirect temporarily redirects to the target page or external URL and indicates to search engines that they should read and use the content on the new page but should keep checking the original URL because the intention is to reestablish it at some point.
...
Design
In the Design tab, you can select a different design template and/or style for the page or page section. This allows you to change the look and feel of the page or page section on the website frontend. To select a different design template for the current content item:
- Click the down arrow for the "Design Template" drop-down list.
- Select the new template for the page or page section from the list.
- Click [Apply] and then click [Close]. The change is immediately processed and you can see the effect in the Editor.
To select a different style for the current content item:
- Click the down arrow for the "Style" drop-down list.
- Select the new style for the content item from the list.
- Click [Apply] and then click [Close]. The change is immediately processed and you can see the effect in the Editor.
...
General
...
When selected, this page or page section requires HTTPS authentication in order to be viewed.
| Note |
|---|
To use this setting, your website must be configured to use HTTPS. Contact your application manager for more information. |
...
Specifies the default language for the page or page section on the website frontend. When a website visitor requests this page or page section, this is the language version they will view. To change the default language, select "Define other settings for this page or page section" and click [Save]. A drop-down becomes available from which you can select the default language version.
| Info |
|---|
This setting applies to the page and not the page version which means that when you change this language setting, it affects not only the page but all versions of it as well. |
...
Links
...
Read Access
...
Page Sections
...
- In the list of page sections, you can change the position where a page section appears on the page by modifying the number that appears in the drop-down list and then clicking [Save]. Where the page section appears depends on your design template. Contact your application manager for complete information about where page sections are designed to appear on a page.
- To remove a page section from the current page, select "Delete" and then click [Save].
...
Sub Pages
...
Changing the Navigation Order
You can quickly and easily change the order that the sub pages appear in the page navigation structure using drag and drop. To do so, simply click on the title of a sub page with the left mouse button and keep the button depressed. Drag the sub page to the desired location in the navigation order and then let go of the left mouse button. The sub page is moved to the new location. Click [Save].
...
Workflow
...
- Select "Define custom workflow model".
- Select the workflow that you want to base your custom workflow on from the drop-down list.
- Select the roles you want to assign to each activity. This allows you to define the number of XperienCentral users who can perform the available activities. Click [Save].
- You can modify the roles that are authorized to modify the custom workflow.
- Click [Save].