| Anchor | ||||
|---|---|---|---|---|
|
User authentication can also be accomplished by developing a plugin that implements the XperienCentral Credentials Service Provider. This Java class makes it possible to use a credentials provider that is external to XperienCentral. Click here for more information.
Beginning in XperienCentral 10.18, some parts of user management have been changed from previous XperienCentral versions. Expand the section below that corresponds with your version of XperienCentral.
| Expand | |||||||||||||||||||||||||||||||||||||||||||||||||||||||||||||||||||||||||||||||||||||||||||
|---|---|---|---|---|---|---|---|---|---|---|---|---|---|---|---|---|---|---|---|---|---|---|---|---|---|---|---|---|---|---|---|---|---|---|---|---|---|---|---|---|---|---|---|---|---|---|---|---|---|---|---|---|---|---|---|---|---|---|---|---|---|---|---|---|---|---|---|---|---|---|---|---|---|---|---|---|---|---|---|---|---|---|---|---|---|---|---|---|---|---|---|
| |||||||||||||||||||||||||||||||||||||||||||||||||||||||||||||||||||||||||||||||||||||||||||
In This Topic
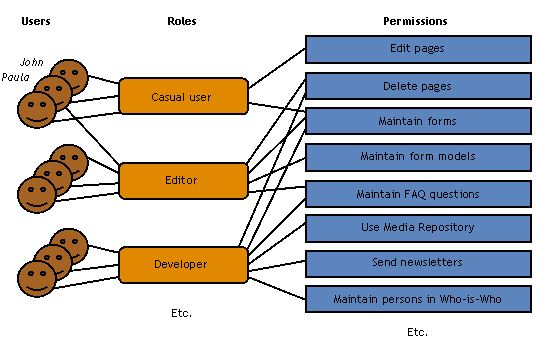
ComponentsThe authorizations within XperienCentral are divided into two types:
In the Workspace environment, authorization management has been further divided into the following components:
Another related functionality is Workflow. Workflows control the allowed transition from one state to another for content items before they are allowed to be published on the web. The website administrator defines these states and configures their behavior. The states are then linked to user roles, which gives actual shape to the workflow. This XperienCentral functionality is based on the standards defined by the Workflow Management Coalition (WfMC). Role Based Access Control (RBAC)Many RBAC models exist, but XperienCentral uses the Core RBAC and Hierarchical RBAC models. These models conform to the standard RBAC specification developed by ANSI/INCITS. Roles and permissionsRole Based Access Control (RBAC) avoids the need to assign permissions to each user individually. Instead, permissions are assigned to roles. A role is a functional or organizational job description in which users sharing the same role share the same tasks. These roles then are assigned to users. The permissions of a role determine which operations a user may perform. RBAC is considerably less labor intensive than assigning permissions to each user individually. A user may have more than one role. An example of a permission is "Edit pages", which grants the permission to modify a page.
In the example above:
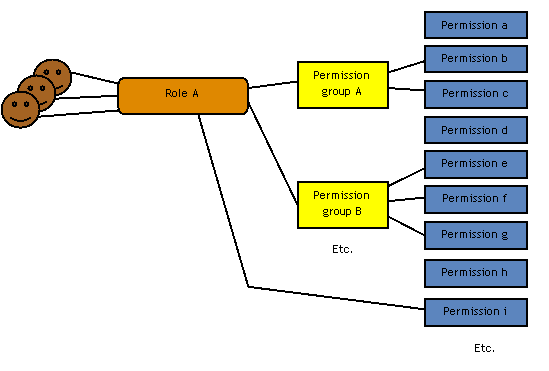
XperienCentral comes with a default set of roles and permissions. Permission groupsNevertheless, defining proper permissions for each role may be a quite laborious operation. For this reason permission groups are introduced. A permission group is a default set of permissions which can be assigned to a role at once. A permission group assigned to a role will implicitly assign all permissions contained by that permission group to that role.
XperienCentral comes with a standard set of permission groups, see Default Authorizations for more information. Permission inheritancePermissions can be assigned in two ways: directly and by means of permission groups. To make things even more flexible, a third way has been introduced: permission inheritance. With permission inheritance, a role has assigned another role to it from which it inherits all permissions which means a child role gets all permissions from its parent role, irrespective of how these permissions have been assigned to the parent role.
XperienCentral comes with a standard set of roles that inherit from each other, see Default Authorizations for more information.
XperienCentral comes standard with the users, roles and permission groups listed below.
Developers are treated differently than all other users. Unlike all other users, developers are able to:
Basic set of permission groups by categoryXperienCentral comes with five standard permission groups. In the "Roles" tab of the Authorization anel you can see which permissions each role has or can be assigned. Maintaining RolesSelecting and Viewing a RoleTo select and view a role:
|
| Anchor | ||||
|---|---|---|---|---|
|
A role may have one or more users and a user may have one or more roles. You can assign users and roles to one another in two ways:
- From the user point of view, see Assigning a Role to a User.
- From the role point of view.
To assign a user to a role:
- Select the desired role from the [Roles] - [Details] tab.
- Select the desired user from the "Add user" drop-down list. The user is added to the list.
| Anchor | ||||
|---|---|---|---|---|
|
You can also separate users and roles from one another in two ways:
- From the user point of view, see Removing a Role from a User.
- From the role point of view.
To remove a user from a role:
- Select the desired role from the [Roles] - [Details] tab.
- In the list "Users assigned to this role", select the "Delete" checkbox next to the user to be removed.
- Click [Apply]. The user is removed from the list.
Assigning Permissions to a Role
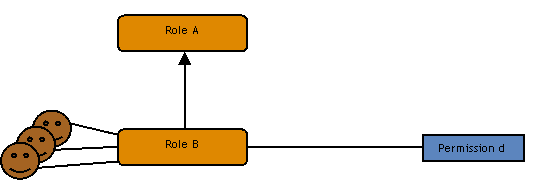
The actual permissions a role gets is determined by the following:
- The permissions it inherits from another selected role.
- The permissions it gets from the assigned permission groups.
- The permissions that have been added directly to the role.
Inherited permissions and group permissions may overlap one another.
To assign permissions to a role:
- Select the desired role from the [Roles] - [Details] tab.
- To select the role to inherit from: select a role from the "Inherits all permissions from" drop-down list.
- To add a permission group, select a permission from the "Add permission group" drop-down list. The permission group is added on top of the drop-down box.
- To assign a permission directly: select the [Permissions] tab and select the desired permission(s).
- Click [Apply].
Removing Permissions from a Role
To remove permissions from a role:
- Select the desired role from the [Roles] - [Details] tab.
- To remove all inherited permissions, : select "Select a role" from the "Inherits all permissions from" drop-down list.
- To remove a permission group: in the list "Permission groups" section, select the "Delete" checkbox next to the permission group you want to remove. A pop-up message prompts you to copy the group permissions to the role directly. When you click [OK] the selected permission group is unassigned from the current role and all permissions from the unassigned group are assigned directly to the current role. If you click [Cancel] the permission group is unassigned from the current role and the role loses all permissions from the unassigned group.
- To remove directly-added permissions: select the [Permissions] tab and clear the permissions to be removed.
- Click [Apply].
Deleting a Role
To delete a role:
- Select the role to be deleted from the [Roles] - [Details] tab.
- Click [Delete role]. The role is removed from the "Select a role" drop-down list.
Finding a User and Viewing their Permission(s)
To find and view a user:
- Navigate to Configuration > Authorization and click the [Users] tab.
- To show a list of users:
- Select "All users" to see the full list.
- Select "Active" to show only active users.
- Select "Inactive" to show only inactive users.
- Select a letter range to show users beginning with a specific letter.
- Click on the arrow in the "Login" column to toggle between alphabetical sorting in ascending (A-Z) and descending (Z-A) order.
- To view the details for a user: click on the desired user in the list. The user details appear below the user.
Maintaining Users
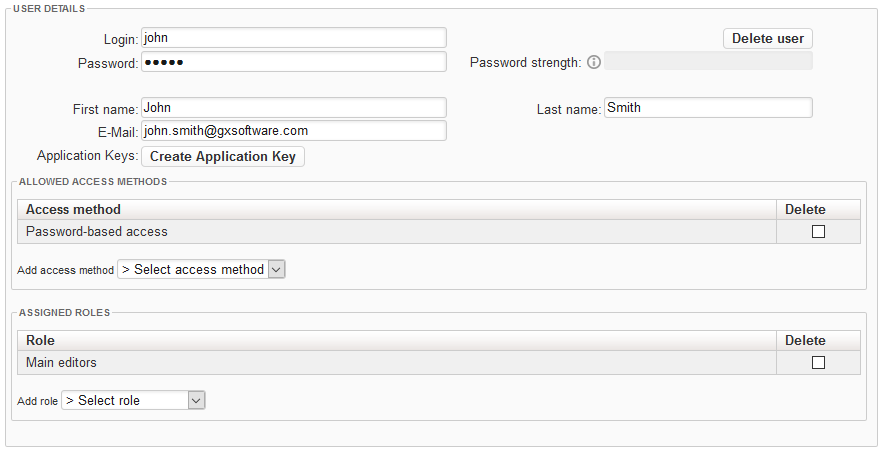
Creating a User
To create an new user:
- Navigate to Configuration > Authorization and click the [Users] tab.
- Click [Create new user]. A user called "New user" is added to the list.
- Enter the login name of the new user in the "Login" field. This is the name that will appear in the upper right corner of the Workspace for the user.
- Enter the password for the new user. For security reasons, it is highly recommended that you create a strong password. A strong password has all of the following characteristics:
- Is at least 8 characters long.
- Is significantly different than the previous passwords used by this user.
- Contains a mix of uppercase and lowercase letters.
- No string of letters spells out a word that appears in the dictionary of the language of the user.
- Contains one or more numbers, but the numbers do not represent anything associated with the user such as their birthdate, age, house address, and so forth.
- Contains one or more special characters. A special character is anything that is not a letter or a number or a space.
- Does not contain any string of letters that spell the user's first or last name, their company name, their job description, their nickname, or any other word that could be associated with them personally.
When you type the new password into the field, the "Password Strength" field indicates the strength of their password using different colors. The following colors are used to indicate the password's strength:- Red — The password is extremely weak (not accepted).
- Yellow — The password is moderately weak (not accepted).
- Blue — The password is good.
Green — The password is strong.
Note For security reasons, if you create/modify a user's password, the first time that they log in to XperienCentral after the modification, they must change their password. The only exception to this rule is when you change your own password.
- Enter the new user's first name in the "First Name" field.
- Enter the new user's last name in the "Last Name" field.
- Enter the new user's e-mail address in the "E-Mail Address" field, Note: This field is extremely important if you use two factor authentication.
- Select the method(s) that the user is allowed to use to log in to XperienCentral. The options are:
Password-based access — The user may log in from the XperienCentral login screen.
Application key-based access — The user may log in via the XperienCentral REST API. This is mainly used for external applications that want to access XperienCentral content. The application key is associated with a single user and it determines what permissions the external application has. When an application key is generated for the current user, this option wil be automatically added to the list of access options.
Container-based access — The user many log in from a backend container-based application.
System user — The user is a system user. See "System User Role" below.Note This option is only available if the option
enable_backend_container_filterin the "website_settings" section of the General tab of the XperienCentral Setup Tool is selected. - Select one or more roles for the user. For example:
- Click [Apply].
| Anchor | ||||
|---|---|---|---|---|
|
| Panel | ||||
|---|---|---|---|---|
| ||||
The ability to define system users was introduced in XperienCentral R28. |
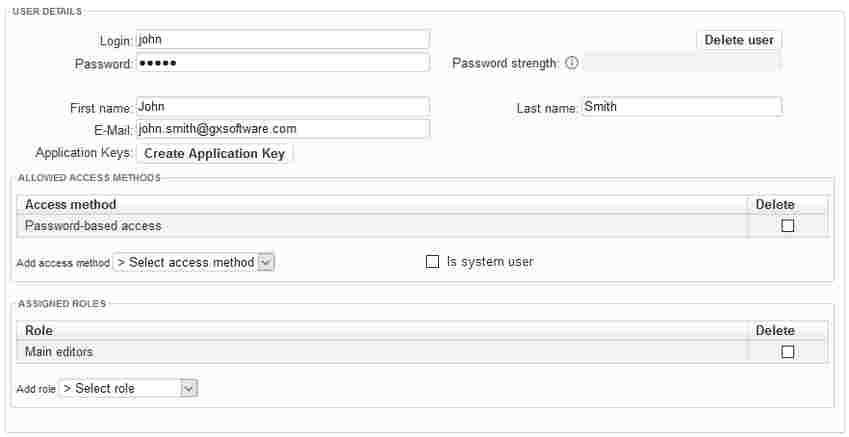
In XperienCentral, a special designation of system user is required for automating the content item Import/Export functionality. Import/Export automation executes import/export jobs on a scheduled basis and requires access to XperienCentral at the system user level. To designate a user a system user, select "Is system user":
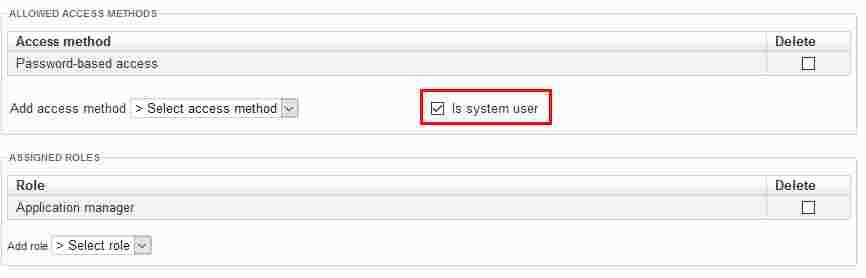
All users designated a system user can be selected from the user drop-down lists in the Import/Export configuration. The rest of the configuration for the system user is the same as for a normal user. In general, a system user account is not meant to be used for purposes other than executing the import/export jobs. GX recommends that you give system users the role of Application Manager and that you use an application key if possible. See Import/Export Configuration.
Modifying a User
To modify a user's details, follow the steps below. You cannot modify a user's details when they are in an inactive state.
- Select the desired user by navigating to Configuration > Authorization and then click the [Users] tab.
Modify the user's details.
Click [Apply].
| Note |
|---|
For security reasons, if you modify a user's password, the first time that they log in to XperienCentral after the modification, they must change their password. The only exception to this rule is when you change your own password. |
| Anchor | ||||
|---|---|---|---|---|
|
In order to have access to XperienCentral, every user must have at least one role. You can assign users and roles to one another in two ways:
- From the role point of view, see Assigning a User to a Role.
- From the user point of view.
To assign a role to a user:
- Select the desired user by navigating to Configuration > Authorization and then click the [Users] tab.
- Select the desired role from the "Add role" drop-down list. The role is added to the list.
| Anchor | ||||
|---|---|---|---|---|
|
You can separate roles and users from one another in two ways:
- From the role point of view, see Removing a User from a Role.
- From the user point of view.
To remove a role from a user:
- Display the desired user by navigating to Configuration > Authorization and then clicking the [Users] tab.
- In the "Assigned roles" list, select the "Delete" checkbox of the role that is to be removed.
- Click [Apply]. The role is removed from the list.
| Anchor | ||||
|---|---|---|---|---|
|
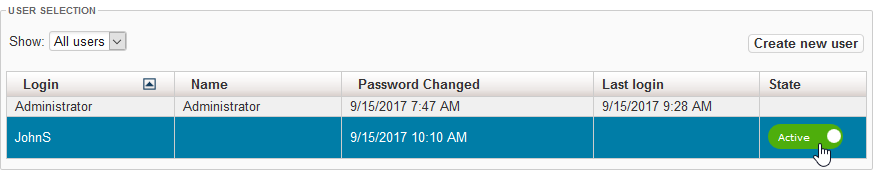
Users in XperienCentral have a state which is either "active" or "inactive". Active users are able to log in and work in XperienCentral. Inactive users are not allowed to log in to XperienCentral. When an inactive user tries to log in, they will receive an error message which states that their username and/or password are invalid. Beginning in XperienCentral version 10.18, users can no longer be deleted from XperienCentral but only made inactive. To change the state of a user, click the "Active" or "Inactive" button in the "State" column next to the user's name. For example:
The state will change to the opposite of what it currently is. When you change a user from the inactive state to the active state, they will once again be allowed to log in to XperienCentral. The last password that they used is their valid password.
| Note |
|---|
|
Importing Users from Other Websites
To allow users of another website (channel) to access to the current website, their user data can be imported. Imported users maintain the same user name and password. Different websites, however, can have different permissions assigned to their roles.
To import users:
- Navigate to Configuration > Authorization and then click the [Import] tab.
- Select the website to import users from
- Check the users to be imported to your current site and click [Apply].
| Anchor | ||||
|---|---|---|---|---|
|
An external application can log in to XperienCentral via the REST API. This makes it possible for external applications to access XperienCentral content. In order to be able to do so, you have to generate an application key for a user.
An application key is tied to a user, which means that the application key used by an external application inherits the role and permissions from the user for whom the application key is generated. For this reason, be sure that you generate an application key with sufficient permission(s) in order for the external application to be able to perform the task(s) for which it is designed. When performing REST calls, the application key should be placed in the custom X-GX-AppKey HTTP header.
To generate an application key for a user, follow these steps:
- Select the user for whom you want to generate an application key from the list.
- Click [Create Application Key] next to the "Application Keys" field. The application key is generated:
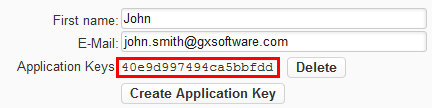
- Highlight the application key and copy it to the application that will access content within XperienCentral. Place the application key in the custom
X-GX-AppKey HTTPheader.
| Expand | |||||||||||||||||||||||||||||||||||||||||||||||||||||||||||||||||||||||
|---|---|---|---|---|---|---|---|---|---|---|---|---|---|---|---|---|---|---|---|---|---|---|---|---|---|---|---|---|---|---|---|---|---|---|---|---|---|---|---|---|---|---|---|---|---|---|---|---|---|---|---|---|---|---|---|---|---|---|---|---|---|---|---|---|---|---|---|---|---|---|---|
| |||||||||||||||||||||||||||||||||||||||||||||||||||||||||||||||||||||||
In This Topic
ComponentsThe authorizations within XperienCentral are divided into two types:
In the Workspace environment, authorization management has been further divided into the following components:
Another related functionality is Workflow. Workflows control the allowed transition from one state to another for content items before they are allowed to be published on the web. The website administrator defines these states and configures their behavior. The states are then linked to user roles, which gives actual shape to the workflow. This XperienCentral functionality is based on the standards defined by the Workflow Management Coalition (WfMC). Role Based Access Control (RBAC)Many RBAC models exist, but XperienCentral uses the Core RBAC and Hierarchical RBAC models. These models conform to the standard RBAC specification developed by ANSI/INCITS. Roles and permissionsRole Based Access Control (RBAC) avoids the need to assign permissions to each user individually. Instead, permissions are assigned to roles. A role is a functional or organizational job description in which users sharing the same role share the same tasks. These roles then are assigned to users. The permissions of a role determine which operations a user may perform. RBAC is considerably less labor intensive than assigning permissions to each user individually. A user may have more than one role. An example of a permission is "Edit pages", which grants the permission to modify a page.
In the example above:
XperienCentral comes with a default set of roles and permissions Permission groupsNevertheless, defining proper permissions for each role may be a quite laborious operation. For this reason permission groups are introduced. A permission group is a default set of permissions which can be assigned to a role at once. A permission group assigned to a role will implicitly assign all permissions contained by that permission group to that role.
XperienCentral comes with a standard set of permission groups, see Default Authorizations for more information. Permission inheritancePermissions can be assigned in two ways: directly and by means of permission groups. To make things even more flexible, a third way has been introduced: permission inheritance. With permission inheritance, a role has assigned another role to it from which it inherits all permissions which means a child role gets all permissions from its parent role, irrespective of how these permissions have been assigned to the parent role.
XperienCentral comes with a standard set of roles that inherit from each other, see Default Authorizations for more information.
XperienCentral comes standard with the users, roles and permission groups listed below.
Developers are treated differently than all other users. Unlike all other users, developers are able to:
Basic set of permission groups by categoryXperienCentral comes with five standard permission groups. In the "Roles" tab of the Authorization anel you can see which permissions each role has or can be assigned. Maintaining RolesSelecting and Viewing a RoleTo select and view a role:
|
| Anchor | ||||
|---|---|---|---|---|
|
A role may have one or more users and a user may have one or more roles. You can assign users and roles to one another in two ways:
- From the user point of view, see Assigning a Role to a User.
- From the role point of view.
To assign a user to a role:
- Select the desired role from the [Roles] - [Details] tab.
- Select the desired user from the "Add user" drop-down list. The user is added to the list.
| Anchor | ||||
|---|---|---|---|---|
|
You can also separate users and roles from one another in two ways:
- From the user point of view, see Removing a Role from a User.
- From the role point of view.
To remove a user from a role:
- Select the desired role from the [Roles] - [Details] tab.
- In the list "Users assigned to this role", select the "Delete" checkbox next to the user to be removed.
- Click [Apply]. The user is removed from the list.
Assigning Permissions to a Role
The actual permissions a role gets is determined by the following:
- The permissions it inherits from another selected role.
- The permissions it gets from the assigned permission groups.
- The permissions that have been added directly to the role.
Inherited permissions and group permissions may overlap one another.
To assign permissions to a role:
- Select the desired role from the [Roles] - [Details] tab.
- To select the role to inherit from: select a role from the "Inherits all permissions from" drop-down list.
- To add a permission group, select a permission from the "Add permission group" drop-down list. The permission group is added on top of the drop-down box.
- To assign a permission directly: select the [Permissions] tab and select the desired permission(s).
- Click [Apply].
Removing Permissions from a Role
To remove permissions from a role:
- Select the desired role from the [Roles] - [Details] tab.
- To remove all inherited permissions, : select "Select a role" from the "Inherits all permissions from" drop-down list.
- To remove a permission group: in the list "Permission groups" section, select the "Delete" checkbox next to the permission group you want to remove. A pop-up message prompts you to copy the group permissions to the role directly. When you click [OK] the selected permission group is unassigned from the current role and all permissions from the unassigned group are assigned directly to the current role. If you click [Cancel] the permission group is unassigned from the current role and the role loses all permissions from the unassigned group.
- To remove directly-added permissions: select the [Permissions] tab and clear the permissions to be removed.
- Click [Apply].
Deleting a Role
To delete a role:
- Select the role to be deleted from the [Roles] - [Details] tab.
- Click [Delete role]. The role is removed from the "Select a role" drop-down list.
Finding a User and Viewing their Permission(s)
To find and view a user:
- Navigate to Configuration > Authorization and click the [Users] tab.
- To show a list of users:
- Click "All users" to see the full list.
- Click on a letter range to get a partial list of login names.
- Click on the arrow in the "Login" column to toggle between alphabetical sorting in ascending (A-Z) and descending (Z-A) order.
- To view the details for a user: click on the desired user in the list. The user details appear below the user.
Maintaining Users
Creating a User
To create an new user:
- Navigate to Configuration > Authorization and click the [Users] tab.
- Click [Create new user]. A user called "New user" is added to the list.
- Enter the login name of the new user in the "Login" field. This is the name that will appear in the upper right corner of the Workspace for the user.
- Enter the password for the new user. For security reasons, it is highly recommended that you create a strong password. A strong password has all of the following characteristics:
- Is at least 8 characters long.
- Is significantly different than the previous passwords used by this user.
- Contains a mix of uppercase and lowercase letters.
- No string of letters spells out a word that appears in the dictionary of the language of the user.
- Contains one or more numbers, but the numbers do not represent anything associated with the user such as their birthdate, age, house address, and so forth.
- Contains one or more special characters. A special character is anything that is not a letter or a number or a space.
- Does not contain any string of letters that spell the user's first or last name, their company name, their job description, their nickname, or any other word that could be associated with them personally.
When you type the new password into the field, the "Password Strength" field indicates the strength of their password using different colors. The following colors are used to indicate the password's strength:- Red — The password is extremely weak.
- Yellow — The password is moderately weak.
- Blue — The password is good.
Green — The password is strong.
Note For security reasons, if you create/modify a user's password, the first time that they log in to XperienCentral after the modification, they must change their password. The only exception to this rule is when you change your own password.
- Enter the new user's first name in the "First Name" field.
- Enter the new user's last name in the "Last Name" field.
- Enter the new user's e-mail address in the "E-Mail Address" field,
- Select the method(s) that the user is allowed to use to log in to XperienCentral. The options are:
- Password-based access — The user may log in from the XperienCentral login screen.
- Application key-based access — The user may log in via the XperienCentral REST API. This is mainly used for external applications that want to access XperienCentral content. The application key is associated with a single user and it determines what permissions the external application has. When an application key is generated for the current user, this option wil be automatically added to the list of access options.
Container-based access — The user many log in from a backend container-based application.
Note This option is only available if the option
enable_backend_container_filterin the "website_settings" section of the General tab of the XperienCentral Setup Tool is selected.- Select one or more roles for the user. For example:
- Click [Apply].
Modifying a User
To modify a user's details, follow these steps:
- Select the desired user by navigating to Configuration > Authorization and then click the [Users] tab.
- Modify the user's details.
- Click [Apply].
| Note |
|---|
For security reasons, if you modify a user's password, the first time that they log in to XperienCentral after the modification, they must change their password. The only exception to this rule is when you change your own password. |
| Anchor | ||||
|---|---|---|---|---|
|
In order to have access to XperienCentral, every user must have at least one role. You can assign users and roles to one another in two ways:
- From the role point of view, see Assigning a User to a Role.
- From the user point of view.
To assign a role to a user:
- Select the desired user by navigating to Configuration > Authorization and then click the [Users] tab.
- Select the desired role from the "Add role" drop-down list. The role is added to the list.
| Anchor | ||||
|---|---|---|---|---|
|
You can separate roles and users from one another in two ways:
- From the role point of view, see Removing a User from a Role.
- From the user point of view.
To remove a role from a user:
- Display the desired user by navigating to Configuration > Authorization and then clicking the [Users] tab.
- In the "Assigned roles" list, select the "Delete" checkbox of the role that is to be removed.
- Click [Apply]. The role is removed from the list.
Deleting a User
To delete a user:
- View the user that is to be deleted by navigating to Configuration > Authorization and then clicking the [Users] tab.
- Do one of the following:
- In the list of users, select the "Delete" checkbox next to the user that is to be removed. Click [Apply].
- In the "User details" section, click [Delete user].
Importing Users from Other Websites
To allow users of another website (channel) to access to this website, their user data can be imported. Imported users maintain the same user name and password. Different websites, however, can have different permissions assigned to their roles.
To import users:
- Navigate to Configuration > Authorization and then click the [Import] tab.
- Select the website to import users from
- Check the users to be imported to your current site and click [Apply].
Generating an Application Key for a User
An external application can log in to XperienCentral via the REST API. This makes it possible for external applications to access XperienCentral content. In order to be able to do so, you have to generate an application key for a user.
An application key is tied to a user, which means that the application key used by an external application inherits the role and permissions from the user for whom the application key is generated. For this reason, be sure that you generate an application key with sufficient permission(s) in order for the external application to be able to perform the task(s) for which it is designed. When performing REST calls, the application key should be placed in the custom X-GX-AppKey HTTP header.
To generate an application key for a user, follow these steps:
- Select the user for whom you want to generate an application key from the list.
- Click [Create Application Key] next to the "Application Keys" field. The application key is generated:
- Highlight the application key and copy it to the application that will access content within XperienCentral. Place the application key in the custom
X-GX-AppKey HTTPheader.