In a standard setup, the XperienCentral application is installed on a single node. It is also possible to install XperienCentral on more than one node in order to create a distributed XperienCentral environment. The principle reasons for creating a clustered XperienCentral environment are:
- Performance: The capacity of the node which generates pages for visitors of the website and that is used by the editors is insufficient to handle the generated loads.
- Security: For security reasons, the XperienCentral backend node is installed on a different node than the ones that generate pages for the website visitors on the frontend.
- Failover: To prevent the website from becoming unavailable when one node goes offline, multiple nodes can be configured to ensure that the website remains available.
This topic describes how to set up a distributed XperienCentral environment. Distributed XperienCentral deployments can consist of a read/write node and one or more read-only nodes or two read/write nodes and one or more read-only nodess. An example of a clustered XperienCentral deployment is shown below:

In the above illustration, all the XperienCentral installations are identical except that the read/write node(s) have read and write permissions to the index and the read-only nodes have just read access to the index The dashed arrow between the load balancer and the read/write node(s) represents the choice of using the read/write node(s) only for the backend environment and/or also being used to generate pages for the frontend.
A distributed XperienCentral deployment can contain two read/write nodes, both of which have write access to the index and which contain local files for the website, as well as several read-only nodes. In order to keep all the files on the nodes synchronized with each other, a file store mechanism (the File Distribution Service) is used. The File Distribution Service manages a central store for all files contained in the web roots of the websites in the clustered environment and monitors the creation/deletion of files on a read/write node and then distributes or deletes the file on all the other nodes.
This topic describes how to configure the XperienCentral nodes in order to create a clustered environment.
In This Topic
OS Level requirements
Installation privilege requirements
Note that in order to install XperienCentral properly, root level privileges are required one the machines where XperienCentral itself is installed on.
User / process separation
It is common practice and advised to make use of separate users/groups for both Apache httpd and Apache Tomcat or JBoss, which ever Java J2SE Servlet engine is used.
This is required so that:
- Access to the Apache httpd Doc root does not directly translate to all Apache Tomcat Web Application files.
- CIS Bench marking can be done, minimizing access on each separate infrastructure component
- A clean SELinux policy can be defined for each process.
Distributed XperienCentral Setup in a Nutshell
The installation of XperienCentral on a node in a distributed setup is the same as installing XperienCentral in a non-distributed setup except for the following differences:
- Database configuration
- Write access to the index
- The sharing of static content
- If you use the File Distribution Service to synchronize files between all the nodes in the cluster, set the maximum allowable file size in the Setup Tool.
To set up a clustered environment, follow these steps:
- Set up the read/write node in the cluster just like in a standalone setup.
- Modify clustering properties in the
settings.xmlfile in order to define the cluster. - Set up the synchronization of static files between the read/write and read-only nodes.
- The setup of each subsequent node is identical to setting up the (first) read/write node, except:
- The database is already in place: actions related to creating the database do not need to be performed.
- You need to assign each node in the cluster a unique identifier and set the read/write properties in the
settings.xmlfile or - Add two Tomcat startup parameters to identify each node in the cluster (cluster ID) and to set the read/write properties.
- Check the firewall settings.
- Start all the nodes in the cluster.
Configure the settings.xml Files
There are three settings that need to be changed/checked in the settings.xml file on each node in the clustered setup:
<activeProfiles><webmanager.clustering.id><webmanager.clustering.readonly>
Clustering-specific Settings for the Read/Write Node
In the settings.xml of the read/write node change/check the following properties:
- The
<activeProfiles>database parameter must be changed fromstandalonetoclustered, for example,<activeProfile>jcr-clustered-mssql</activeProfile>
instead of<activeProfile>jcr-standalone-mssql</activeProfile>.
for an MSSQL database. The same applies to MySQL and Oracle ― changestandalonetoclustered(jcr-clustered-mysqlandjcr-clustered-oracle). - Check the
webmanager.cluster.syncDelayparameter (should be set to 500 miliseconds). - Set the clustering ID of the node. Choose a unique identifier for each node in the cluster. It is good standard practice to use the node’s hostname as the clustering ID. For example:
<webmanager.clustering.id>edit01</webmanager.clustering.id> - Be sure the read-only setting is set to
false― This is the default setting, but check it anyway. For example:
<webmanager.clustering.readonly>false</webmanager.clustering.readonly>
Complete the configuration of the node just like a standalone XperienCentral node by issuing the following command from a Command prompt:
mvn –s settings.xml –P configure-jcr-repository
Clustering-specific Settings for all Nodes
Once the read/write node is running properly, use the settings.xml of the read/write node for the other read/write node (if you have a dual read/write node environment) as well as for the read-only node(s). Two properties in the settings.xml of the read/write node have to be changed for the other read/write node (if you are setting up a dual read/write node cluster) as well as for the read-only node(s):
- The
clustering.idwhich defines the clustering ID of each node. Choose a unique ID for each node. It is good standard practice to use the node’s hostname as the clustering ID. For example:<webmanager.clustering.id>www01</webmanager.clustering.id> - Check the
webmanager.cluster.syncDelayparameter (should be set to 500 miliseconds).
For a dual read/write node configuration, set the
clustering.filestoresetting totrueon all nodes.If you use a central storage location for the static content of your website and log files set this to
false.
No Central Storage Location Used<webmanager.clustering.filestore>true</webmanager.clustering.filestore>
Central Storage Location Used<webmanager.clustering.filestore>false</webmanager.clustering.filestore>
Finish the configuration of the node just like a standalone XperienCentral node by issuing the following command from a Command prompt:
mvn –s settings.xml –P configure-jcr-repository
Make Static Content Available to all Nodes
When an editor places an image on a page within XperienCentral, this image will initially be only available on the read/write node on which it was placed. Through the use of a file store mechanism (the File Distribution Service), XperienCentral synchronizes static content between all the nodes in the cluster.
If your clustered XperienCentral environment contains more than one read/write node, you must use the File Distribution Service.
In a single read/write node configuration, if you do not use the XperienCentral File Distribution Service to synchronize static content between all nodes in the cluster, some sort of mechanism must be configured in order to make the static content (such as images) available to all nodes in the cluster. Using Robocopy, Rsync or another file synchronization tool, you must synchronize the following directory between the single read/write and read-only nodes in the cluster:
vol/www/mywebsite/configuration/
Check/Modify the Tomcat Parameters
If you are using JBoss, skip this section.
The servlet container on every node needs to know whether it should start up as a read/write or read-only node. This can be defined in the Java runtime options of Tomcat. To change the startup parameters of Tomcat, click the Monitor Tomcat icon in the system tray. After activating the Monitor, a pop-up appears. Switch to the [Java] tab.
Check the line on the webmanager.clustering.readonly property.
For a read/write node set this to:
–Dwebmanager.clustering.readonly=false
For a read-only node set this to:
–Dwebmanager.clustering.readonly=true
Assign a unique clustering ID to each node in the cluster:
–Dwebmanager.clustering.id=x
where x is the clustering identifier for the machine.
If you want to use the XperienCentral File Distribution Service in a single read/write node configuration, add the following line to the XperienCentral-specific Tomcat parameters:
-Dwebmanager.clustering.filestore=true
Check/Modify the JBoss Parameters
If you are using Tomcat, skip this section.
To change the startup properties of JBoss, open the file /vol/www/jboss-mywebsite/bin/standalone.conf. Check the JAVA_OPTS line setting the webmanager.clustering.readonly property. For a read/write node set this to:
–Dwebmanager.clustering.readonly=false
For a read-only node set this to:
–Dwebmanager.clustering.readonly=true
Assign a unique clustering ID to each node in the cluster:
–Dwebmanager.clustering.id=x
where x is the clustering identifier for the machine.
If you want to use the XperienCentral File Distribution Service in a single read/write node configuration, add the following line to the XperienCentral-specific Tomcat parameters:
-Dwebmanager.clustering.filestore=true
Check the Database and Memory Settings in an Environment that Uses the File Distribution Service
The XperienCentral File Distribution Service synchronizes files between the nodes in the cluster and cleans up files that have been deleted. The File Distribution Service uses the Jackrabbit DataStore supported by your relational database. For this reason you must ensure that your database is able to store a binary large object (BLOB) larger than or equal to the size of the largest file that exists or can exist in the web root. Check the following settings for the supported databases:
MySQL
The setting max_allowed_packet should be set to a value higher than the largest file that exists or can exist in the web root directory. Additionally, the XperienCentral node and the MySQL node must be able to handle the largest file on the file system. Because MySQL stores the complete file in memory, you could encounter out of memory errors if this setting is set too low. For more information, see the MySQL documentation for the max_allowed_packet property.
MSSQL
For MSSQL versions 2008 10.0.5 and higher, the maximum file size that has been successfully tested is up to and including 2 GB. For more information, contact your GX consultant.
Oracle
The maximum file size that has been successfully tested is up to and including 4 GB. For more information, contact your GX consultant.
Set the File Distribution Service Maximum File Size
If you use the XperienCentral File Distribution Service to synchronize files between the nodes in a clustered environment, check and/or modify the maximum allowed file size in the Setup Tool. By default, the maximum allowed file size is 100 MB. File sizes larger than 100 MB are not officially supported. Follow these steps:
- Log in to the XperienCentral Setup Tool.
- Click [General].
- Locate the section
file_distribution (default):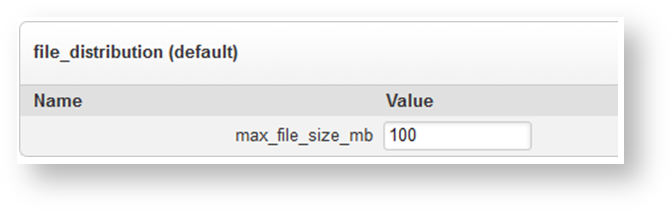
If you want to change the default maximum allowed file size, enter a new value in the “Value” field (in MB).
Scroll down to the bottom of the page and click [Save Changes].
Synchronizing Uncontrolled Files
Uncontrolled files are files created by custom plugins. In order for these files to be distributed to all nodes in the cluster, you must add a Tomcat parameter to catalina.sh or add a setting to the settings.xml file to enable the synchronization of uncontrolled files.
GX Software recommends that you do not create uncontrolled files in a clustered environment. If you do create uncontrolled files in a clustered environment, it is best to store them in then index. To enable the synchronization of uncontrolled files, add the following to your catalina.sh file:
-Dwebmanager.clustering.scanner.interval=x
where x is the number of milliseconds between scans. Or, to enable the synchronization of uncontrolled files in the settings.xml file, add the following line to the clustering properties section:
<webmanager.clustering.scanner.interval>x</webmanager.clustering.scanner.interval>
where x is the number of milliseconds between scans. The default value is 60000 ms (60 seconds). A value that is too high will cause a delay between the synchronization of the files. A value that is too low can cause performance issues when the number of files and/or the file sizes are large.
Check the Firewall Settings
In many configurations, firewalls are placed between the nodes. Below is an overview of the connections necessary in order to ensure the proper functioning of XperienCentral in a clustered environment:
| From | To | Protocol | Description |
|---|---|---|---|
read/write + read-only(s) | database | DB protocol | The connection from the read/write node(s) and read-only modes to the database server for performing queries. |
read/write node | read-only node | XperienCentral File Distribution Service or file synchronization mechanism such as Robocopy or RsyncS | To synchronize files between all nodes in the clustered environment. |
Internet | read-only node | HTTP(S) | To handle page requests from the frontend. |
Intranet + VPN | read/write node | HTTP(S) | To access the read/write (editor’s) node(s). |
Check the Cluster Lock Mechanism Setting
In a cluster of multiple read/write nodes, each read/write node has a lock on a particular task in order to prevent multiple nodes from interfering with each other, for example each modifying the same index entry at the same time. Each read/write node regularly updates a special lock timestamp in the database related to the tasks it is currently performing. When a read/write node detects a lock on a task it wants to perform, it compares the lock timestamp with the current time in order to determine whether it is “stale”. If the timestamp is stale, the read/write node then waits for a set amount of time and then rechecks the lock timestamp. If the timestamp is still stale, the read/write node removes the lock from the task at which time another read/write node can put a lock on the task.
To define the time interval for the timestamp check, navigate to the Setup Tool and locate the setting stale_cluster_lock_retry_time on the “General" tab. The default time interval is 60 seconds. Modify the time interval to suit the conditions of your clustered deployment. In general, the time setting should be higher than the longest time that your database is normally unavailable. GX Software recommends a time interval between 30 and 60 seconds. The default is 60 seconds. For example:

Start All Nodes in the Cluster (Dual Read/Write Node Configuration)
Start XperienCentral on one of the read/write nodes. XperienCentral is completely started when the following messages appears in the Tomcat log:
[date] [time] nl.gx.webmanager.startup.impl.Startup start
INFO: XperienCentral started successfully in x ms
After the first read/write node is started, it will begin the one time only process of uploading the files in the upload and upload_mm directories to the file store. Depending on the number of files and/or the size of the files on your website, this process could take some time.
It is not possible to start the other read/write node until this process is completed. After the file store has been populated with all files in the upload and upload_mm directories, the following message will appear in the log:INFO: Finished scanning the web roots for files for the File Distribution Service
It is now possible to start the second read/write node.
When the second read/write node starts, it will begin the process of synchronizing files from the central store. Until that process is complete, it will not be available. Once the synchronization is complete, start the read-only node(s).
Start All Nodes in the Cluster (Single Read/Write Node Configuration)
Check the timestamps of all files in the .WAR binary on all nodes. The timestamps of all .JAR files must be exactly the same on all the nodes. Start XperienCentral on the read/write node.
Be sure to wait until XperienCentral has completely started on the read/write node before starting the read-only nodes. XperienCentral is completely started when the following messages appears in the Tomcat log:
[date] [time] nl.gx.webmanager.startup.impl.Startup start
INFO: XperienCentral started successfully in x ms
If you are using the XperienCentral File Distribution Service to synchronize files between the nodes, it begins the process of uploading the files in the upload and upload_mm directories to the file store. Depending on the number of files and/or the size of the files on your website, this process could take some time.
It is not possible to start the read-only node(s) until this process is completed.
After the file store has been populated with all files in the upload and upload_mm directories, the following message will appear in the log:
INFO: Finished scanning the web roots for files for the File Distribution Service
It is now possible to start the read-only node(s).
Load Balancing in a Clustered Environment
There are two ways to set up load balancing for an XperienCentral clustered environment: a hardware load balancing scheme and an Apache Tomcat server load balancing scheme. Using hardware to set up load balancing in an XperienCentral clustered environment is the most straightforward and simple option. How to do so is not described in this document. Refer to the documentation for your load balancing hardware for information on setting up load balancing.
For more information about setting up clustering/session replication in an Apache Tomcat server, see http://tomcat.apache.org/tomcat-7.0-doc/cluster-howto.html.
In the following load balancing example, there are three nodes: server.gx.com (the load balancer) and Balance Members server1.gx.com and server2.gx.com:
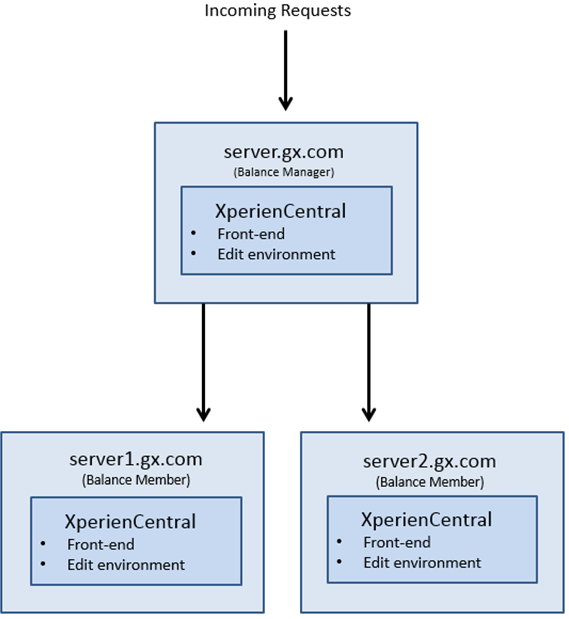
On all three nodes, an instance of XperienCentral is running that can handle both frontend and backend environment requests. All incoming requests are received by the load balancer and are routed appropriately. This scenario provides both load balancing and failover in case an active node becomes unavailable.
Configuration on server.gx.com
In the sample configuration, server.gx.com is the Balance Manager. The following configuration is created on server.gx.com.
HTTPD.conf
On server.gx.com, you must add a pointer to the configuration files of all the nodes in the cluster so that Apache is able to resolve their host names and determine their configuration. In the Apache httpd.conf file, add the following line:
Include conf.d/vhosts/*.conf
This specifies the location of the configuration files for all the virtual hosts in the cluster.
server_gx_com.conf
On server.gx.com, a configuration file is created that defines general settings such as those for logging and also defines server.gx.com as the Balance Manager:
<VirtualHost *:80>
   ServerName    server.gx.com
   ServerAdmin   webadmin@gxsoftware.com
   ErrorLog      logs/errors/gx
   CustomLog     logs/access/gx combined

   ProxyPass /balancer-manager !
   ProxyPass / balancer://mycluster/
   ProxyPassReverse / balancer://mycluster/
   ProxyPreserveHost On
Next, the Balance Members of the cluster are defined (server1.gx.com and server2.gx.com):
Header add Set-Cookie "ROUTEID=.%{BALANCER_WORKER_ROUTE}e; path=/" env=BALANCER_ROUTE_CHANGED
   <Proxy balancer://mycluster>
   BalancerMember http://server1.gx.com:80 route=1
   BalancerMember http://server2.gx.com:80 route=2
   ProxySet stickysession=ROUTEID
Next, the server-gx.edit.com server (backend) is defined and the Balance Member nodes server1-gx.edit.com and server2-gx.edit.com are similarly defined:
<VirtualHost *:80>
   ServerName      server-edit.gx.com
   ServerAdmin     webadmin@gxsoftware.com

   ProxyPass /balancer-manager !
   ProxyPass / balancer://mycluster/
   ProxyPassReverse / balancer://mycluster/
   ProxyPreserveHost On

   Header add Set-Cookie "ROUTEID=.%{BALANCER_WORKER_ROUTE}e; path=/" env=BALANCER_ROUTE_CHANGED
   <Proxy balancer://mycluster>
      BalancerMember http://server1-edit.gx.com:80 route=1
      BalancerMember http://server2-edit.gx.com:80 route=2
      ProxySet stickysession=ROUTEID
   </Proxy>
Configuration on server1.gx.com (node1)
On the Balance Member server1.gx.com, the following configuration is created.
Server.xml
The server.xml file defines the node in the context of the global resources. A service is created, in this case called WebManager that defines the XperienCentral instance on the server1.gx.com. For an example see conf/server.xml.
server1_gx_com.conf
The configuration file server1_gx_com.conf defines the URL of the frontend and backend environments running on server1.gx.com as well as other parameters for the node within the context of the cluster. To begin, the properties of the frontend are defined:
<VirtualHost *:80>
   ServerName      server.gx.com
   ServerAlias     server1.gx.com
   ServerAlias     server2.gx.com

   ServerAdmin     webadmin@gxsoftware.com
   DocumentRoot    /vol/www/gx/mywebsite
   ErrorLog        logs/errors/gx
   CustomLog       logs/access/gx combined
   <Directory "/vol/www/gx/web-docs">
      Options FollowSymLinks +includes
      AllowOverride All
      Order allow,deny
      Allow from all
   </Directory>

ProxyPass          /web/ balancer://frontend/ stickysession=JSESSIONID|jsessionid
   ProxyPassReverseCookiePath /web /

   <Proxy balancer://frontend>
      BalancerMember ajp://localhost:8009/web route=node1
      BalancerMember ajp://192.168.1.2:8009/web route=node2 status=+H
   </Proxy>

   <IfModule mod_rewrite.c>
      RewriteEngine On
      RewriteLogLevel 0

      RewriteCond %{REQUEST_URI} !^/web/
      RewriteRule ^/(.*)\.htm$ /web/$1.htm [PT,L]
   </IfModule>
</VirtualHost>
- The connector port (
BalancerMember ajp://localhost:8013/web route=node1) must match the connector port defined in theserver.xmlfile forserver1.gx.com (8013in this case). - In the following frontend declarations
BalancerMember ajp://localhost:8009/web route=node1BalancerMember ajp://192.168.1.2:8009/web route=node2 status=+H
note that/web(the XperienCentral default) is prefixed to the URL of the cluster nodes. If you prefix a string to the URL of your XperienCentral frontend, be sure the prefix strings above match it.
The same is done for the backend environment. For example:
<VirtualHost *:80>
   ServerName      server-gx.edit.com
   ServerAlias     server1-gx.edit.com
   ServerAlias     server2-gx.edit.com.com

   ServerAdmin     webadmin@gxsoftware.com
   DocumentRoot    /vol/www/gx/mywebsite
   ErrorLog        logs/errors/gx-edit
   CustomLog       logs/access/gx-edit combined
   <Directory "/vol/www/gx/web-docs">
      Options FollowSymLinks +includes
      AllowOverride All
      Order allow,deny
      Allow from all
   </Directory>

   ProxyPass                    /web balancer://backend stickysession=JSESSIONID|jsessionid
   ProxyPassReverseCookiePath  /web /

   <Proxy balancer://backend>
      BalancerMember ajp://localhost:8009/web route=node1
      BalancerMember ajp://192.168.1.2:8009/web route=node2 status=+H
   </Proxy>

   <IfModule mod_rewrite.c>
      RewriteEngine On
      RewriteLogLevel 0

      RewriteCond %{REQUEST_URI} !^/web/
      RewriteRule ^/(.*)\.htm$ /web/$1.htm [PT,L]
   </IfModule>
</VirtualHost>
- The connector port (
BalancerMemberajp://localhost:8009/web route=node1) must match the connector port defined in theserver.xmlfile forserver1.gx.com (8013in this case). - In the following backend declarations
BalancerMember ajp://localhost:8009/web route=node1BalancerMember ajp://192.168.1.2:8009/web route=node2 status=+H
note that/web(the XperienCentral default) is prefixed to the URL of the cluster nodes above. If you prefix a string to the URL of your XperienCentral backend environment, be sure the prefix strings above match it.
HTTPD.conf
On server1.gx.com, you must add a pointer to the configuration files of the nodes in the cluster so that Apache is able to resolve their host names and determine their configuration. In the Apache httpd.conf file, add the following line:
Include conf.d/vhosts/*.conf
This specifies the location of the configuration files for all the virtual hosts in the cluster.
Configuration on server2.gx.com (node2)
On the Balance Member server2.gx.com, the following configuration is created.
server.xml
The server.xml file defines the node in the context of the global resources. A service is created, in this case called WebManager, that defines the XperienCentral instance on the server2.gx.com.
server2_gx_com.conf
The configuration file server2_gx_com.conf defines the URL of the frontend and Edit environments running on server2.gx.com as well as other parameters for the server within the context of the cluster. To begin, the properties of the frontend servers are defined:
<VirtualHost *:80>
   ServerName        server.gx.com
   ServerAlias       server1.gx.com
   ServerAlias       server2.gx.com

   ServerAdmin          webadmin@email.com
   DocumentRoot         /vol/www/gx/web-docs
   ErrorLog             logs/errors/gx
   CustomLog            logs/access/gx combined
   <Directory "/vol/www/gx/web-docs">
      Options FollowSymLinks +includes
      AllowOverride All
      Order allow,deny
      Allow from all
   </Directory>

ProxyPass        /web/ balancer://frontend/ stickysession=JSESSIONID|jsessionid
   ProxyPassReverseCookiePath /web /

   <Proxy balancer://frontend>
      BalancerMember ajp://localhost:8013/web route=node1
      BalancerMember ajp://192.168.1.1:8009/web route=node2 status=+H
   </Proxy>

   <IfModule mod_rewrite.c>
      RewriteEngine On
      RewriteLogLevel 0

      RewriteCond %{REQUEST_URI} !^/web/
      RewriteRule ^/(.*)\.htm$ /web/$1.htm [PT,L]
   </IfModule>
</VirtualHost>
- The connector port (
BalancerMember ajp://localhost:8013/web route=node2) must match the connector port defined in theserver.xmlfile forserver2.gx.com(8013in this case). - In the following frontend declarations:
BalancerMember ajp://localhost:8009/web route=node1BalancerMember ajp://192.168.1.1:8009/web route=node2 status=+H
note that/web(the XperienCentral default) is prefixed to the URL of the cluster nodes above. If you prefix a string to the URL of your XperienCentral frontend, be sure the prefix strings above match it.
The same is done for the backend environment. For example:
<VirtualHost *:80>
   ServerName        server-gx.edit.com
   ServerAlias       server1-gx.edit.com
   ServerAlias       server2-gx.edit.com

   ServerAdmin       webadmin@email.com
   DocumentRoot      /vol/www/gx/web-docs
   ErrorLog          logs/errors/gx-edit
   CustomLog         logs/access/gx-edit combined
   CustomLog         logs/access/gx-edit-proxy proxy
   <Directory "/vol/www/gx/web-docs">
      Options FollowSymLinks +includes
      AllowOverride All
      Order allow,deny
      Allow from all
   </Directory>

   ProxyPass /web balancer://backend stickysession=JSESSIONID|jsessionid
   ProxyPassReverseCookiePath /web /

   <Proxy balancer://backend>
      BalancerMember ajp://localhost:8009/web route=node1
      BalancerMember ajp://192.168.1.1:8009/web route=node2 status=+H
   </Proxy>

   <IfModule mod_rewrite.c>
      RewriteEngine On
      RewriteLogLevel 0

      RewriteCond %{REQUEST_URI} !^/web/
      RewriteRule ^/(.*)\.htm$ /web/$1.htm [PT,L]
   </IfModule>
</VirtualHost>
- The connector port (
BalancerMember ajp://localhost:8009/web route=node2) must match the connector port defined in theserver.xmlfile forserver2.gx.com (8009in this case). - In the following backend declarations
BalancerMember ajp://localhost:8009/web route=node1BalancerMember ajp://192.168.1.1:8009/web route=node2 status=+Hnote
note that/web(the XperienCentral default) is prefixed to the URL of the cluster nodes above. If you prefix a string to the URL of your XperienCentral Edit environment, be sure the prefix strings above match it.
HTTPD.conf
On server2.gx.com, you must add a pointer to the configuration files of the nodes in the cluster so that Apache is able to resolve their host names and determine their configuration. In the Apache httpd.conf file, add the following line:
Include conf.d/vhosts/*.conf
This specifies the location of the configuration files for all the virtual hosts in the cluster.