The content import/export functionality was introduced in XperienCentral version R25.
In This Topic
The exporting and importing of content in XperienCentral makes it possible to exchange content between channels. The following content can be exported/imported:
- Pages (XperienCentral R26 and higher)
- Page sections (XperienCentral R26 and higher)
- Articles (XperienCentral R25 and higher)
- Images (XperienCentral R25 and higher)
- Layouts (XperienCentral R30 and higher)
- Downloads (XperienCentral R25 and higher)
- Modular Content (R28 and higher)
- Modular Content elements (R28 and higher)
The following features of content can be exported/imported:
- Links
- A subset of content elements (see the list below for those that are not supported)
- Personalizations — if the exact same personalization definition exists in the channel into which you are importing, then the personalization will be imported and applied to the same content/content element. If not, the content will still be imported but the personalization(s) will be lost.
- Interactive Form element — if the Interactive Form that the element refers to has also been imported, then the Interactive Form element will be imported intact. If the Interactive Form has not been imported, then the imported Interactive Form element will be empty.
- Tags — if a tag does not exist in the channel into which you are importing, you have the option of creating it.
- Thesaurus relations between tags — Beginning in XperienCentral version R41, thesaurus relations between tags are maintained during the export/import process.
- Presentation variants — if a presentation variant does not exist in the channel into which you are importing, you have the option of creating it.
- Modular page metadata (R29.1 and higher)
The following content types/content elements/features can not be exported/imported:
- Custom content types
- Modular Content (R27 and lower)
- Modular Content elements (R27 and lower)
- Custom content elements
- Discussion content elements
- Application content elements
- Image Map content elements
- Anchor content elements
- Thesaurus relations between tags (XperienCentral versions R40 and lower)
Exporting and importing Interactive Forms is performed in a separate process. See Importing and Exporting Forms for complete information.
Exporting Content
To export content, follow the steps below. If you want to export Modular Content, see Exporting Modular Content.
- Navigate to Advanced Search.
- Using facet(s), search for the content types you want to export.
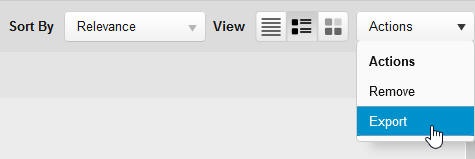
- When the content item(s) you want to export appear in the search results, click [Actions] to access Bulk Actions.
- Select "Export":
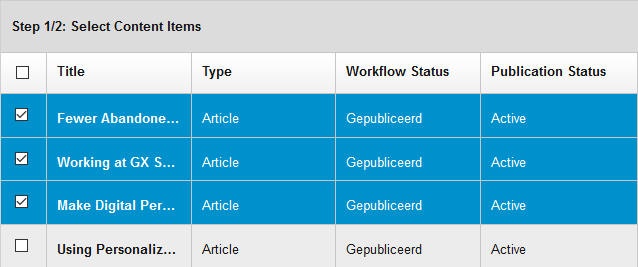
The Export Wizard runs. - In Step 1, select the content items to export by clicking the checkbox to the left of the title of the content item. For example:
To select all content items in the search results, click the checkbox to the left of the Title column: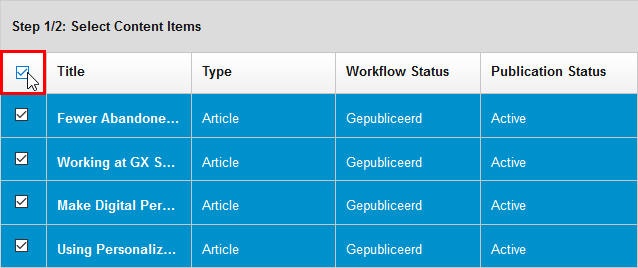
- Click [Next] to proceed to step 2 of the Export Wizard.
- The number of content items that will be exported is shown.
- Click [Confirm] to export the content items. The content items are exported to a .zip file.
- Click [Download the export file] to download the export package. Select "Save" and then click [OK]. The export package will be saved to the designated "Download" folder configured for the browser you are using.
Exporting Modular Content
To export modular content, follow these steps:
- Open the Modular Content panel (Configuration > Modular Content).
- Click [Export] in the upper right-hand part of the panel.
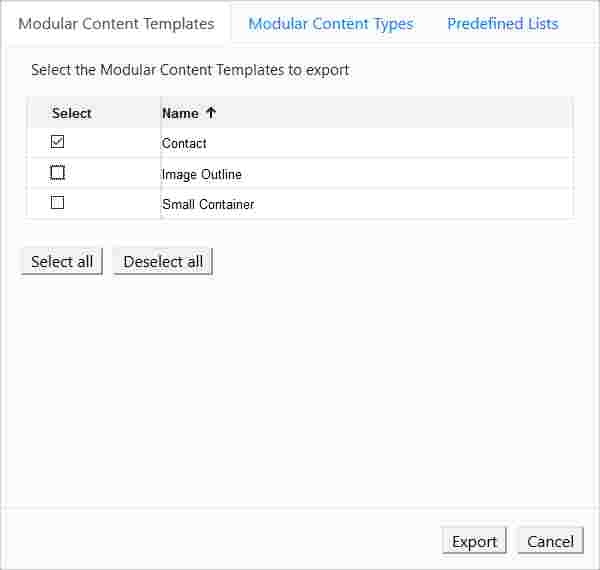
- On the Modular Content Templates tab, select the templates you want to export by clicking the check box under "Select":
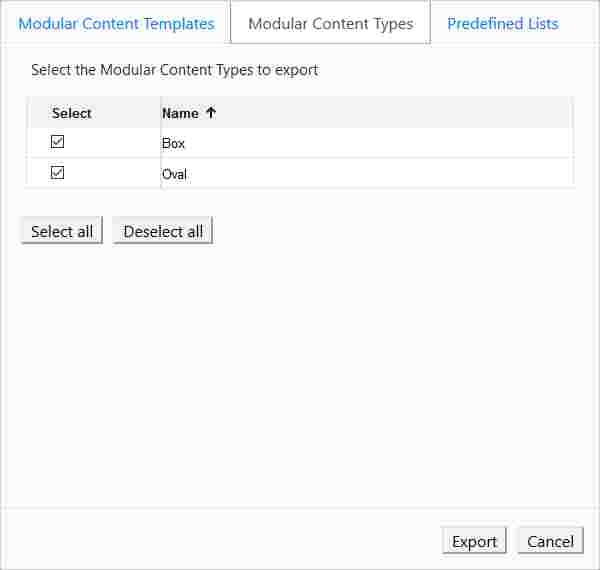
- Click the Modular Content Types tab.
- Select the modular content types you want to export by clicking the check box under "Select":
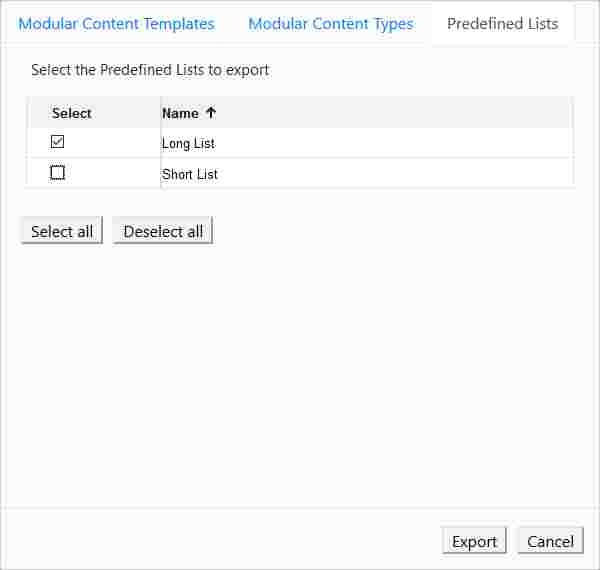
- Click the Predefined Lists tab.
- Select the lists you want to export by clicking the check box under "Select":
- Click [Export].
- Select "Save File" and then click [OK]. The file is saved to the Download directory configured for your browser.
Exporting Layouts
To export layouts, follow these steps:
- Navigate to the Layouts panel (Configuration > Layouts).
- Click [Export]:
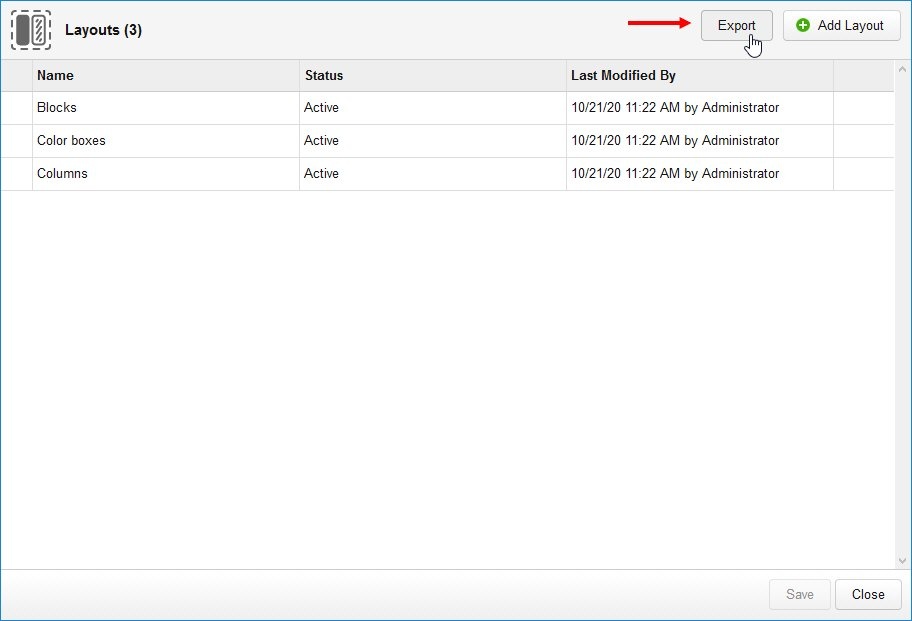
- A panel will appear in which you can select the layouts to export.
- Click the "Select" checkbox next to each layout you want to export. To export all layouts, click [Select all].
- Click [Export]. A Windows open/save dialog box opens.
- Select "Save" By default, the name of the export file is "layouts-export_dd_mm_yyyy.zip where "dd-mm-yyyy" is today's date. For example:
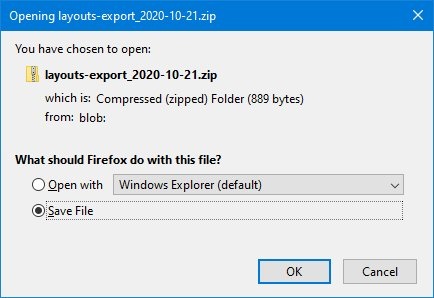
- Click [OK], The export file is saved to your browser's Download folder.
Importing Content Items
To import content items, follow the steps below. To import Modular Content, see Importing Modular Content. Once the .zip file containing the exported content items has been delivered to you, navigate to Configuration > Import Content. This starts the XperienCentral Content Importer Wizard. The Wizard consists of 11 possible steps. Depending on the circumstances and the choices you make, you may step through only a subset of these.
Select the Import Package File
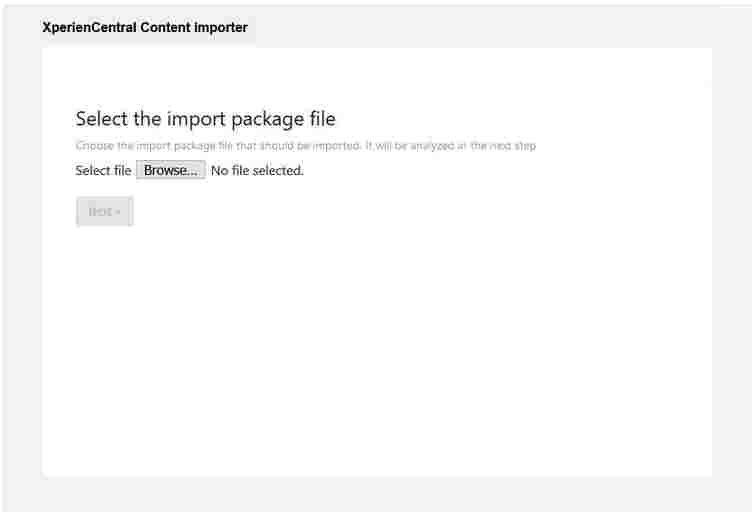
Click [Browse], select the content export file and then click [Open]. Click [Next].
Content Import File Analysis

A summary of the file analysis is shown. Click [Next].
Step 2
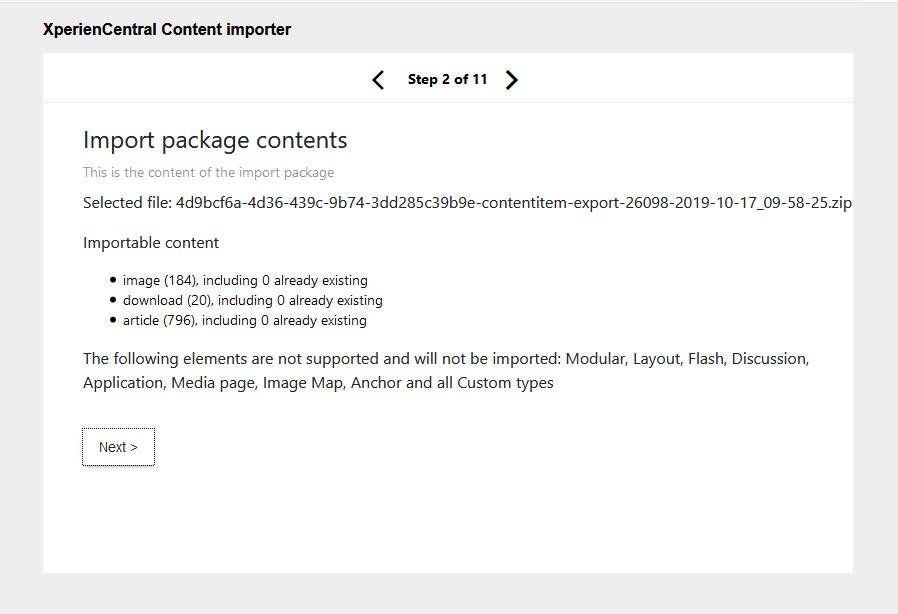
Step 2 summarizes the content items in the export .zip file that can be imported. The summary includes the number of content items that will be imported and how many of the content items already exist in the channel (if any) you are importing them into.
Step 2 of the Content Import Wizard includes a note about content elements that will not be imported. This list does not include any custom content elements unique to your channel(s) that will not be imported.
Click [Next].
Step 3
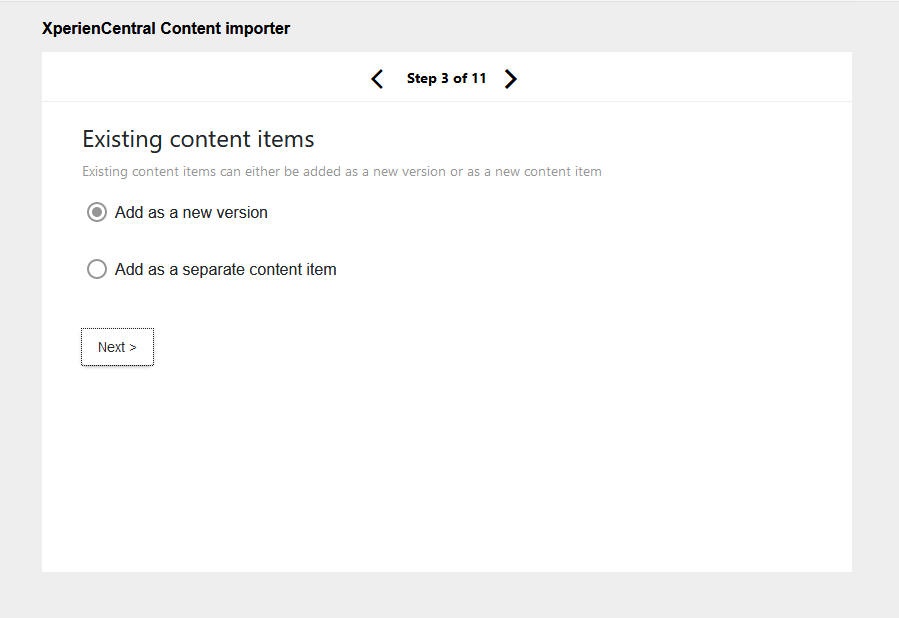
Step 3 is only triggered if the import package contains content items that already exist in the target channel. Select what happens to the imported content items that already exist: Add as a new version or Add as a separate content item. If you add a content item as a new version, it will retain its name and you will have content items with identical names. Click [Next].
Step 4
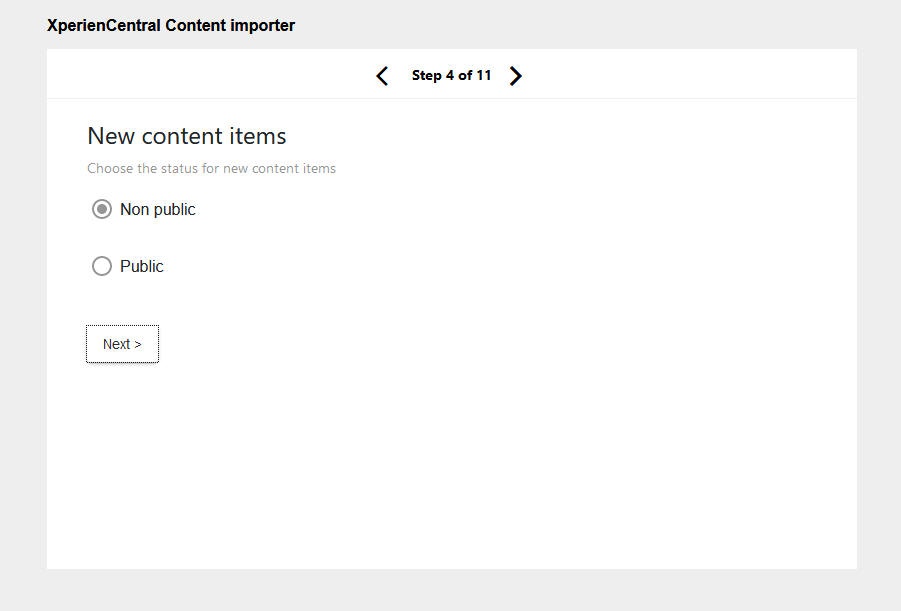
Step 4 is only triggered if the import package contains content items that do not exist in the target channel. Choose the status to give the imported content items that are new to this channel: Non public or Public. Click [Next].
Step 5
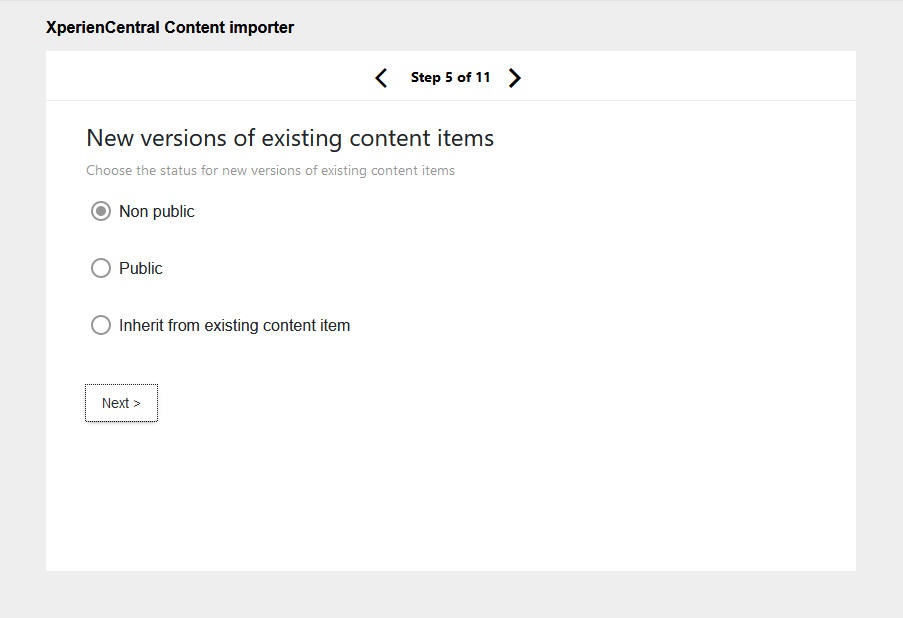
Step 5 is only triggered if you selected to import content items as new versions in step 3. Choose the status to give the imported content items: Non public, Public or Inherit from existing content item. Click [Next].
Step 6
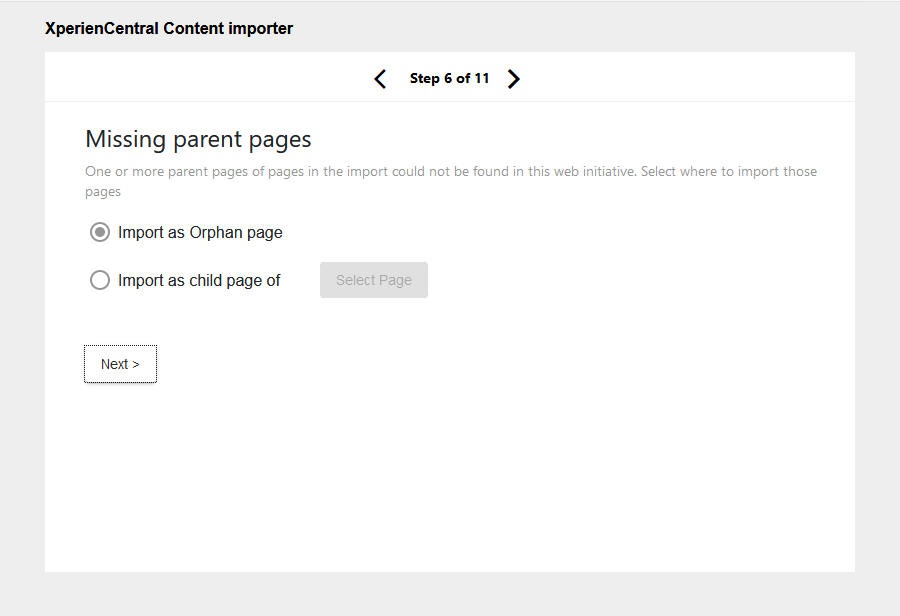
Step 6 is only triggered if the parent page of a page being imported does not exist in the target channel. Select whether to import the page(s) to the Orphan pages tree or as the child page of a page you select. Click [Next].
Step 7
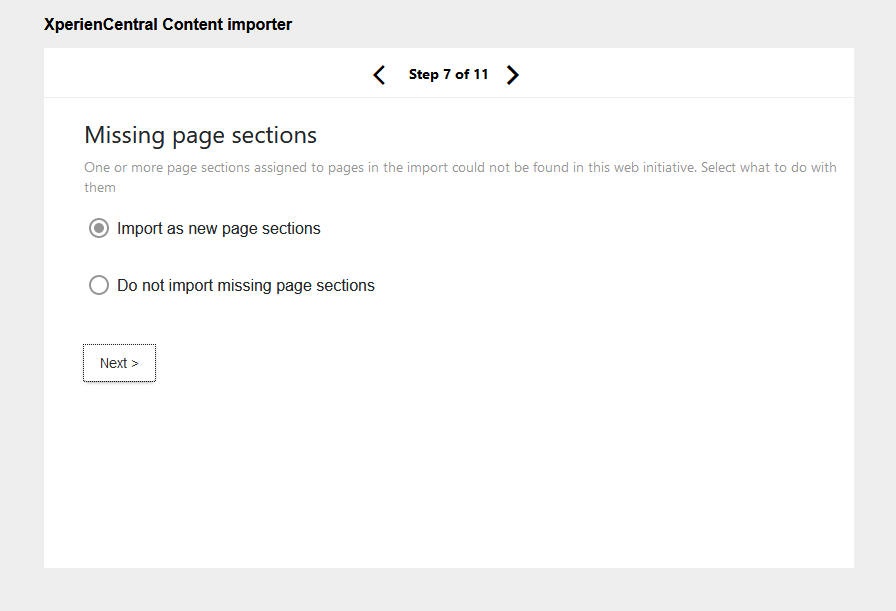
Step 7 is only triggered if page section(s) assigned to a page being imported do not exist in the target channel. Select whether to import the page section(s) as new page sections or not import them at all. Click [Next].
Step 8
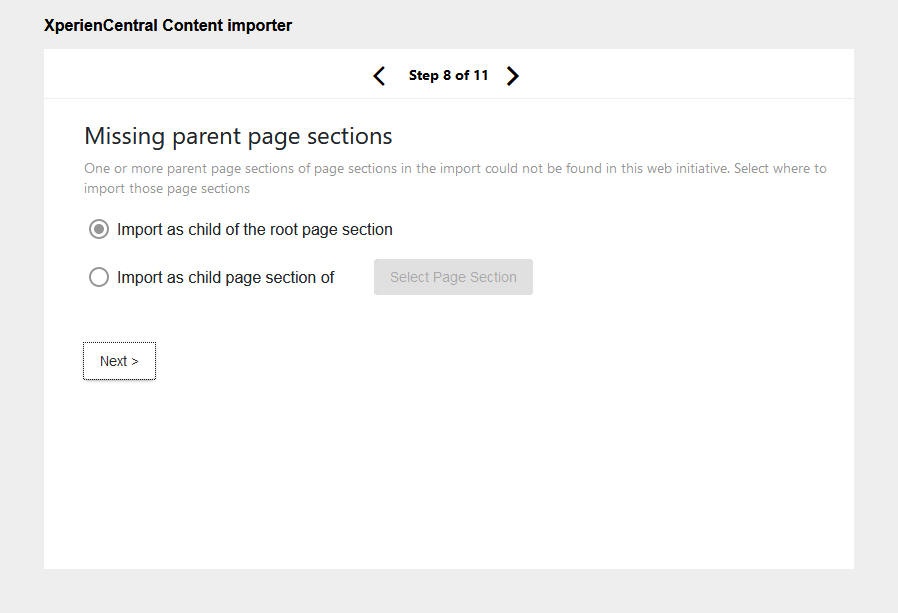
Step 8 is only triggered if the parent page section of page section(s) being imported does not exist in the target channel. Select whether to import the page section(s) as a child of the root page section or as the child of a page section that you select. Click [Next].
Step 9

Step 9 is only triggered if the import package contains tags that do not exist in the target channel. Select whether to create the unknown tags in this channel. Click [Next].
Step 10
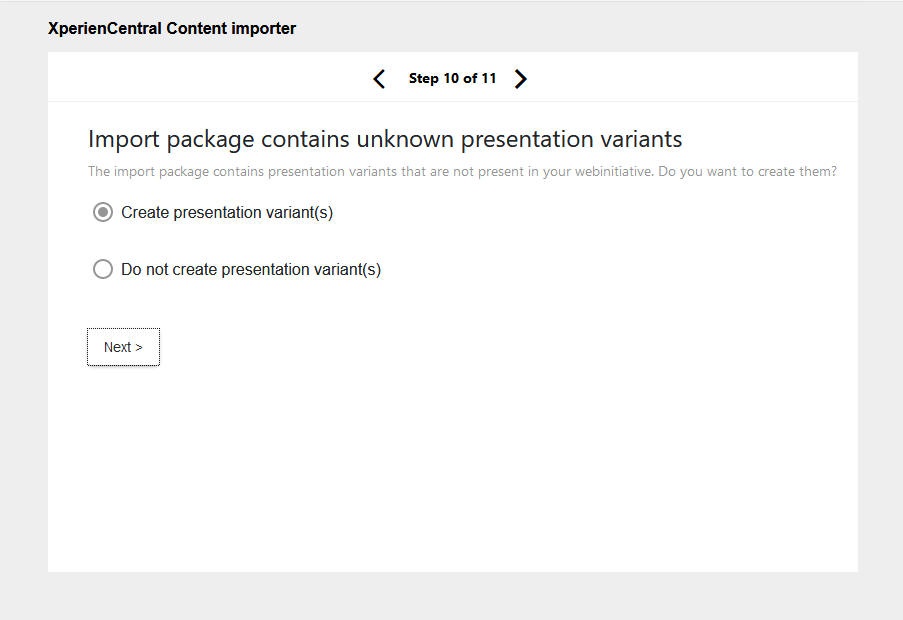
Step 10 is only triggered if the import package contains presentation variants that do not exist in the target channel. Select whether to create the unknown presentation variants in this channel. Click [Next].
Step 11
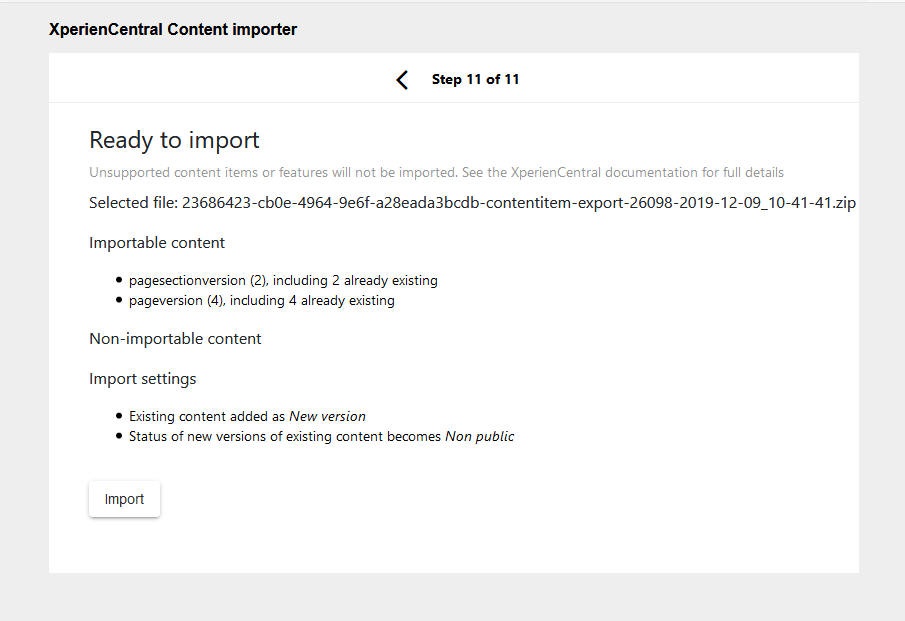
Step 11 summarizes what will and will not be imported as well as the import settings.
Step 11 of the Content Import Wizard includes a list of non-importable content. This list does not include the custom content elements/content items unique to your channel(s) that will not be imported.
Click [Import] to import the importable content. The content item import process begins. If the import package contains a large number of content items, this step could take a while.
Import Complete
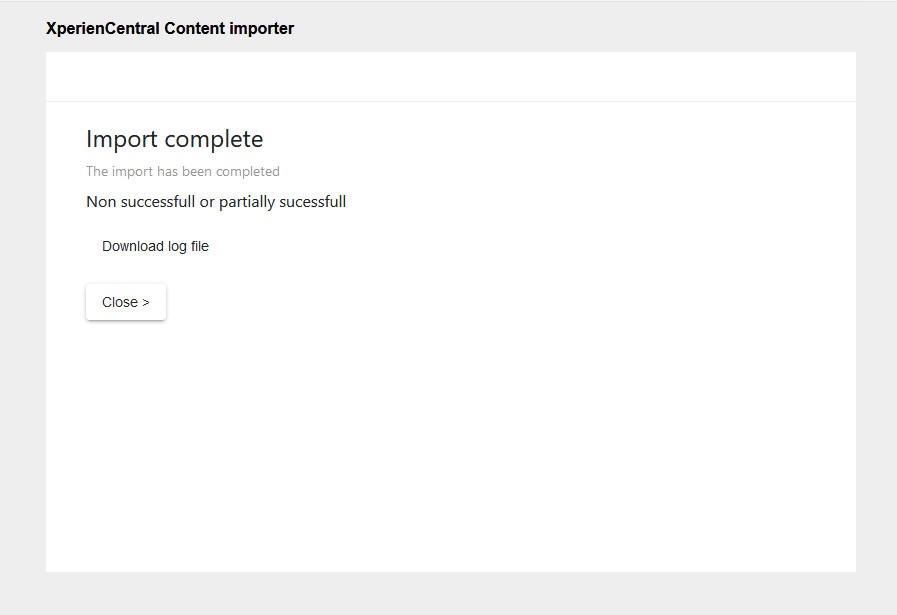
When the import is complete, a summary of the number of content items that could not be imported at all or only partially imported in shown. Click [Download log file] if you want to view the log in a browser, otherwise click [Close].
Importing Modular Content
To import modular content, follow the steps below. Once the .zip file containing the exported modular content has been delivered to you, navigate to Configuration > Import Content. This starts the XperienCentral Content Importer Wizard. The Wizard consists of 4 possible steps. Depending on the circumstances and the choices you make, you may step through only a subset of these.
Select the Import Package File
Click [Browse], select the content export file containing the modular content definition(s) and then click [Open]. Click [Next].
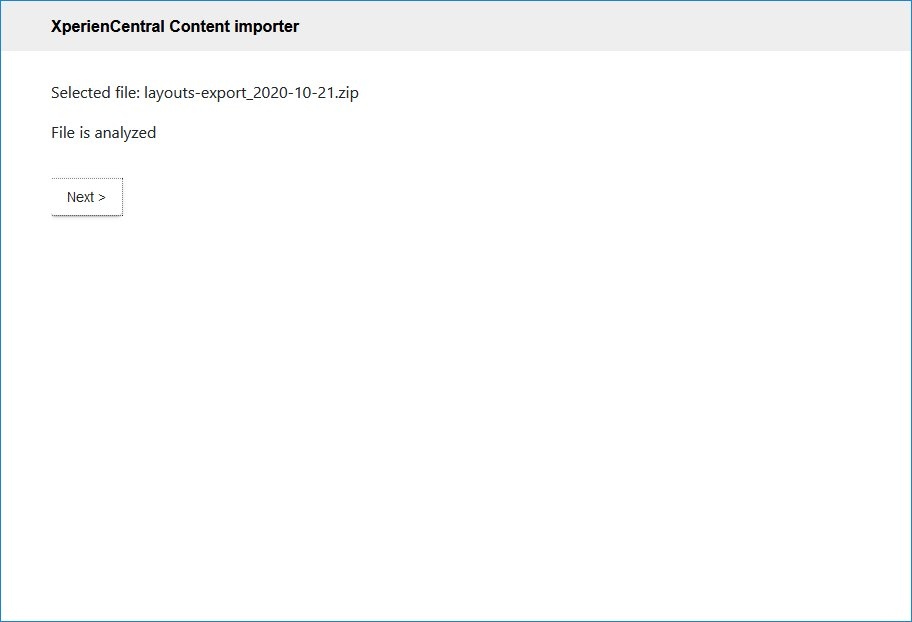
File Analysis

After the file has been analyzed, click [Next].
Step 1 No Duplicate Content
The contents of the import package are summarized. Click [Next].
Existing Content
This step is only triggered if you are importing modular content that already exists in this channel. Select whether to overwrite existing definitions or to only import modular content which is new to this channel. If you choose to overwrite existing modular content, the following rules apply:
- If there are no differences between the definitions, the imported modular content will be identical to the original.
- If there are any differences between the existing modular content definitions and those being imported, for example a conflict between types (boolean versus integer, and so forth), XperienCentral will attempt to make the most logical choices during the overwrite. For example, in a conflict between a field defined as a string in the channel and as an integer in the import file, XperienCentral will choose to keep the string type rather than convert it to an integer. In most cases, the intent is to keep the most simple/flexible definitions over those that are more limiting.
Click [Next].
Ready to Import
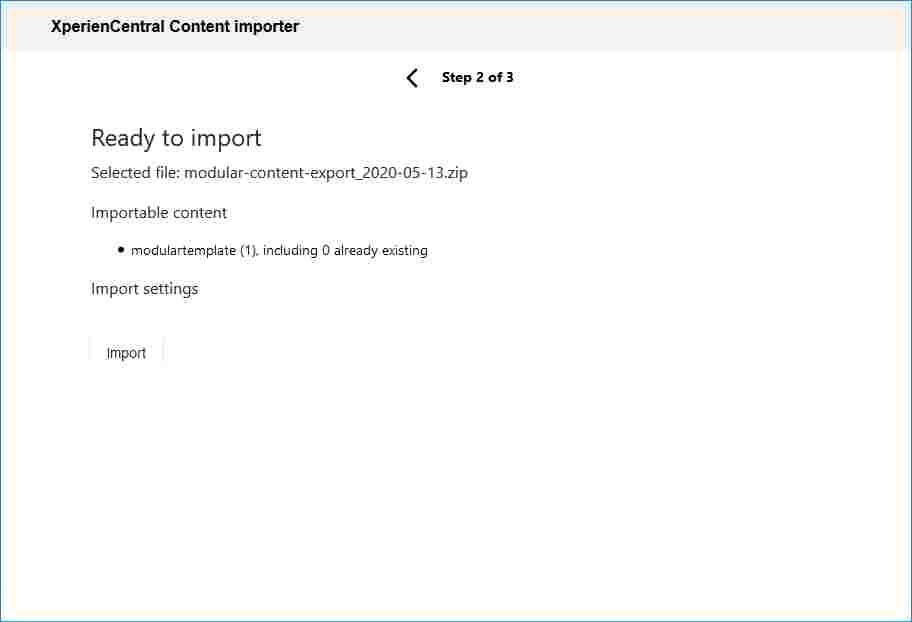
Click [Import]. The modular content is imported.
Importing Layouts
To import layouts, follow the steps below. Once the .zip file containing the exported modular content has been delivered to you, navigate to Configuration > Import Content. This starts the XperienCentral Content Importer Wizard. The Wizard consists of 4 possible steps. Depending on the circumstances and the choices you make, you may step through only a subset of these.
Select the Import Package File
Click [Next].
File Analysis
Click [Next].
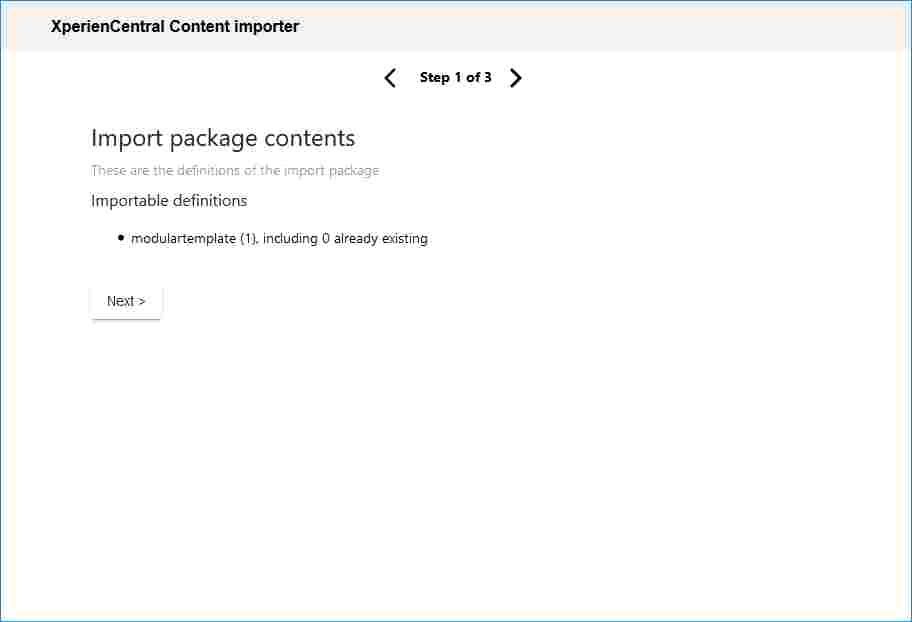
Step 1 of 4 Import Package Contents Summary
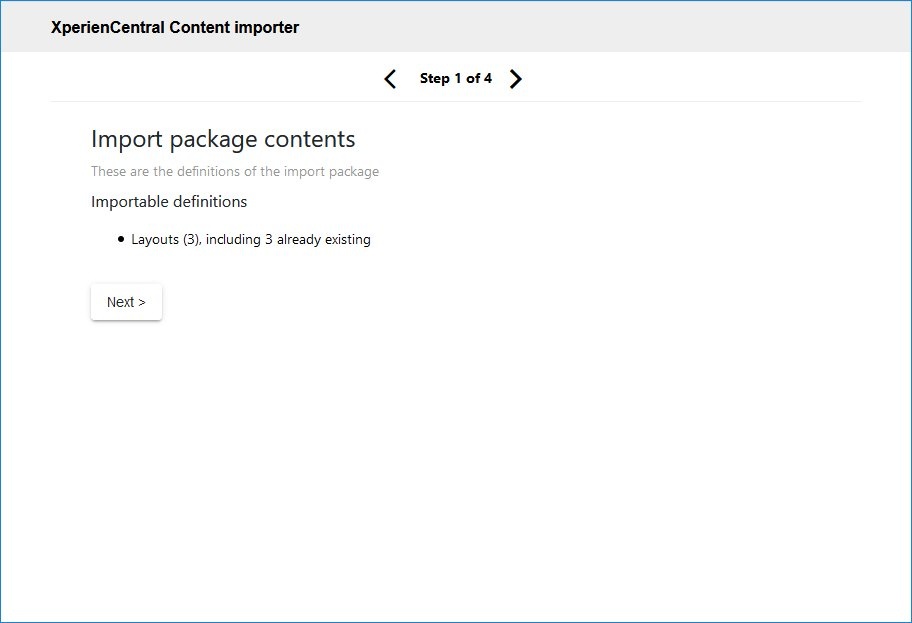
The summary in step 1 shows what will be imported and whether the content already exists in your XperienCentral project.
Click [Next].
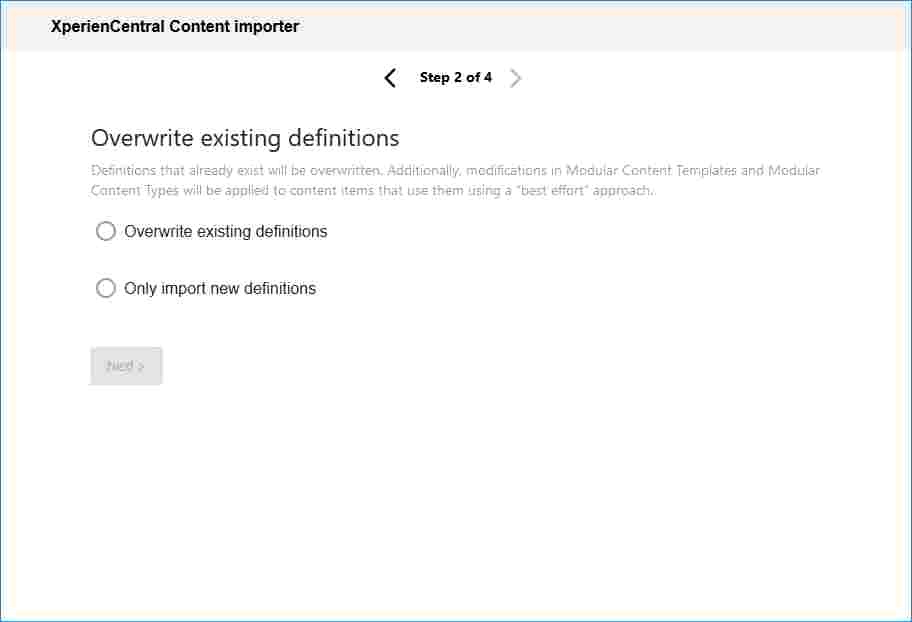
Step 2 of 4 Overwrite existing definitions
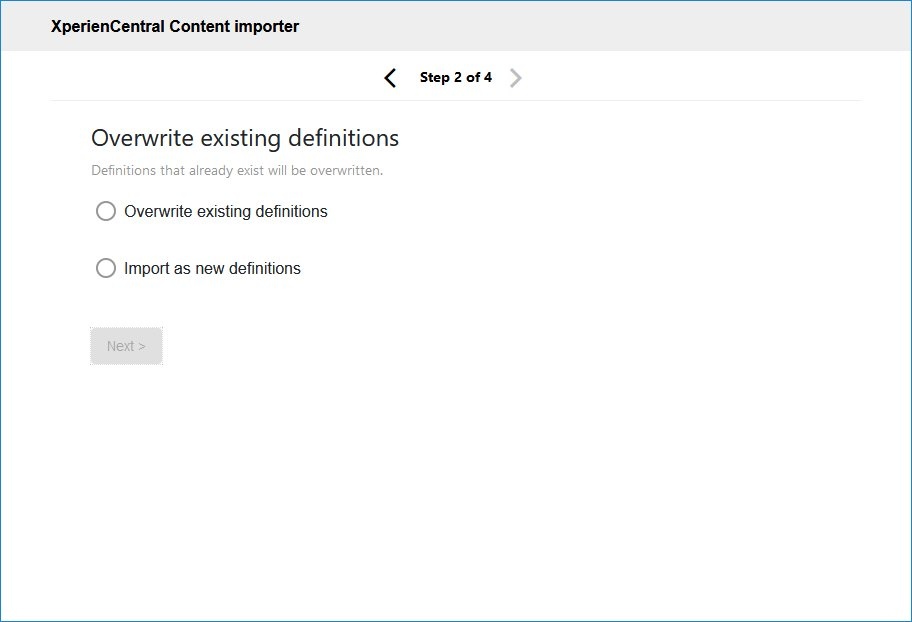
In step 2, select whether to overwrite existing content with content in the import package if it already exists.
Notes:
- Layout definitions created before XperienCentral version R30 cannot be overwritten during the import process. In all cases the layouts created in a version older than R30 will be imported as new with the same name as the exiting layout and the status "inactive".
- If you select to overwrite existing definitions, the imported layouts will inherit the active/inactive status of the existing definitions. If you choose to import the existing layouts as new definitions, the new layouts will have the same name as the existing layouts but will have the status "inactive".
Click [Next].
Step 3 of 4 Ready to import
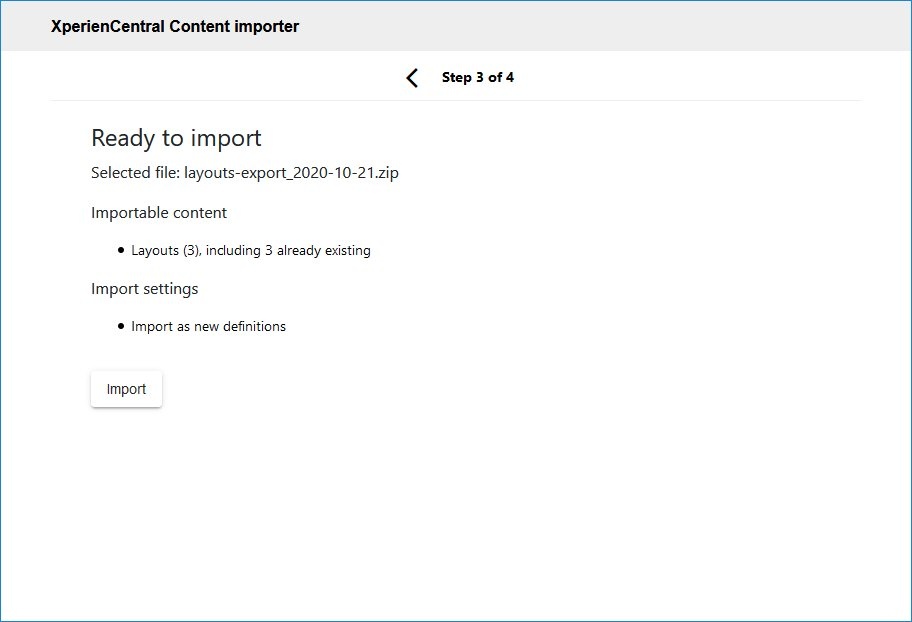
Step 3 shows a summary of what will be imported.
Click [Import].
Import complete
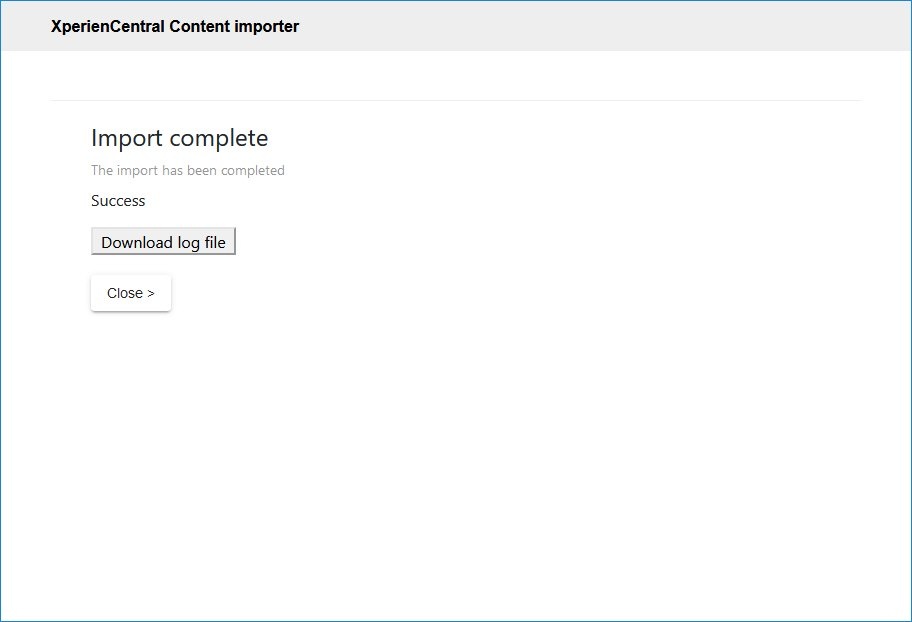
The Import complete panel indicates that the import is complete and whether it was successful. Click [Download log file] to see the log.
Import/Export Configuration
In the Import/Export configuration panel you can view and manage the history of past import/export jobs that have run and their outcomes, download logs and archives, configure where log histories are stored and manage the credentials for the user who is authorized to view import/export log histories. You can automate import/export jobs. This is configured in the Jobs and Connectors tabs. The configurations defined on these tabs are specific to each XperienCentral deployment and will in almost all cases be set up and and managed in conjunction with your GX Software consultant. To access the Import/Export Configuration panel, navigate to Configuration > Import/Export Configuration.
Import/Export History
The Import/Export History tab shows the import/export actions that have been performed in the current channel.
Filter Option | Description |
|---|---|
| History View | Allows you to filter for export/import jobs that started within a specific date range. Click the calendar icons and select the begin and end dates. |
| Show only failed runs | Filters for only the export/import jobs that failed. Failed jobs appear in the list in red. |
| Minimum log level | Specifies the minimum log level to download. |
| Regular expression that log entries must match | Specifies the regular expression that downloaded log entries must match. This makes it possible to filter the log entries and only download what you are interested in. |
| Log history entries | Shows a list of recently completed import/export jobs. Details include:
|
| Clear these history entries | Clears the job history entries in the current list. |
| Clear all history entries | Deletes all history entries stored on the local disk. |
| Download all history entries | Downloads the complete history entries stored on the local disk. |
| Archive all history entries | Copies all history entries stored in the "Target directory" (c:\temp by default) to <target-directory>\archive. |
| Clear archive | Deletes all history entries from <target-directory>\archive. |
| Download archive | Downloads all history entries from <target-directory>\archive. |
Jobs
Most of the settings on the Jobs tab are project-specific and will in almost all cases be configured in conjunction with your GX Software consultant.
Defining the User whose Account Executes the Jobs
All user accounts designated as system users are available in the User drop-down list. Select the user account from the list that will execute the job(s). For more information, see System User.
Connectors
The settings on the Connectors tab are project-specific and will in almost all cases be configured in conjunction with your GX Software consultant.
Configuration
Filter Option | Description |
|---|---|
| Ajax Refresh Rate | Specifies, in milliseconds, how often to refresh the Ajax progress bar. Setting this to a lower setting may cause lock contention in the JCR and thereby reduce performance for jobs that write intensively to the JCR. |
| Target Directory | Specifies the local directory where the log history files are written. |
| Maximum number of log entries to keep | Specifies the maximum number of log entries to keep. Once the limit is reached, the first log entries will be overwritten and eventually all entries will be overwritten in looping fashion. |
| User | Select the system user account from the list that will execute the job(s). For more information, see System User. |