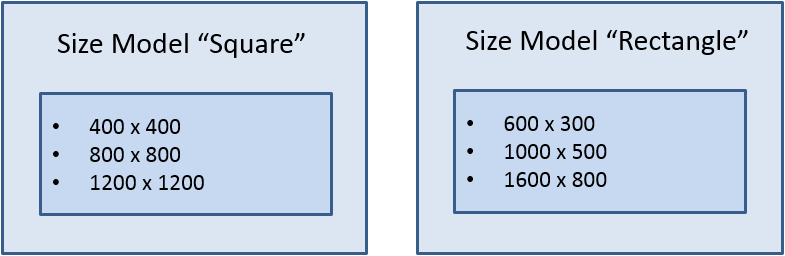
A Size Model contains a collection of width/height definitions that control how images stored in the Content Repository are rendered in an image element. When you create a new size model, it becomes available in the "Size Model" drop-down list in the Properties for an image content type. When a Size Model is assigned to an image stored in the Content Repository, the width/height pairs contained within it are available to be used for rendering the image. The width/height definition you select overrides the actual width/length of an image and is used to render the image in the Editor and on the website frontend. You can only assign one size model to an image.
In This Topic
Creating a Size Model
To create a new size model, follow the steps below. When you have created a size model, it becomes available as an option for images stored in the Content Repository.
- Navigate to Configuration > Content Repository and select the "Size Models" tab.
- Select >New Size Model< from the "Select Size Model" drop-down list.
- In the "Title" field, enter the name of the new size model.
- Enter the width (in pixels) for the image size in the "Width" field.
- Enter the height (in pixels) for the image size in the "Height" field.
- Click [Apply]. The width/height pair is added to the size model.
- Repeat the above steps for each width/height pair you want to add to the size model.
- Click [Close].
Assigning a Size Model to an Image
To assign a Size Model to an image, follow the steps below.
- Navigate to the image in the Editor using Quick Search or Advanced Search.
- Click [Edit] in the Properties widget.
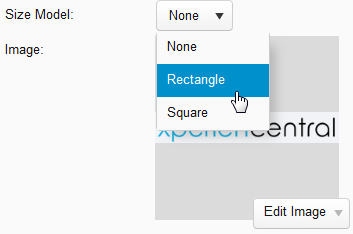
- Expand the Size Model drop-down list and select the size model that contains the width/height pair(s) you want to make available to use for the image. For example:
- Click [Save] and then [Close].
Assigning a Size to an Image
Once a Size Model has been assigned to an image content type, the width/height pair(s) contained within it can be used to define how the image is rendered in the Editor and on the website frontend. Follow these steps to define the size of an image:
New Image
To assign a size to a new image:
- Navigate to the content item to which you want to add the image.
- Hover the mouse over the title of the content item and click [Edit].
- Click in the part of the content item where you want to add the image,
- Click [Insert] and select "Image".
- Drag and drop the image from an Explorer window onto the "Drop your image here" or click [Select from Repository] to select the image from the Content Repository. The image appears on the content item.
- Click [Edit] to show the properties for the image element,
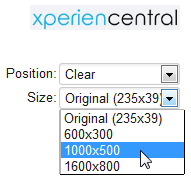
- Expand the Size drop-down list and select the width/height to use to render the image from the list. For example:

- Click [Apply] and then [OK]. The image appears in the Editor in the size you selected.
Existing Image
To assign a size to an existing image:
- Navigate to the content item containing the image to which you want to assign a new size.
- Hover the mouse over the title of the content item and click [Edit].
- Click the image in content item and then click [Edit] to show the properties for the image element,
- Expand the Size drop-down list and select the width/height to use to render the image from the list. For example:
- Click [Apply] and then [OK]. The image appears in the Editor in the size you selected.