It is possible to connect XperienCentral to one or more external databases. The word ‘external’ is used to indicate that it is different from the internal database: The database that maintains XperienCentral’s internal content & administration. It is possible that the tables with external data are located in the same database as XperienCentral’s internal tables.
Because XperienCentral can be connected to other databases, it is, for example, possible to request data from the backoffice and show these on the website.
In This Topic
Use of Queries
Views on Database Content
By means of queries you can configure views on database content. For example:
Overview Versus Detail View
You can view database content on two levels:
- The overview level shows a list of records from the database.
- The detail view level shows more details of a selected record.
In the screenshot above, the upper part shows an overview and the lower part shows a detail view. You can also place the detail view on a different (special) page.
Sorting by Column
At the overview level, you can sort by column by clicking on a column heading which toggles the sorting between ascending and descending order. For each column in the overview, you can enable or disable column sorting separately.
Query Definitions
Queries are defined using SQL (Structured Query Language). The information returned from the database can then be shown on the website. The following is an example of an SQL query:
SELECT <fields> FROM <tables> WHERE <conditions> ORDER BY <field>
In XperienCentral, you manage your query definitions at a central point. Each query definition has a name, code, the name of the database, the presentation format of the retrieved data, which fields of the retrieved data are to be shown in which columns and query parameters. To show the retrieved data on a web page, you insert a Query content element on a page. In the content element you select the desired query definition.
Query Parameters
To make queries more flexible, you can use parameters in the query code. For instance, you may use a parameter to filter the data to be retrieved on certain characteristics. After that you only have to assign another value to the parameter without changing the query code. The parameter is put between @ characters in the WHERE clause. For example:
SELECT <fields> FROM <tables> WHERE <field> IN (@myParameter@) ORDER BY <field>
You can assign values to a parameter at two levels:
- Using the query content element
- With the query definition
About the Example Database
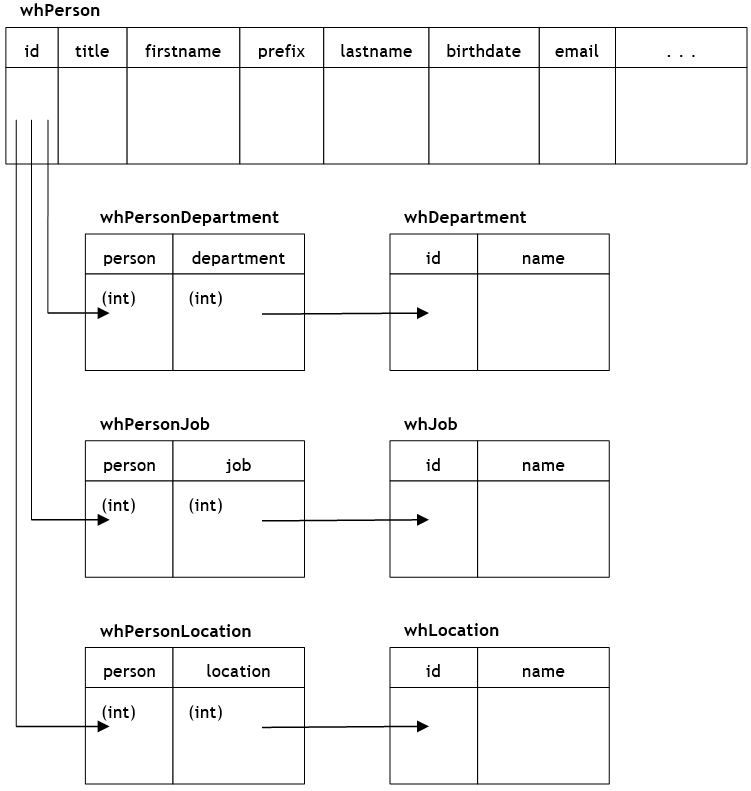
In this topic, the example database "Who is Who" is used to illustrate concepts. In this database, the whPerson table is the central table containing most of the personal data. The other tables are extensions used to store additional information about the person.
Connecting an External Database
You can connect one or more databases of the type MySQL, MSSQL and Oracle. A database is contained on a database server, which may accommodate one or more databases. Prior to configuring a database connection the database server must have been installed and started up properly. For each database connection, you have to set the name and some connection related attributes like the URL, a valid user name and a password.
To connect an external database, perform the following steps:
- Make sure a filled external database is available and that you know the connection related attributes.
- Navigate to Configuration -> Database Maintenance.
- Select the Database connections tab.
- Select New database connection from the drop-down menu (top left). A blank dialogue pane with connection related attributes is shown.
- Enter the connection related attributes.
- Click Apply. If XperienCentral can make the connection, the product and driver information is shown as well as a table content list.
See Database Maintenance for complete information on connecting external databases.
Using Queries
In this section, we set up a basic view on the whPerson table by showing the following fields: lastname, prefix, firstname and email. We start with the following query:
SELECT whPerson.lastname, whPerson.prefix, whPerson.firstname, whPerson.email FROM whPerson ORDER BY whPerson.lastname
Defining an Overview Query
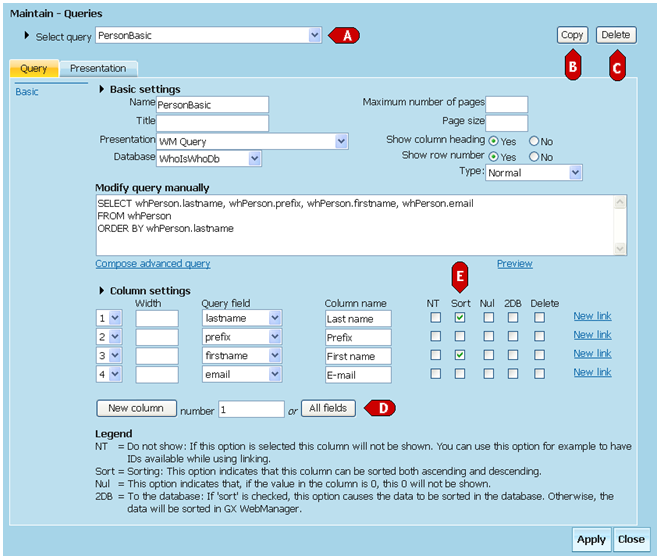
Select menu Configuration > Queries (Query tab):
- To create a query, select "New query" from the drop-down list (see A).
- To copy a query, select it and click Copy (see B).
- To delete a query, select it and click Delete (see C).
- To add a column to the overview for any field in the SELECT clause, click All fields (see D). Then enter the column names (headings).
- To enable sorting by column, check the ‘Sort’ box] (see E).
Defining a Query Content Element
After defining the overview query, you can place the Query content element on a page.
- Navigate to the desired page.
- Add the Query content element to the page.
- Select the desired overview query from the drop-down list.
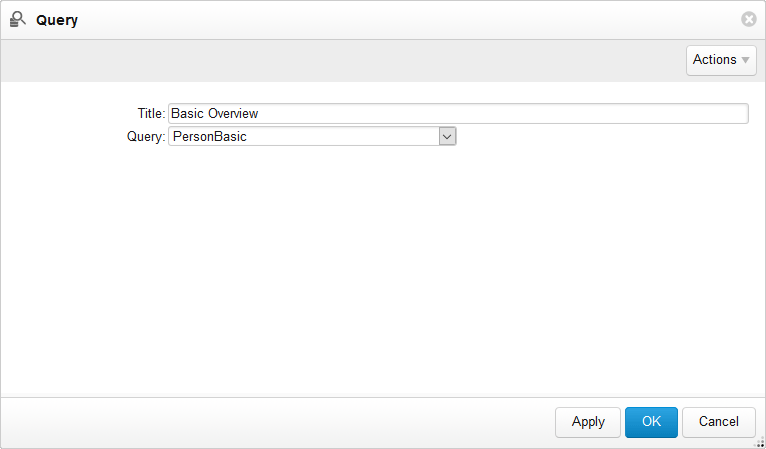
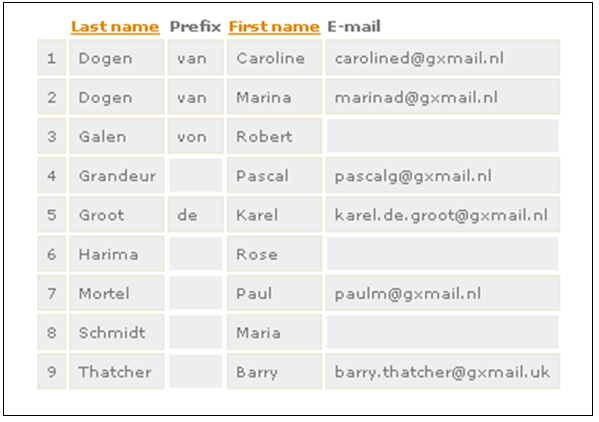
Showing the Basic Overview
The result looks like this. Sorting by column has been enabled for "Last name" and "First name". By clicking on it, you can toggle sorting between ascending and descending order. For this type of content element with this presentation format, the title in the content element is not shown.
Overview with Parameter
Introduction
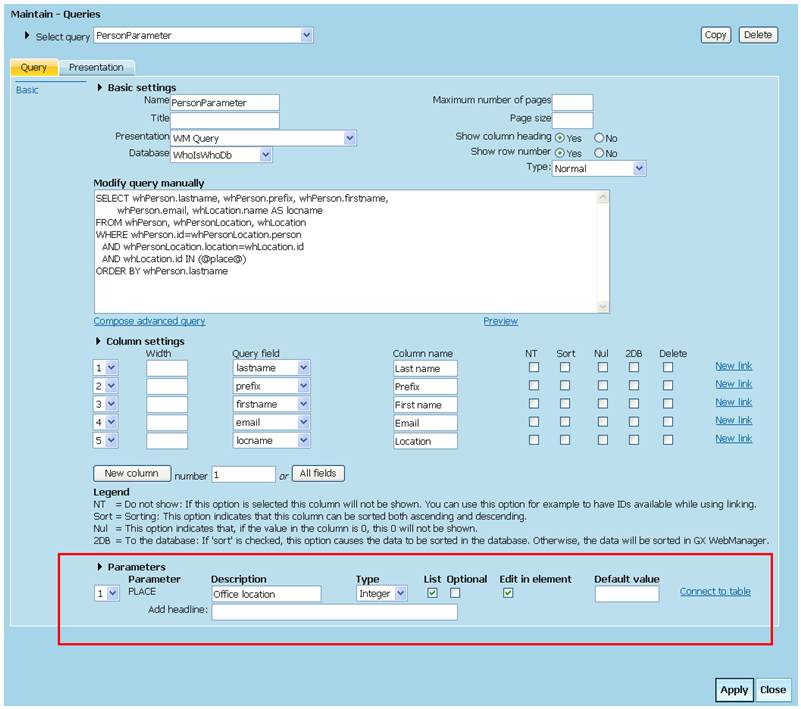
In this section, we introduce a query parameter. However, first we extend the overview with a column ‘Location’. In the query code, the ‘AS’ statement renames a field named ‘name’ to ‘locname’. This is used to avoid possible confusion with fields in other tables that are also named ‘name’ (in example further on in this document):
SELECT whPerson.lastname, whPerson.prefix, whPerson.firstname, whPerson.email, whLocation.name AS locname FROM whPerson, whPersonLocation, whLocation WHERE whPerson.id=whPersonLocation.person AND whPersonLocation.location=whLocation.id ORDER BY whPerson.lastname
To be able to filter on names of different locations, we use a parameter @place@. A parameter substitutes a comma-separated list and thus it can adopt more than one value at the same time.
SELECT whPerson.lastname, whPerson.prefix, whPerson.firstname, whPerson.email, whLocation.name AS locname FROM whPerson, whPersonLocation, whLocation WHERE whPerson.id=whPersonLocation.person AND whPersonLocation.location=whLocation.id AND whLocation.id IN (@place@) ORDER BY whPerson.lastname
Defining an Overview Query with Parameter
- Select the desired overview query (Configuration > Queries).
- Enter the query with a parameter.
- Click Apply. A "Parameters" section is automatically added at the bottom of the screen.
- Define the parameter options:
- Set the type to "Integer".
- Select "Edit in element" to be able to assign values to the parameter on the query content element.
- Select "List" to be able to assign more than one value to the parameter on the query content element.
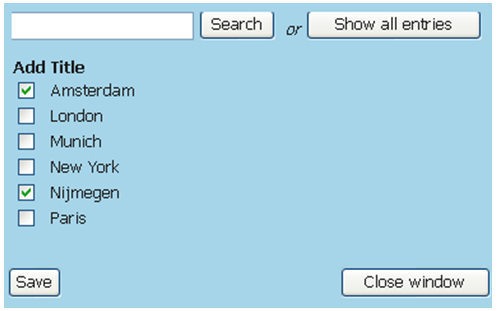
Connecting an Options Table to a Parameter
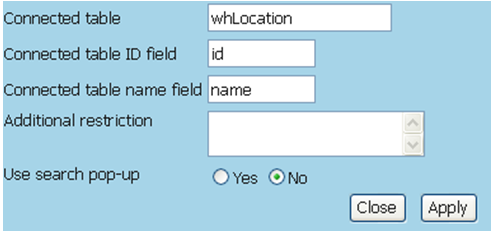
The goal is to let the editor choose from a list of options for the "place" parameter in the Query content element. The options in the list can be obtained from another table from the database.
- Click "Connect to table" (or "Edit table" if a table already exists).
- Enter the name of the table and the names of the ID and name fields. Click Apply.
- Click Close. You can now select a default value for the parameter. This list is also available with the query content element now.
Defining a Query Content Element with Parameter
After defining the overview query, you can place the content element ‘Query’ on a page.
- Navigate to the desired page.
- Add a Query content element.
- Select an overview query that includes a parameter. A parameter drop-down box is added to the content element.
- Select one or more parameter values on which you want to filter your view.
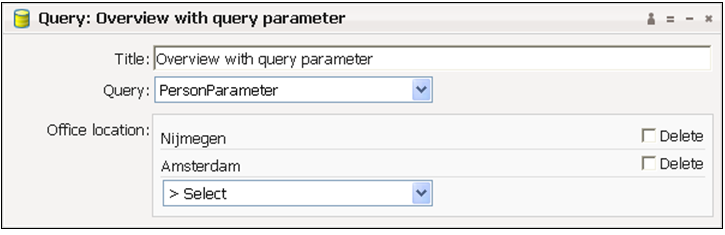
If you selected "Use search pop-up", the following panel pops up when setting the locations on the query element:
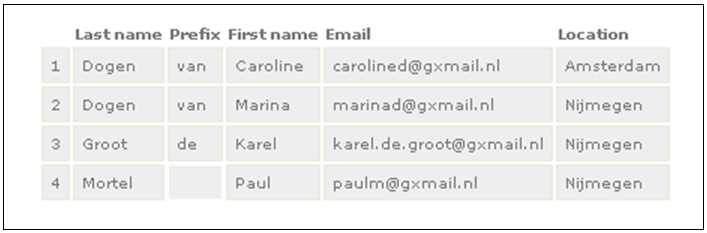
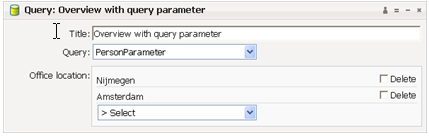
Showing the Overview with Parameters
The result only shows records in which the location is Amsterdam or Nijmegen:
Overview with Link to Detail View
Introduction
In this section, first we define a detail view and then from an overview we set a link to it. A detail view is defined by three query types:
- Get information query.
- Get query
- Search query
Get Information Query
This query is used to retrieve all the details of one specific record (the record that was clicked on in the overview). The record is identified by a parameter that is referred to as @dbid@ and which is typically used in the WHERE clause. When you click on a link of a specific record in the overview, the @dbid@ parameter gets the ID value of the record after which the query is executed. In our example, we use the following query:
SELECT whPerson.lastname, whPerson.prefix, whPerson.firstname, whPerson.telephone FROM whPerson WHERE whPerson.id=@dbid@
Get Query
This query is used to retrieve the title of the detail view. This title is typically shown in a larger font on the page. The query must contain an "id" and a "name" in the SELECT clause. In our example, we use the following query code:
SELECT whPerson.id AS id, whperson.lastname AS name FROM whPerson WHERE whPerson.id=@dbid@
Search Query
This query is used to retrieve data for search functions that are present in XperienCentral itself. The query must contain an "id" and a "name" in the SELECT clause. In addition, it needs an @search@ parameter in the WHERE clause. In our example, we use the following code:
SELECT whPerson.id AS id, whperson.lastname AS name FROM whPerson WHERE lastname LIKE '%@search@%'
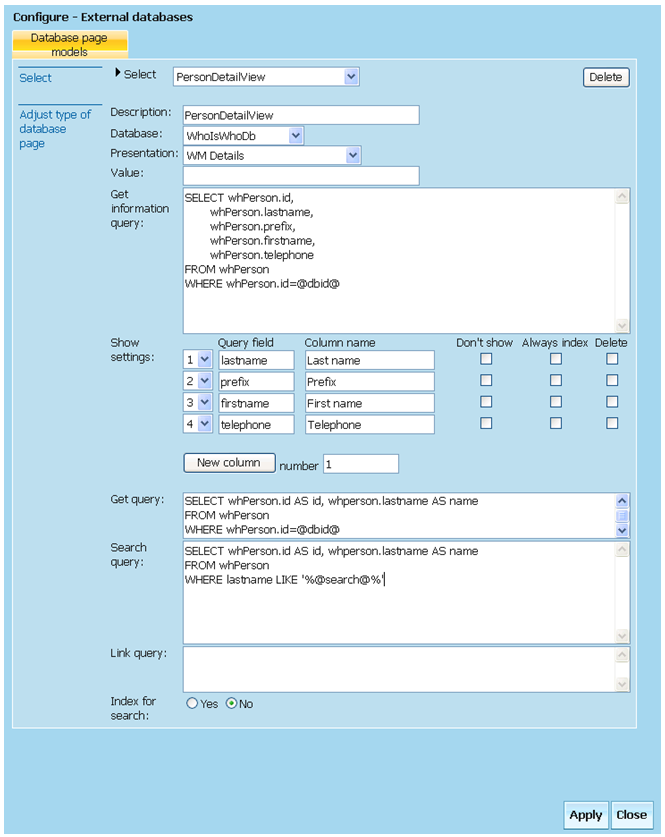
Defining a Detail View
- Navigate to Configuration > External Databases.
- Enter the queries and define other settings. For example:
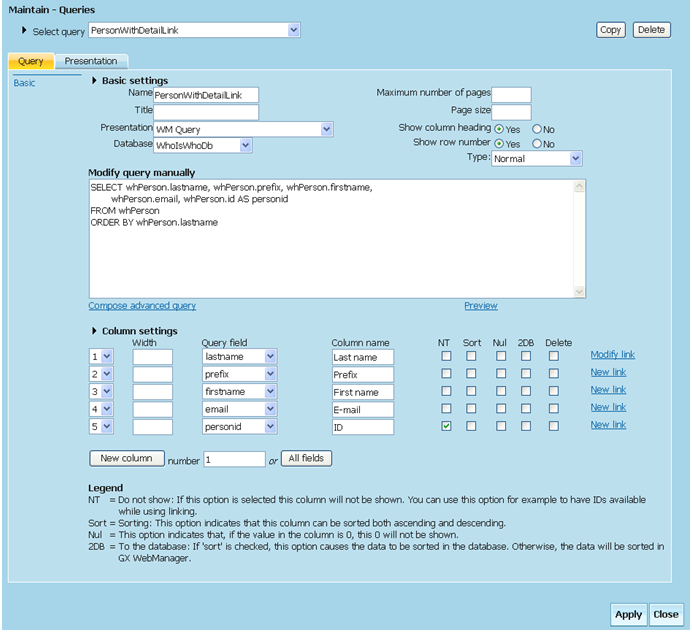
Linking an Overview to a Detail View
In our basic overview example, we add a link from the "Last name" field to a person’s detail view. However, to be able to link to a detail view, an integer field with the unique record ID must be present in the SELECT clause. Any other type of ID than an integer type of field will not work.
So, in our overview the overview query code will be:
SELECT whPerson.lastname, whPerson.prefix, whPerson.firstname, whPerson.email, whPerson.id AS personid FROM whPerson ORDER BY whPerson.lastname
This record ID field must be selected in the "Columns settings" as well. More than likely, it is not the intention to show this integer field at the website. So, we set it to "Do not show".
- Select the desired overview query (Configuration > Queries Queries tab).
- Under "Column settings" add a column for the record ID field and check "NT" for "Do not show".
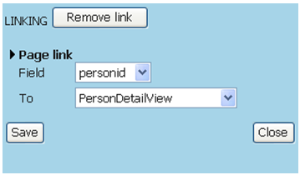
- In order for the field to be linked, select "New link" under "Column settings" or "Modify link" if a link already exists.
- From the "Field" drop-down list, select the ID field(in this example "personid").
- From the "To" drop-down list, select the desired detail view. Click [Save].
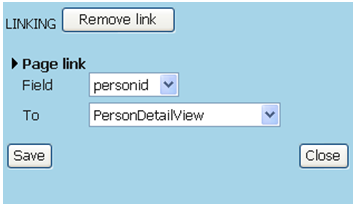
- Click [Close]. The overview query looks like this:
Defining a Query Content Element with Detail Link
After defining the overview query, you can place the Query content element on a page.
- Navigate to the desired page.
- Add a Query content element.
- Select an overview query that includes a link to a detail view from the upper drop-down list:
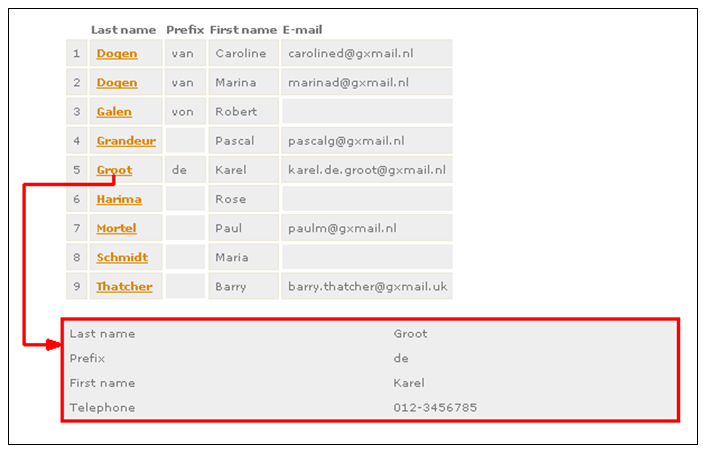
Showing the Overview with Link to Detail View
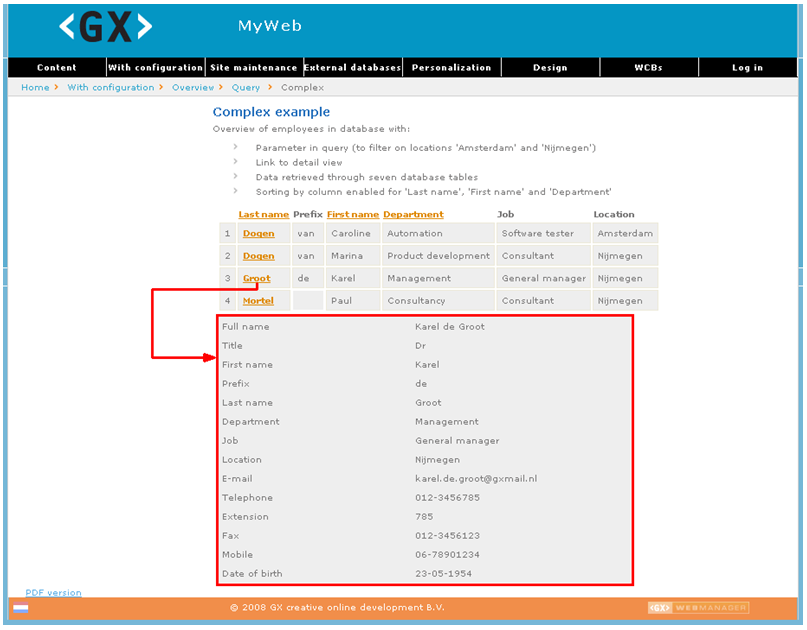
In the example below, the upper part shows the overview. The lower part is the detail view, which appears after clicking the last name "Groot":
Using a Special Page for the Detail View
By default, the detail view is shown on the same page as the overview. If this is not desired, because one of the views needs a different presentation, you can also place the detail view on another special page. Proceed as follows:
- Create the detail page and publish it.
- Navigate to Configuration > Channel Configuration > Special pages.
- Find the name of the detail view under "Database pages" and click [Search].
- Select the page on which the detail view is to be shown and click [Apply].
The detail view will hereafter be shown on this special page.
More Complex Example
- A parameter that filters on the locations Amsterdam and Nijmegen.
- A link to a detailed view which is shown underneath the overview.
- Three columns (Department, Job and Location) whose fields are not retrieved directly from the
whPersontable but indirectly through six other tables. This requires a more complex WHERE clause.
Overview Query
SELECT whPerson.lastname, whPerson.prefix, whPerson.firstname, whDepartment.name AS depname, whJob.name AS jobname, whLocation.name AS locname, whPerson.id AS personid FROM whPerson, whPersonDepartment, whDepartment, whPersonJob, whJob, whPersonLocation, whLocation WHERE whPerson.id=whPersonDepartment.person AND whPersonDepartment.department=whDepartment.id AND whPerson.id=whPersonJob.person AND whPersonJob.job=whJob.id AND whPerson.id=whPersonLocation.person AND whPersonLocation.location=whLocation.id AND whLocation.id IN (@place@) ORDER BY whPerson.lastname
Detail Query – Get Information
SELECT firstname + ' ' + prefix + ' ' + lastname AS fullname, title, firstname, prefix, lastname, whDepartment.name AS depname, whJob.name AS jobname, whLocation.name AS locname, email, telephone, devicenumber, fax, mobile, convert(char(10), birthdate, 105) AS birthdate FROM whPerson, whPersonDepartment, whDepartment, whPersonJob, whJob, whPersonLocation, whLocation WHERE whPerson.id = @dbid@ AND whPerson.id=whPersonDepartment.person AND whPersonDepartment.department=whDepartment.id AND whPerson.id=whPersonJob.person AND whPersonJob.job=whJob.id AND whPerson.id=whPersonLocation.person AND whPersonLocation.location=whLocation.id
Reference Information
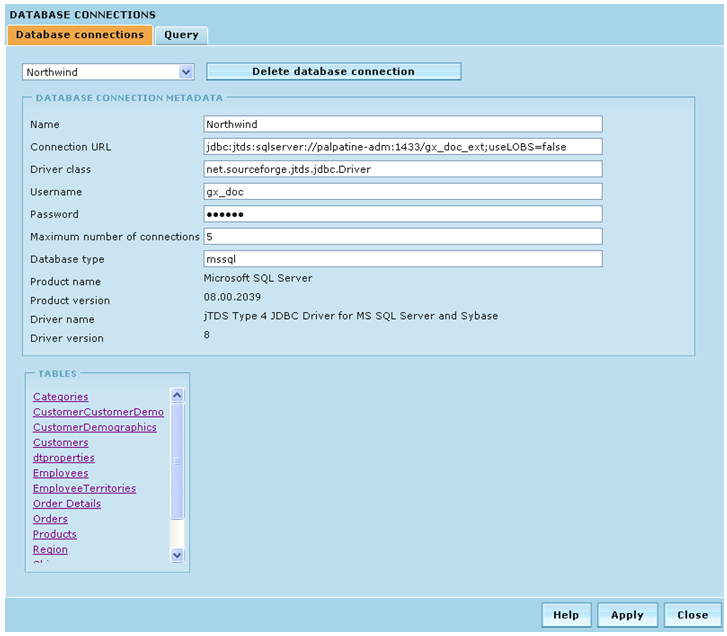
Database Connection Panel
Configuration > Database Maintenance > Database connections
Field | Description |
Drop-down selection box | List of database connections. |
Delete button | Deletes the current database connection. |
Name | The name of the database connection. The name is case sensitive. |
Connection URL | The URL where an application can access the database. |
Driver class | The classpath of the JDBC driver software. |
Username | The user name to use to log in to the database. |
Password | The user's password. |
Maximum number of connections | The maximum number of connections that may be established between XperienCentral and the database for that database pool. |
Database type | Select the database type: MySQL, Oracle or MSSQL. |
Product name | The full product name of the database server. |
Product version | The product version of the database server. |
Driver name | The name of the database driver. |
Driver version | The version of the database driver. |
Tables | A list of the database tables. When you click on a table name, the field definitions of the table are shown at the right. |
Query Overview Panel
Configuration > Queries > Query
Field | Description |
Copy button | Copies the current query. The name of the copy is "Copy of <name>". |
Delete button | Deletes the current query. |
Name | The name of the query that should be displayed in the selection lists. |
Title | Title that should appear above the result when the query is submitted on a page. |
Presentation | Select "WM query" for the presentation to use for the results of the query. |
Database | The database the query is submitted to. |
Maximum number of pages | ‘Page size’ x ‘Maximum number of pages’ = maximum number of records retrieved from the database. |
Page size | The number of records allowed to be shown on a page. |
Show column heading | Indicates whether column headings should be shown above the query result. |
Show row number | Indicates whether row numbers should be shown in front of records. |
Type | Type of query: ‘Normal’, ‘Who-is-Who’, ‘Target audience’, ‘Events’, ‘Subjects’, ‘Product overview’, ‘Themes’, ‘Questions’, or ‘Documents’. Depending on the functionality present, this list can include other types as well |
Modify query manually | The query can be manually entered here. Do not use SELECT *, but name the individual column headings in the SELECT clause. Enter a variable by entering a word that begins and ends with @, such as |
[Compose advanced query] link | If the Microsoft SQL Server is used, a table with columns can be assigned using a wizard. The SELECT statement will then be generated. |
[Preview] link | If the Microsoft SQL Server is used, the result of the query can be viewed. If parameters are used in the query, a pop-up window appears where these parameters can be entered. |
Column settings - Order | A number that determines the sequence of the columns. |
Column settings - Width | Width of the column in pixels. If no width value is entered, the browser will determine the width. |
Column settings – Query field | Database field where the column gets its information. |
Column settings – Column name | Text that should be shown above the column on the page (if the ‘Show column heading’ is set to ‘Yes’). If this field is left blank, the content of the ‘Query field’ will be used. |
Column settings - NT | Indicates whether this column should be shown. This can be handy to still have the primary key columns available when several tables are joined. |
Column settings - Null | Indicates whether a 0 should be shown if a cell in this column is empty or if the value is 0. |
Column settings – 2DB | If ‘Sort’ is checked, indicate here whether the data should be sorted in the database. Otherwise, the data will be sorted in XperienCentral. |
Column settings - Delete | The column can be deleted here. |
New link/ Modify link | To create a hyperlink to a database page. Example of a pop-up:
Field: Select the property from the pulldown which contains the ID to the detailed view of the object. This property always has to be of the integer type. To: A selection can be made from the database pages that are defined in Database Maintenance. |
New column button + number | Add a number of columns. |
All fields button | Add as many columns as there are fields in the SELECT clause of the query. |
The following fields are only visible if the query has @ parameters:
Field | Meaning |
Parameters | A number that determines the sequence of the parameters and the headings. |
Parameters - Parameter | The name of the parameter, as it occurs in the query, but then without the enclosing ‘at’ symbols (@). |
Parameters - Description | In the case of a parameter, the name of the parameter appears here. In the case of a headline, the text of the headline appears here. |
Parameters - Type | The data type of the parameter (‘Date’, ‘Integer’, or ‘Text’.) |
Parameters - List | Indicates whether it is allowed to enter more values for this parameter. If this option is checked, several values can be selected on the query content element:
|
Parameters - Optional | Indicates whether this parameter is optional or required. If a parameter has no value, XperienCentral removes the row where this parameter is used from the query. Therefore, set this type of WHERE parts in separate rows. |
Parameters – Edit in element | Indicates whether the value of the parameter may be entered on the content element or whether the parameter is filled, based on the value in the query string. |
Parameters – Default value | The default value of the parameter if a value is not entered. |
Parameters –Add headline | Enter a new headline here. Headlines are texts that can be set on the query element between groups of parameters. This is done to enhance usability. |
Connect to table/ Edit connected table | This allows connecting a parameter to a column from a table to show a list of selections on the query element. Example:
|
Parameters - [Delete] button | Only present if a headline exists. Deletes the headline. |
Detail Query Screen
Configuration > External Databases
Field | Description | |
Select | List of database page models (detail views). | |
[Delete] button | Delete this database connection. | |
Description | Name of the database page that should be displayed in the selection lists. | |
Database | List of database connections. | |
Presentation | Select ‘WM Details’. This is the default value in XperienCentral. Other values (such as ‘WM Agenda’, ‘WM Person’, and ‘WM Product’) are added to the list if certain functionalities are imported in XperienCentral. | |
Value | A unique value used by the search engine for indexing. | |
Get information query | This is the query to be run if the detail view has to be displayed. This query is connected with @dbid@ to the record that was clicked through. The variable For example:
| |
Show settings - | A number that determines the sequence of the columns to be shown. | |
Show settings – Query field | Name of the column in the SELECT clause. This can be a column name or alias (behind the keyword ‘AS’). | |
Show settings – Column name | Text that should be shown above the column on the page (only if the ‘Show column heading’ is set to ‘Yes’). If this field is left blank, the content of the ‘Query field’ will be used. | |
Show settings – Don’t show | Indicates whether this column should be shown or not. | |
Show settings – Always index | A column that is not shown is not indexed by default. To index this column, a check mark can be placed here. This setting is, however, ignored if ‘Index for search’ is set to ‘No’. | |
Show settings - Delete | The column to be shown can be deleted here. | |
Show settings - [New column] button + number | Add a number of columns. | |
Get query | Query to retrieve the title of the database object. This title is shown on the page in a larger font. The query has to contain an ID and a name in the SELECT clause. | |
Search query | The search query is used in two places:
The query has to return an ID and a name and can use the search parameter to find the proper records in the database. For example:
| |
Link query | Using this query, the links related to this table can be retrieved from a specially created link table. The Link query is only used for the product catalog and for meetings that have been created in the Meetings and Papers component. | |
Index for search | Indicates whether this type of page should be indexed and, therefore, be shown in the search element. | |