Entities with several business units, channels, brands, and extranets often want to centrally manage all their outlets and initiatives from one application or platform. XperienCentral is designed to manage multiple channels and handle multi-channel publishing. It is possible to set up new channels without installing additional hardware and/or software. Every channel has its own page structure and its own Workspace environment. The added value of multiple channels is the possibility to share and reuse information across those channels. Content Repository items that have been created in one channel can be reused in another channel. It is possible to specify exactly which functionality and content can be shared between which channels.
This topic describes how to set up extra channels and how to share information between these channels as well as some additional functionality. Some of the tasks have to be performed by a system administrator and/or application manager due to some core configuration changes. This topic describes both local and development environments. A multiple channel setup for production environments can be configured in a similar way, but it does require extra configuration changes to the web server(s) and possibly other software. Procedures for production environments are described in the Linux and Windows installation topics for production environments.
Before creating a new channel, stop XperienCentral (the web server).
In This Topic
Generate New Hostnames
To create a second channel, two new hostnames are required: the hostname for the public channel and the hostname for the Workspacer environment. In this document www.mysecondsite.com and cms.mysecondsite.com will be used as examples.
Add the new hostnames to your "hosts" file (C:\Windows\system32\drivers\etc\hosts on Windows computers) and point them to 127.0.0.1. For example:
127.0.0.1    www.mysecondsite.com
127.0.0.1    cms.mysecondsite.com
If you use a proxy server, add excludes for these hostnames in the proxy configuration of your browsers.
Request an Updated configuration.xml from GX Software
The configuration.xml is a file with a license key that also contains the valid hostnames for your installation. To create a new channel, a new configuration.xml containing the two new hostnames is required - Send an e‑mail to developersupport@gxsoftware.com or contact your GX Software consultant in order to obtain a new configuration.xml. If you send an e-mail, do not forget to include the two new required hostnames
Update your configuration.xml
The new configuration.xml that you receive from GX Software has to be saved in the following locations:
<xperiencentral-root>\webmanager‑webapps\webmanager‑backend‑webapp\target\webmanager‑backend‑webapp‑1.0‑SNAPSHOT\WEB‑INF\siteworks\
and <xperiencentral-root>\webmanager-webapps\webmanager‑backend‑webapp\src\main\webapp\WEB-INF\siteworks\
For production environments (depending on the configuration): <xperiencentral-root>/configuration/
The correct location for the configuration.xml file can always be found in the XperienCentral Setup Tool on the General tab (the setting config_filename).
Create a New Channel in XperienCentral
To create the new channel in XperienCentral, follow these steps:
- Start XperienCentral and log in.
- Navigate to Configure > Channel Configuration.
- Select "<new channel>" from the pull-down menu at the top of the panel, The New Channel wizard appears.
Step 1: Name the New Channel
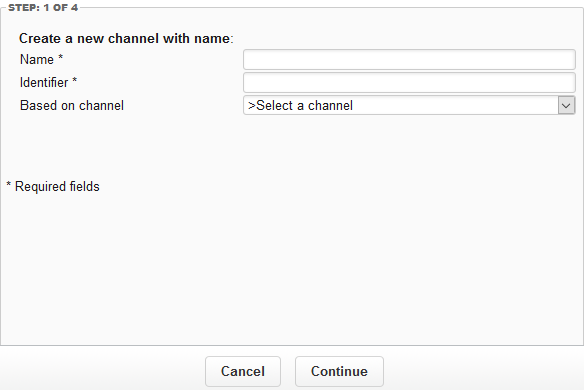
Configure the following fields:
| Setting | Description |
|---|---|
Name | The name of the new channel. |
Identifier | The identifier of the new channel. |
Based on channel | Choose a channel here if all the parameters are similar to those of an existing channel. We recommend that you base the new channel on an existing channel because all the configuration settings (such as paths) will be duplicated. |
Step 2 of 4: Configuration Settings for the New Channel
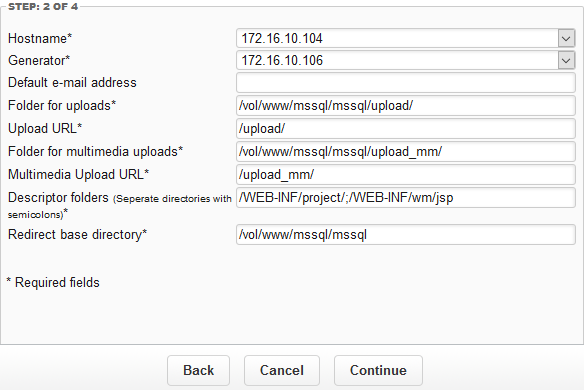
Configure the following fields:
Fields | Description |
Hostname | The hostname of the public channel. |
Generator | The hostname of the Workspace environment. |
Default e-mail address | The default e-mail address for functionality that makes use of e-mail messages. |
Folder for uploads | The folder where uploaded files are stored. |
Upload URL | The base URL for uploaded files |
Folder for multimedia uploads | The folder where binary files are stored. |
Multimedia Upload URL | The fase URL of the uploaded binary files. |
Descriptor folders | The folders where the presentation JSPs are stored. A scheduled task scans these folders for descriptor files. Multiple folders can be specified separated by semicolons. |
Redirect base directory | The base folder of the static files. |
The settings above can be modified in the General (R30 and older) tab of the Setup Tool after the channel has been created.
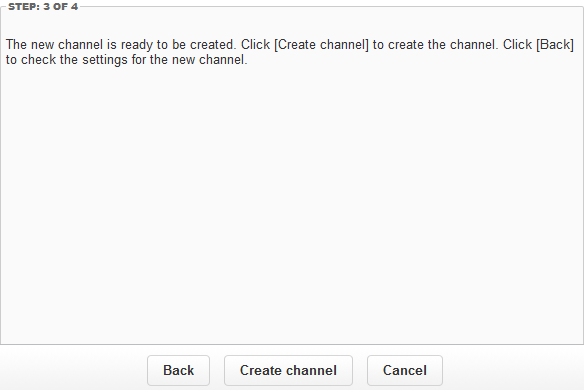
Step 3 of 4: Create the New Channel
In step 3 you have to confirm that you want to create a new channel. Click [Create channel]. This operation could take a few moments. The new channel with one page, the homepage, has been created. You can now log in to the channel by accessing the URL by its new hostname (+port number) followed by /web/edit. Following the example in this topic, that URL is http://cms.mysecondsite.com:8080/web/edit.
Extending the Folder Structure (Optional)
The configuration of the new channel can be extended or altered to allow separate files or presentations.
Separating Presentations
When managing multiple channels, it might be necessary to share common resources and (parts of) the presentation. In order to realize this, the following conditions must be met:
- There must be a central folder for the shared files and presentations.
- Besides the central folder, each channel also has its own folders for private files and presentations.
The following is an example of a folder structure in a presentation plugin:
<plugin JSP folder>/common/page/
                       /pagepart/
                       /element/
                       /etc
              /channel1/page/
                       /pagepart
                       /element
                       /etc
              /channel2/page/
                       /pagepart
                       /element
                       /etc
In order to be able to use this subdivision, you need to modify your configuration in the Setup Tool. On the General tab, navigate to the section "website_settings (x)" where x is the name of the channel you want to configure.
- For the first channel, enter the following folders for the setting
presentation_jsps_url:/WEB-INF/%PACKAGE%.%WCB NAME%/<dir>(WEB-INF/project/nl.gx.solutions.userprofileextension/jsp, for example) where<dir>is the name of the folder where the channel-specific JSPs are located./WEB-INF/wm/jsp/(optional) - Click [Save Changes].
- Repeat the above steps for each channel.
The descriptor directories are listed in a specific sequence. This sequence also indicates which JSPs are used if there are other JSPs with the same name. For example, if there is a page.jsp in the common directory and there is a page.jsp in the channel1 directory, then the page.jsp from the channel1 directory will be used.
The static files can be placed in a similar way as the JSPs:
…/presentationtype/static/common/images/
                                /stylesheets/
                                /scripts/
                                /…

…/presentationtype/static/channel1/images/
                                  /stylesheets/
                                  /scripts/
                                  /…

…/presentationtype/static/channel2/images/
                                  /stylesheets/
                                  /scripts/
                                  /…
Finally, the uploaded files can be placed in separate folders. In this way, the first channel can use the standard upload and upload_mm folders. Uploads for the second and subsequent channels can be placed in a separate folder below the main folder. For example:
backend/
/upload/                  for the first channel
/upload_mm/               for the first channel
/mysecondsite/upload/     for the second channel
/mysecondsite/upload_mm/  for the second channel
These paths can be set for each channel using the following settings:
file_upload_directoryandfile_upload_url(for normal uploads)file_upload_mm_directoryandfile_upload_mm_url(for Content Repository uploads)
Sharing Content
For organizations with several channels and multiple publication channels (multi-channel publishing), it is often essential to be able to manage content from a central location and to reuse it in multiple places. This means not only content but also web users, forms etc. In a default installation with more than one channel, all content is strictly separated. Content sharing is not done automatically, so if you want to do this you have to configure it. Most of these configuration properties involve assigning different read/write permissions for different channels. Editors of the various channels must explicitly allow one another to read and reuse content. By explicitly specifying what can be read per channel, everything can be set up in a safe and flexible manner.
An important feature of shared content is that it can only be read on another channel. For example, when an article is created in channel A then it can be displayed on channel B, but it can never be modified on channel B. This ensures that the rights of the author remain with the author. When different editors are allowed to edit content on different channels, their user accounts have to be shared as well. Editor X on channel A must be shared and granted permission to work on channel B as well.
In the following sections, the term "content" is used in a broader context and should be regarded as a synonym for regular content types, model types, settings, web users, etc. Language labels don't belong to this form of content. Language labels are maintained in a single object pool that is valid for all channels (see Language Labels).
Sharing and Accepting
In order to share content between channel A and channel B, the configuration has to be changed to be able to expose (share) the content of one channel with another as well as to receive (accept) content from another channel. Sharing content is configured in three steps. For each channel, specify the following:
- Which content is available for sharing.
- Which content should be shared with which other channel(s).
- Which content should be accepted from other channel(s).
In this example, we will configure two channels so that articles from the Content Repository are shared between channel A and channel B, and editors on both channel A and B are able to add new articles and to use each other’s articles on their channel.
Step 1
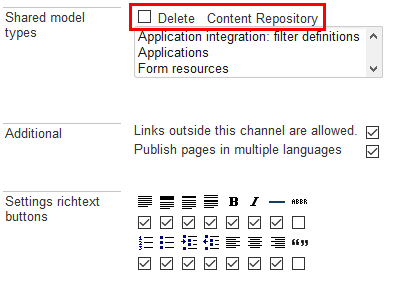
Which content types are available for sharing is configured in Configuration > Channel Configuration on the [Functionalities] tab under "Shared model types". In order to share the Content Repository, select it in the list. For example:
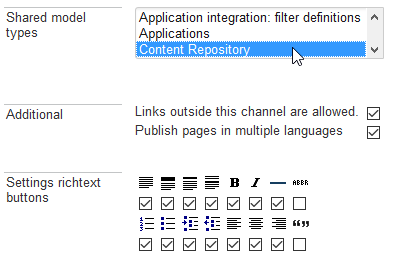
Click [Apply]. The Content Repository is now shared in channel A. For example:
Repeat this step for channel B.
Steps 2 and 3
Sharing and accepting are configured in Configuration > Channel Configuration on the [Sharing/Accepting] tab:
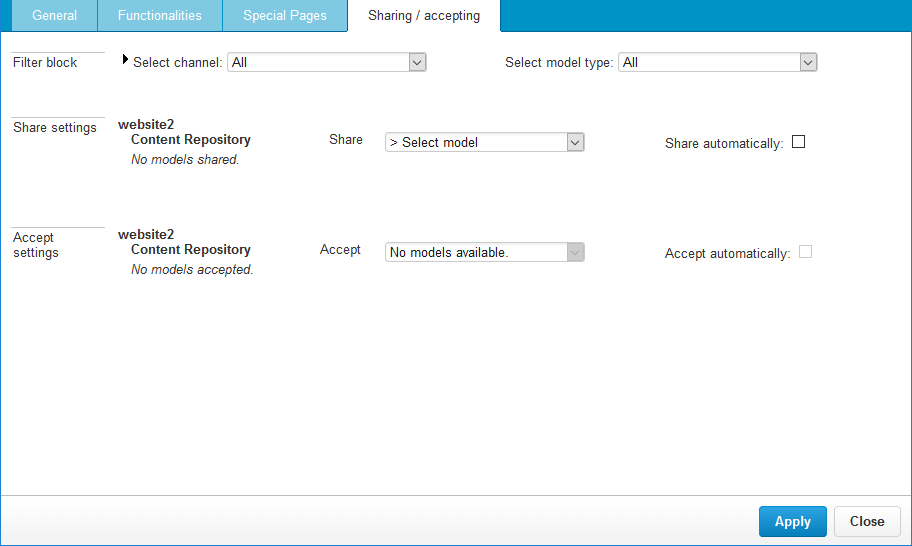
On this tab you have the following fields:
Field | Description |
(Filter block) Select channel | Select a channel to configure. |
(Filter block) Select model type | Filter to show only specific model types. |
(Share settings) Share | Select the models that you want to share. |
(Accept settings) Accept | Select the models that you want to accept from the other channel. |
Share automatically | If this option is selected, all sharable items of the selected model type (that are available) are automatically shared |
Accept automatically | If this option is selected, all sharable items of the selected model type (that are available) are automatically accepted |
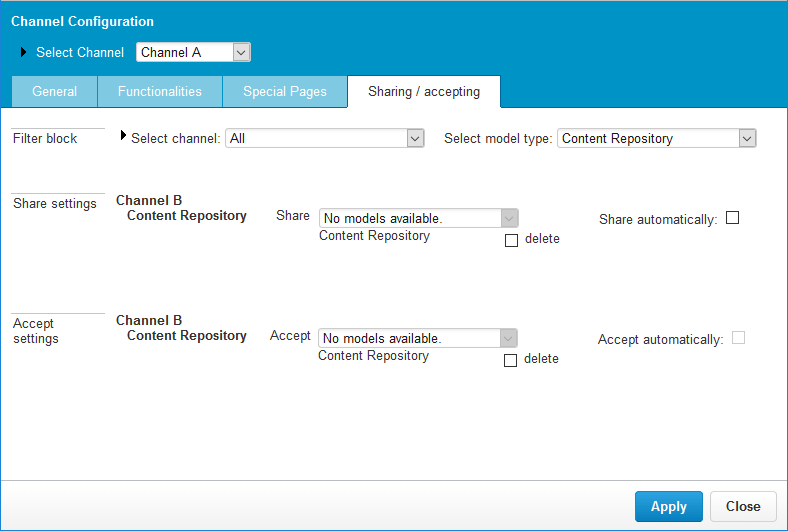
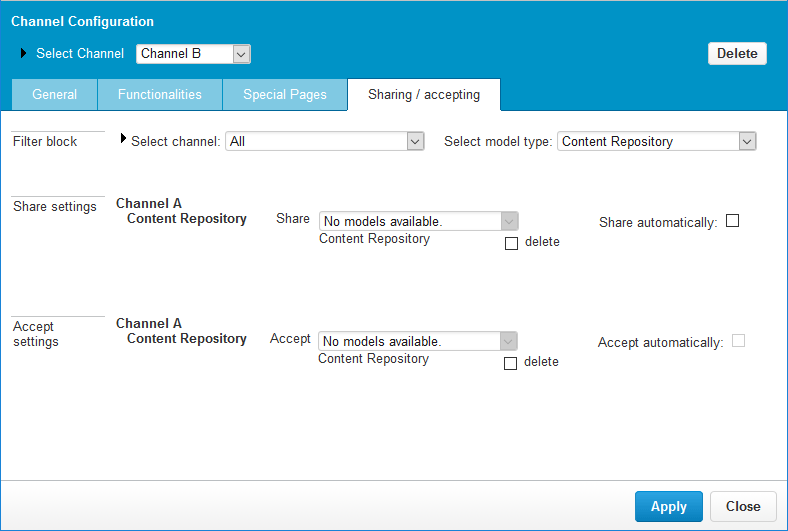
In order to share the Content Repository in this example:
- Channel A has to share the Content Repository with Channel B
- Channel A has to accept the Content Repository from Channel B
- Channel B has to share the Content Repository with Channel A
- Channel B has to accept the Content Repository from Channel A
When this is completed the configuration looks like this:
Channel A
Channel B
Model Types
Below is a list of all model types that can be shared. When there are no comments for a model type, the individual items of a model type can be shared. For example, with the queries you can choose on a query level which queries are shared or not.
Model Type | Comment |
Application integration: filter definitions | |
Applications | |
| Content Repository | The entire Content Repository is always shared and not individual content types. |
Form resources | Form resources and form steps |
Form models | |
Form rules (all handlers) | |
| Forms | |
Languages | |
Page section labels | |
Personalization | Both personalization expressions as well as personalization models |
Presentations | Only presentations and no presentation variants |
Queries | |
| User groups | |
Web users | All web users are always shared and not individual web users. |
Multiple Channels versus Language Switch
For organizations that publish content in multiple languages you can either use multiple channels or use the language switch functionality available in the Language Widget. The pros and cons of both approaches are described in the table below.
See Working with Language Versions in XperienCentral if you want to maintain multiple language versions of your channel(s).
Language Switch | Extra Channels |
The site structure for all language versions of the channel is the same. Not all pages have to be translated or published. | Each channel has its own site structure. |
Authorization per language is not possible. An editor can edit content in all the available languages. | Authorization is fully adjustable per channel. Each channel has its own edit environment. |
All languages use the same presentation. | There are many ways to separate the design or share parts of the design between several channels. |
No additional license is required to maintain multiple language versions of your channel(s), however it does require extra development work. | An additional license is required for each extra channel. |
For a straightforward one-to-one translation of a channel and when the content is translated by the same group of editors, the natural choice would be the language switch. In cases where extra functionality is required or authorization is required for each language, then you probably want to set up a separate channel and use sharing and accepting to share content.