...
| Panel | ||||
|---|---|---|---|---|
| ||||
Styling Options options were introduced in XperienCentral version R30. |
Styling options give editors more choices for formatting text in content items. A styling option has as its basis a font
...
, definition and any number of other CSS formatting options (margin, alignment, spacing etc.) which is then combined with the existing format definitions for h1, h2, paragraph, and so forth
...
.
...
De CSS classes staan gedefinieerd in het design van de website. In onze CE style edition heb ik een CSS class “monospace” toegevoegd in de CSS code. Deze “monospace” class kan dan beschikbaar worden gemaakt voor editors dmv het toevoegen van de stijloptie.
The CSS class(es) containing the style definition(s) are part of the channel design. It is useful to know that the defined class is added as a class attribute in the HTML generated in the channel. For example, if an editor adds the styling "Monospace" to an h2, then the HTML generated would be
<h2 class=”monospace"></h2>.
If the CSS code of the channel contains a rule such as h2.monospace Wat voor Services dus nuttig is om te weten is dat de class die daar wordt toegevoegd als class attribute gezet wordt in de HTML. Dus als een editor een Style met CSS class “funky” toevoegt aan een heading 2. Dan wordt de html: <h2 class=”funky”>Some heading text</h2>. Als de CSS code van de website dan een rule bevat “h2.funky { color: red;}” dan kan editor met die style de heading 2’s rood maken. Het bewerken van de CSS code kan niet via XC denk ik? then the editor can make the h2s red.
The definition of a style in your CSS will look similar to the following:
| Code Block | ||
|---|---|---|
| ||
.monospace { font-family: "Courier New", Courier, monospace |
...
;
   color: #ff0000;
   margin-bottom: 5px;
   text-align:center;
} |
In XperienCentral, the style is added as follows:
- Navigate to Configuration > Design Templates.
- Click the "Styling options" tab.
- Select "<new>" from the Select drop-down list.
- Enter the name of the style in the "Name" field. This is the name that will appear in the Styling drop-down list in the Editor.
- Enter the name of the CSS class in the "CSS class" field without the prefixed period (.). This is the name of the styling's CSS class. In the example above, the class is named
.monospacein the code, therefore the name in the style definition is "monospace". For example: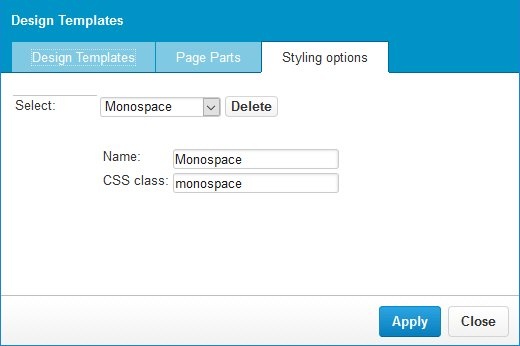
- Click [Apply] and then [Close]. If you add a new style while other users are logged in to XperienCentral, they need to refresh their browser session in order to pick up the new style definition.
All custom styling options are available from the "Default" drop-down in the Rich Text Editor. See Entering Rich Text for complete information on applying custom styles to content.