neralIn the Server Configuration panel you can configure settings related to URL redirects, caching, and static content. The settings/commands described in this topic that have an effect on the performance of your XperienCentral website(s) are just a small subset of the complete set available in XperienCentral. See the Setup Tool for all of the other settings that you can configure for your installation. To reach the Server Configuration panel, navigate to Configuration > Server Configuration in the XperienCentral Workspace.
In This Topic
Redirects
Alias redirects route URL requests for nonexistent URLs to a valid target URL. The target URL for an alias redirect can be a page in the current channel(s) as well as an external URL. Redirects allow you to make available simple, easy to remember URLs to direct visitors to pages on your website in cases where your tree structure is complicated or the target URL contains a difficult to remember path structure. URL aliases can only be a single identifier that contains no hierarchical structure. The address of the alias URL is relative to the root URL of your website. For the website www.gxsoftware.com,, for example, any alias URL you create can only be reached in a browser via a URL that adds the identifier to the root address, www.gxsoftware.com/<alias> for example, where <alias> is an identifier such as "Products", "Services", "Developer Support" and so forth.
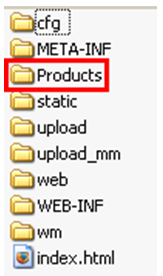
The validity of the string that forms the identifier is dependent on the operating system on which XperienCentral is running. When an alias redirect is created, a new directory is created on the file system of the server in this location: <xperiencentral-root>\webmanager-webapps\webmanager-static-webapp\target\webmanager-static-webapp-xx, where "xx" is the version of XperienCentral you are running. The name of the directory matches the name of the alias that you create. For example, if you create an alias URL named "Products", then you would see the following folder created in the path listed above:
The name of the alias URL you create must be a valid directory or folder name for the operating system in which XperienCentral is running.
To create an alias redirect, follow these steps:
- Navigate to Configuration > Server Configuration.
- Click [Redirects].
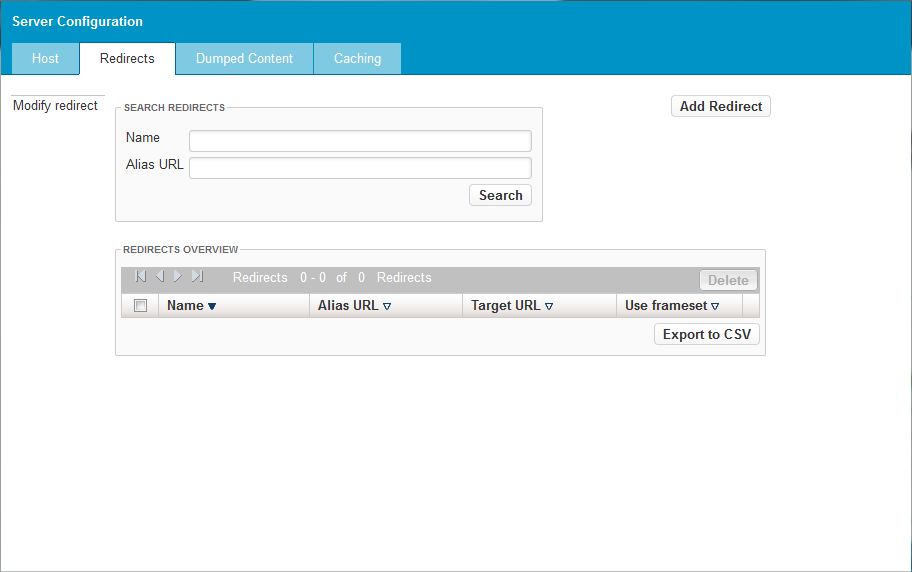
- Click [Add Redirect]. The "Add Redirect" section appears.

- In the "Name" field enter the internal name of the alias. This name is descriptive and only used to identify the alias URL in XperienCentral.
- In the "Alias URL" field, enter the string for the alias. The alias can include spaces but no special characters. The string can't include an extension such as .htm or .html and can be just the alias string or the string preceded by a forward slash (
/homefor example). - To select a page in the current channel, click [Choose URL]. The Advanced Search dialog box appears. For example:

- Select the page to assign as the target URL and then click [Select].
- To assign an external address as the target URL, enter the fully qualified address in the "Target URL" field.
- Set the frameset option. Selecting "Yes" means that the alias URL will appear in the browser's address bar. Selecting "No" means that the target URL will not appear in the browser's address bar. For example:

- Click [Apply]. The redirect is added.
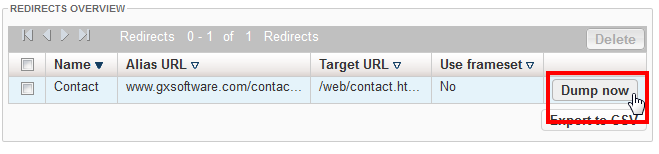
- Click [Dump now] to complete the operation. For example:
- Click [Apply]. The alias redirect is added to the list.
Deleting a Redirect
To delete a redirect, follow these steps:
- Select the checkbox to the left of the redirect that you want to delete.
- Click [Delete]:
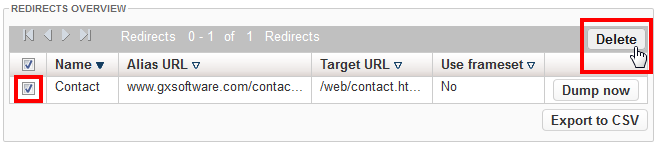
The redirect is deleted.
Dumped Content
In XperienCentral, you can save static versions of dynamic web pages to disk in a process known as "dumping". When you dump a page, a static HTML file containing the page's contents is created. There is a speed advantage for pages that have been dumped because XperienCentral does not have to generate the content for a page when it is requested. You can set how often a static variant of a page is saved to disk (for instance, once every two minutes). Often the home page of a website is dumped because it is the most visited page and therefore has the highest number of requests. Pages that have been dumped with the extension ".html" are processed by the Apache web server:
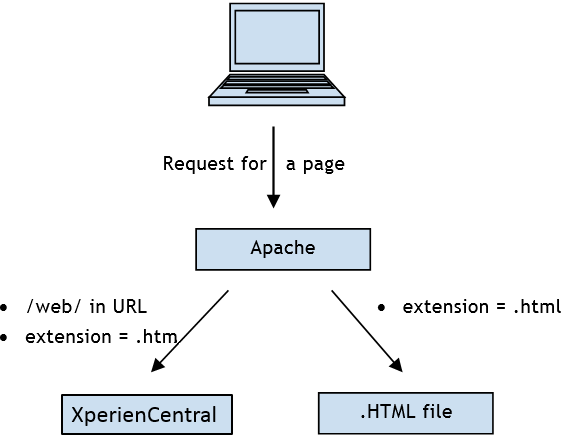
The extension given to the dumped HTML file should be different from the extension of the friendly URLs. Apache determines, based on a fixed pattern in the URL, where the page data should come from. By default, Apache transfers those URLs beginning with /web/ or ending with ".htm" directly to XperienCentral's Tomcat or JBoss server. All other URLs are processed by Apache.
For performance reasons, XperienCentral will always use the static variant of a page if one exists. For example, a page with the title "Economy" has the corresponding friendly "Economy.htm" URL and is also dumped to "Economy.html". When "Economy" is requested, XperienCentral will refer to "Economy.html" because it can be loaded faster. Requests to "Economy.htm" will also work but the response could be somewhat slower because the web server has to generate the page.
Dumping Pages to Static HTML Files
To dump a dynamic page in XperienCentral to a static HTML file, follow these steps:
- Navigate to Configuration > Server Configuration.
- Click the [Dumped Content] tab:

- In the "Description" field, enter a description for the page you want to dump.
- Click [Apply]. Fields for specifying the name of the page and how often it should be dumped appear.
In the "Relative URL" field, enter the friendly URL for the page, for example
/GX/Contact.htm.The relative URL that you specify must match the friendly URL listed under "URLs used by active versions" in the "SEO" tab of the Properties Widget.
- In the "Filename" field, specify the name of the HTML file.
- In the "Time" field, enter the number of minutes and seconds after which XperienCentral will create a new static version of the page.
- Select "Yes" for "Active" if you want the page to be dumped every x minutes and x seconds as specified in the time field. Select "No" if you want to dump the page only one time.
- Click [Dump now]. The page will be dumped immediately.
Thereafter, the page will be dumped every x minutes and y seconds that you specified if "Active" is set to "Yes". (every 2 minutes in the example below):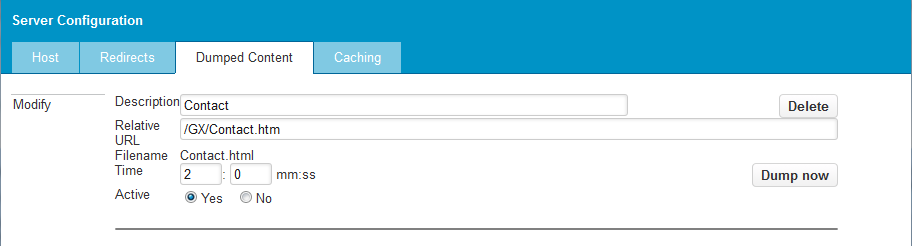
Caching
Caching is essential for high traffic websites. It will handle the load created by the many page requests by using an intelligent mechanism that returns pages without having to regenerate them completely. The XperienCentral caching module is also tailored to not interfere with interaction and personalization, therefore visitors to your site will not notice that they are looking at a largely static website.
This topic explains the options available in the Server Configuration. For a complete discussion of caching in XperienCentral, see Caching.
Cache Settings
Under normal conditions, XperienCentral manages the cache when content is changed, added or removed. When an editor adds an element to a page, the timestamp for the page will be set to the current date and time. The next time that the modified page is requested, the caching mechanism will regenerate the page.
There are more complex situations, for example when several page sections are involved or situations where a lot of caching timeouts are set for individual parts of a page or when the load on the server is very high and there's no time to regenerate pages. Content is normally regenerated automatically, however, in some situations, you do not want to wait until a visitor requests the content, but instead you want to manually force all the content to be regenerated.
Navigate to Configuration > Server Configuration > Caching. The Caching tab appears as follows:
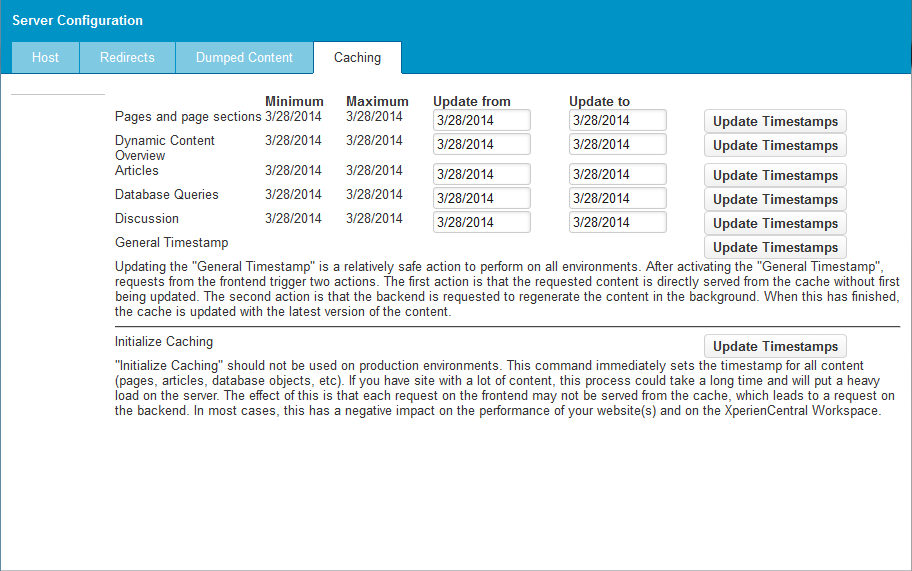
For each object type in XperienCentral, the following caching details are shown:
| Detail | Description |
|---|---|
| Minimum | The "Minimum" date entry shows the oldest timestamp in the database for an object of that type. For example, if the "Minimum" date for "Pages and page sections" is 2/28/2014, then the oldest timestamp for a page or page section is that date. This allows you to monitor the oldest date of a page or page section and gives you the option of manually updating it if you find it too old. |
| Maximum | The date shown as the "Maximum" reflects the newest timestamp in the database for an object or set of objects. |
| Update from | Specifies the beginning of the date period an object's timestamp must be to schedule it for an updated timestamp. |
| Update to | Specifies the end of the date period an object's timestamp must be to schedule it for an updated timestamp. |
Updating the Timestamps
To immediately update the timestamps to the current date and time, click the [Update Timestamps] next to the specific content type. When this action is performed, each content item will be regenerated and placed in the cache the next time it is requested. If your website contains a large number of the specific type that you update, use caution because this action could put a large load on the server.
Updating all Timestamps
To update the timestamps for all content types on your website, click [Update Timestamps] next to "General Timestamp". Updating the timestamps in this manner is a relatively safe action to perform on all environments. After activating the "General Timestamp", requests from the frontend trigger two actions. The first action is that the requested content is directly served from the cache without first being updated. The second action is that the backend is requested to regenerate the content in the background. When this has finished, the cache is updated with the latest version of the content.
Initializing the Cache
GX Software strongly recommends that you do not use this command on production environments. This command immediately sets the timestamp for all content (pages, articles, database objects, etc). If you have a site with a lot of content, this process could take a long time and will put a heavy load on the server. The effect of executing this command is that each request on the frontend may not be served from the cache, which leads to a request on the backend. In most cases, this has a negative impact on the performance of your website(s) and on the XperienCentral Workspace.