In XperienCentral, personalizations are used to target relevant content to individual website visitors depending on their behavior and/or the segment or segments that they belong to. Personalizations can also be used restrict access to certain content for a certain class of website visitors, for example those that are not logged in. You can assign a personalization to all content elements as well as selected rich text entered directly on a page in the Editor and to layouts. When a website visitor falls within the targeted group, they will see the content to which the personalization is assigned. Those visitors who do not fall within the segment will not see the personalized content.
The personalizations that are available for you to assign to content are typically created and maintained by an Application Manager and/or Main Editor. For complete information on creating personalizations, see Personalize. Content personalization works hand in hand with Personas in XperienCentral. Once you have personalized content, you can preview how content in XperienCentral appears to users who belong to a persona. For complete information on previewing personalized content, see Personas.
You can personalize rich text in the Editor as well as the content in layouts. Personalizations apply to content elements as a whole.
In XperienCentral versions 10.18 and higher, the way you personalize content has changed from previous versions. Expand the section below that corresponds with your version of XperienCentral.
In This Topic
Definining Personalization Variants
Personalizing content is achieved by adding personalization variants to content. A personalization variant determines the conditions for showing personalized content and what that content is. Personalization variants can be nested within each other in layouts and they can also be grouped or stacked, which allows you to define multiple variants that occupy the same position within a content item. See Grouping Personalization Variants and Nested Personalizations for complete information.
To personalize content, follow these steps:
- Double-click on the content item or hover over the title and select [Edit] to enter Edit mode.
- If you want to personalize a content element, click it to select it. To personalize rich text, highlight it.
- Click the Personalize icon in the Editor toolbar:

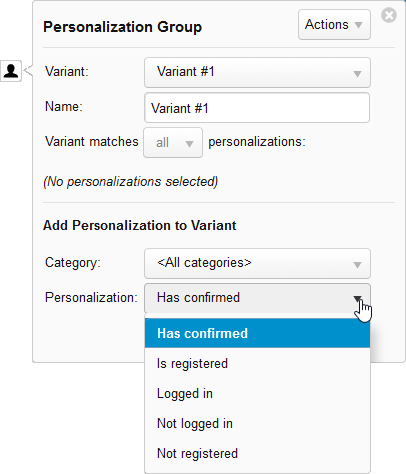
A dialog box appears from which you can define the personalization variant. - Select the category to which the personalization belongs to (if applicable) from the "Select a Category" drop-down list.
- Select the personalization from the "Select a Personalization" drop-down list. For example:
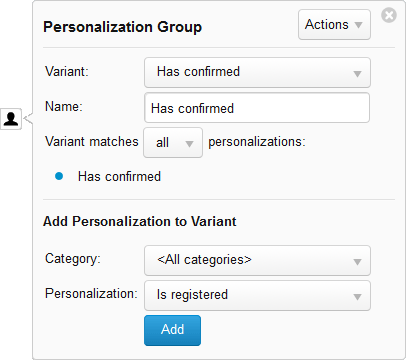
- Click [Add]. The personalization is assigned to the content. A small "personalization" icon appears next to the content that has been personalized. The name of the personalization appears in the "Selected Personalizations" dialog box and a blue circle appears next to the name of the personalization, For example:
When you are in Edit mode, the content that has been personalized is surrounded by a dashed outline. For example:
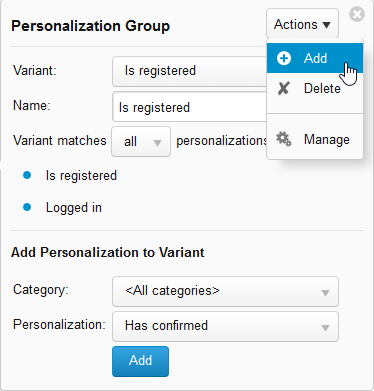
When a personalization group contains just one variant, the default name of the variant is the name of the personalization "Has confirmed" in this example.
Multiple Personalizations
You can assign more than one personalization to a variant. When you do so, you have the option of defining whether there is an "AND" or "OR" relationship between the personalizations. When "AND" (all) is defined, the content will only be displayed when all personalizations are matched. When "OR" (any) is defined, the visitor will see the content when they match any of the assigned personalizations.
To assign multiple personalizations to content, follow these steps:
- Double-click on the content item or hover over the title and select [Edit] to enter Edit mode.
- Select the content that you want to personalize.
- Click the Personalize button in the Toolbar.
- Select the personalization from the "Personalization" drop-down list.
- Click [Add].
- Repeat the previous two steps for each personalization you want to assign to the content.
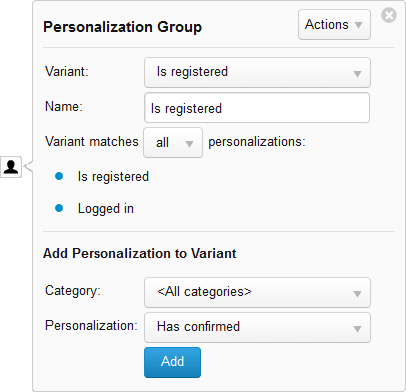
All personalizations assigned to the content appear in the list. For example:
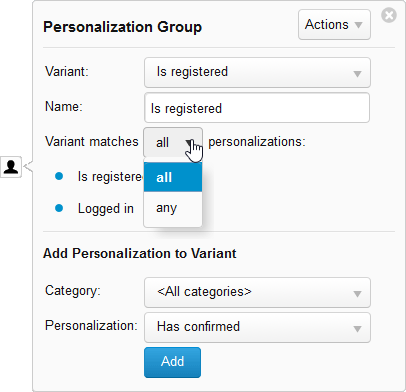
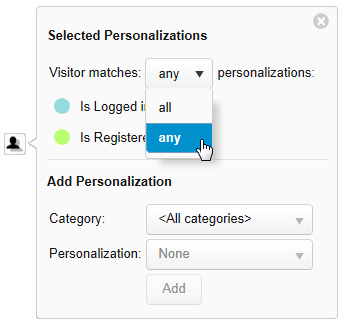
- Select whether the personalizations have an AND (all) or an OR (any) relationship with each other from the drop-down list. For example:
Grouping Personalization Variants
Grouped personalization variants are variants that are assigned to the same content and occupy the same position on a content item. When you group or stack personalization variants, only one can be triggered depending on the conditions. You determine the order in which personalization variants are evaluated and triggered. Grouped personalizations can be visualized as follows:
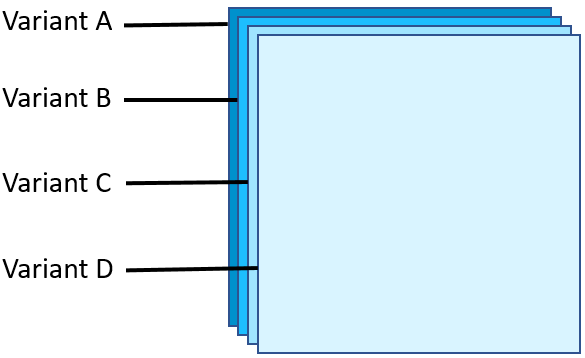
As you can see, the stacked personalization variants are all assigned to the same location on the content item. When a website visitor matches a personalization variant, the content assigned to that variant is shown. When variants are grouped, only one of them can be triggered.
To group personalization variants, follow these steps:
- Select the content that you want to personalize.
- Click [Personalize].
- Create a personalization variant.
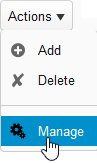
- Select Add from the Actions menu:
The new variant is added to the group. - Add one or more personalization to the new variant and define it further as described in Defining Personalization Variants.
After you add one or more variants, the personalize icon changes to reflect that there are multiple variants assigned to the location:
Defining the Order of Evaluation
When personalization variants are grouped, only one of them can be triggered. You define the order that the variants are evaluated. To do so, follow these steps:
- Open the personalization group.
- Select Manage from the Actions menu:
The variants are listed in the order they will be evaluated. For example:
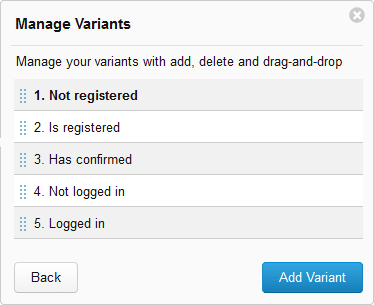
The personalization(s) assigned to the first variant that is matched will be shown to the website visitor. To change the order, click and drag a variant up or down in the list.
Editing Personalization Assignments
To modify the personalization(s) assigned to content, follow these steps:
- Double-click on the content item or hover over the title and select [Edit] to enter Edit mode.
- Click the personalization icon to the right of the content to open the Select Personalization dialog box.
- Modify the personalization assignments as desired.
- Close the Select Personalizations dialog box by clicking the Close icon in the upper right corner.
Removing a Personalization
To remove a personalization from content, follow these steps:
- Double-click on the content item or hover over the title and select [Edit] to enter Edit mode.
- Click the Personalization icon to the right of the content in the Editor. The Select Personalizations light box appears.
- In the list of personalizations in the "Selected Personalizations" dialog box, hover the mouse over the personalization you want to remove and click the "X" to the right of it. For example:
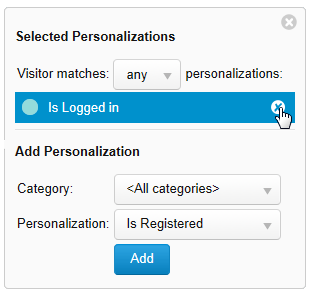
The personalization is removed from the content.
Nested Personalizations
Personalizations nested within each other can be visualized as follows:

When a personalization variant is nested within another, the content will not be shown unless the outer personalization variant is triggered. In the example above, personalization variant B cannot be triggered unless personalization variant A is triggered. Likewise, personalization variant C cannot be triggered unless both A and B are.
Personalizations allow you to target content at specific types of visitors. This is a powerful tool to reach a specific audience and to make their experience of your channel more relevant. You can personalize rich text in the Editor as well as content elements and layouts.
In This Topic
Adding Personalizations
To personalize content, follow these steps:
- Double-click on the content item or hover over the title and select [Edit] to enter Edit mode.
- If you want to personalize a content element, click it to select it. To personalize rich text, highlight it.
- Click the Personalization icon in the Editor toolbar:
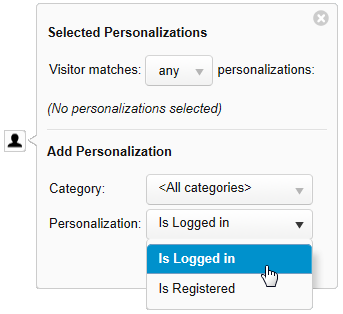
A dialog box appears from which you can select the personalization. - Select the category to which the personalization belongs to (if applicable) from the "Select a Category" drop-down list.
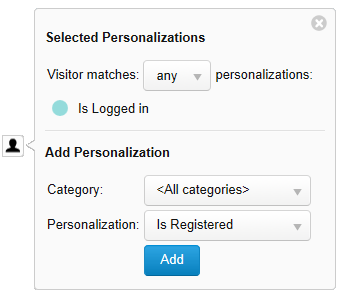
- Select the personalization from the "Select a Personalization" drop-down list. For example:
- Click [Add]. The personalization is assigned to the content. A small "personalization" icon appears next to the content that has been personalized. The name of the personalization appears in the "Selected Personalizations" dialog box and a colored circle appears showing the color assigned to the personalization, For example:
When you are in Edit mode, the content appears in the color assigned to the personalization.
Color Coding
XperienCentral uses color coding to indicate that content has one or more personalization assigned to it. Once a color has been assigned to a personalization, then that same color is used for that personalization everywhere it is used in the web initiative. For example, if you create a personalization named "Is Logged In" and XperienCentral assigns it to appear green, then from that point on, "Is Logged In" will always appear green wherever it is used and no other personalization can be assigned to green.
Personalizations are managed by your application manager. Contact him or her for complete information on which personalizations are available for use.
Back to top
Multiple Personalizations
You can assign more than one personalization to the same content. When you do so, you have the option of defining whether there is an "AND" or "OR" relationship between the personalizations. When "AND" (all) is defined, the content will only be displayed when all personalizations are matched. When "OR" (any) is defined, the visitor will see the content when they match any of the assigned personalizations.
To assign multiple personalizations to content, follow these steps:
- Double-click on the content item or hover over the title and select [Edit] to enter Edit mode.
- Select the content that you want to personalize.
- Click the Personalize button in the Toolbar.
- Select the personalization from the "Personalization" drop-down list.
- Click [Add].
- Repeat the previous two steps for each personalization you want to assign to the content.
All personalizations assigned to the content appear in the list. For example:
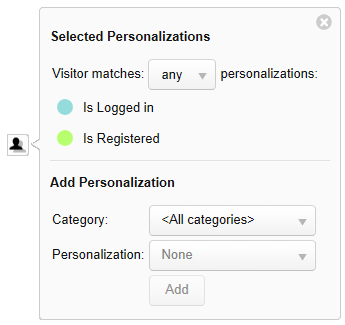
When multiple personalizations are assigned to content, the colors are blended into a striped configuration. - Select whether the personalizations have an AND (all) or an OR (any) relationship with each other from the drop-down list. For example:
Editing Personalization Assignments
To modify the personalization(s) assigned to content, follow these steps:
- Double-click on the content item or hover over the title and select [Edit] to enter Edit mode.
- Click the personalization icon to the right of the content to open the Select Personalization dialog box.
- Modify the personalization assignments as desired.
- Close the Select Personalizations dialog box by clicking the Close icon in the upper right corner.
Removing a Personalization
To remove a personalization from content, follow these steps:
- Double-click on the content item or hover over the title and select [Edit] to enter Edit mode.
- Click the Personalization icon to the right of the content in the Editor. The Select Personalizations light box appears.
- In the list of personalizations in the "Selected Personalizations" dialog box, hover the mouse over the personalization you want to remove and click the "X" to the right of it. For example:
The personalization is removed from the content.